The Basics of Magento 2 Theming
A theme in Magento 2 defines the look and feel of a storefront, which is what site customers see when they visit. It is the domain of the front-end developer and the starting point for almost every tutorial that describes front-end development in Magento 2. Luckily, the task of setting up a theme is very straightforward. This tutorial will cover the basic concepts of a theme and the changes that have come with the latest update (Magento 2.2).
Magento 2 comes with two built in themes: Blank and Luma. There is no requirement to use these themes, you can start your theme from scratch without any inherited templates, styles or layouts. But, the built in themes provide a baseline to build off of that covers the whole scope of an eCommerce site. Using either of these themes will give you a complete eCommerce experience for your customers without having to change a single line of code. By contrast, setting a theme up from scratch gives you the ability to define the full tech stack you desire to use, but lacks the complete scope of the site. This requires you to understand the breadth of the site you are building and verifying that all functionality is properly covered.
Each approach has its advantages. One of the frustrations with frond-end development in Magento 2 is the complexity of the theme framework built into the system. While having great features and well thought out designs, they are not intuitive. This can frustrate developers that have learned more traditional ways of developing web sites or those that have committed themselves to the cutting edge of web development (Javascript – I’m looking at you).
The technology stack for the built-in themes are not uncommon: Less, jQuery, Knockout JS, HTML templates, PHTML templates and XML layout files. The difficult part is the implementation of this stack. While this complexity can be challenging, when deciding to a theme from scratch or not the advantages of Magento 2’s themes far outweighs the disadvantages.
In this tutorial I will be covering the basic implementation of a theme in Magento 2, and in future tutorials we will continue to build on and cover some of the other techniques used to make great eCommerce sites within this complicated system.
Creating a Child Theme
We will be creating a child theme based on the built in Blank theme. Before we get started, I’m going to already assume you have a Magento 2.2 install running on a development environment (if not, see this page for some more info on that process) and that install is running in developer mode (see here for more information on that different modes). It is not necessary to have sample data installed, but I find it useful, learning more about that here.
One of the improvements of Magento 2 over Magento 1 is code organization. If you are coming from Magento 1, you know that theme files are spread out over two different directories (sometimes three if you are using the root JS directory). This created a bipolar system that made tracking down files convoluted even in the best of times. With Magento 2 all themes files are in one directory. That directory is in the app/design directory.

When you first install Magento 2.2, there will be nothing in this directory other then an empty Magento directory. To create a theme, we need to create a directory that will define our name space.
A name space in Magento 2 is a way to create files that will not conflict with each other. Because the Magento application will be scanning these files and making override decisions based on their location and naming, it is essential that no conflicts occur.

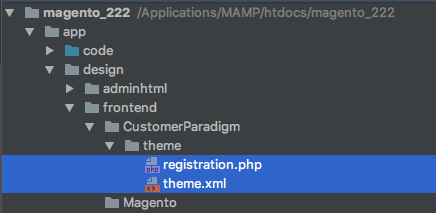
Your name space can be anything to want it to be, but try and use something distinct, for this project we will be using CustomerParadigm which will be placed in the frontend directory (there is also an adminhtml directory here, we will not be covering its use in this tutorial). After creating this directory, we need a theme directory. This can be named anything you like, for this tutorial we will be using theme.
Our next step will be registering our theme so that Magento knows it’s there. In our newly created theme directory, create a registration.php file and theme.xml with this code:
// file: app/design/frontend/CustomerParadigm/theme/registration.php

<?php
\Magento\Framework\Component\ComponentRegistrar::register(
    \Magento\Framework\Component\ComponentRegistrar::THEME,
    'frontend/CustomerParadigm/theme',
    __DIR__
);
The registration.php file sets the path and name space for our theme, literally ‘registering’ it with the application. This file will remain the same with only the name space and theme name changing between themes.
// file: app/design/frontend/CustomerParadigm/theme/theme.xml

<theme xmlns:xsi="http://www.w3.org/2001/XMLSchema-instance" xsi:noNamespaceSchemaLocation="urn:magento:framework:Config/etc/theme.xsd">
    <title>Customer Paradigm Theme</title>
    <parent>Magento/blank</parent>
</theme>
The theme.xml sets the name of the theme in the admin and defines the parent theme. If you were building this from scratch, you would omit the <parent> node. There is more theme related configuration that can be set in this file but for brevity, we will not be covering them in this tutorial. In this tutorial, we will be basing our theme on Magento’s Blank theme. If you wanted to inherit from the Luma theme you would set this value to <parent>Magento/luma</parent>.
There are a lot of differences between Luma and Blank, but for this tutorial, it won’t make too much of a difference for us. I’m using Blank here to help illustrate some other theme points in the rest of the tutorial. For me, I have noticed that the Luma theme brings with it a polish and better look to the site. But when you are trying to match a design or radically alter the way a Magento site looks, the polish of the Luma theme will get in the way. If the changes you are looking to make are less intrusive, the Luma theme can do a lot of heavy lifting for you.
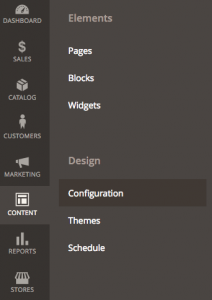
With these files in place, we can log into our admin and configure our site to use our theme. Navigate to Content -> Design -> Configuration.
You might be tempted to click on the Themes menu options. This section will provide you information about the installed themes on the site, but for setting and editing a theme, all that work is done in the Configuration section. Inside here you will see there are 3 scopes. If you have a new installation of Magento 2, you should see that there is no theme set under the theme name heading.
By default when you install Magento 2 with sample data, it will show us the default store view using the Luma theme. But no theme will be defined in the admin until we explicitly define a value. Each of the 3 sections here define a store scope. By clicking on the top section’s edit button, we can set our new theme for all store views.
You will notice the drop-down menu has all theme’s registered on the site. By changing that drop down to our theme and clicking save we will have set Magento to now use our theme. If you did not install the sample date, the process is exactly the same, but all the fields will be blank for you.

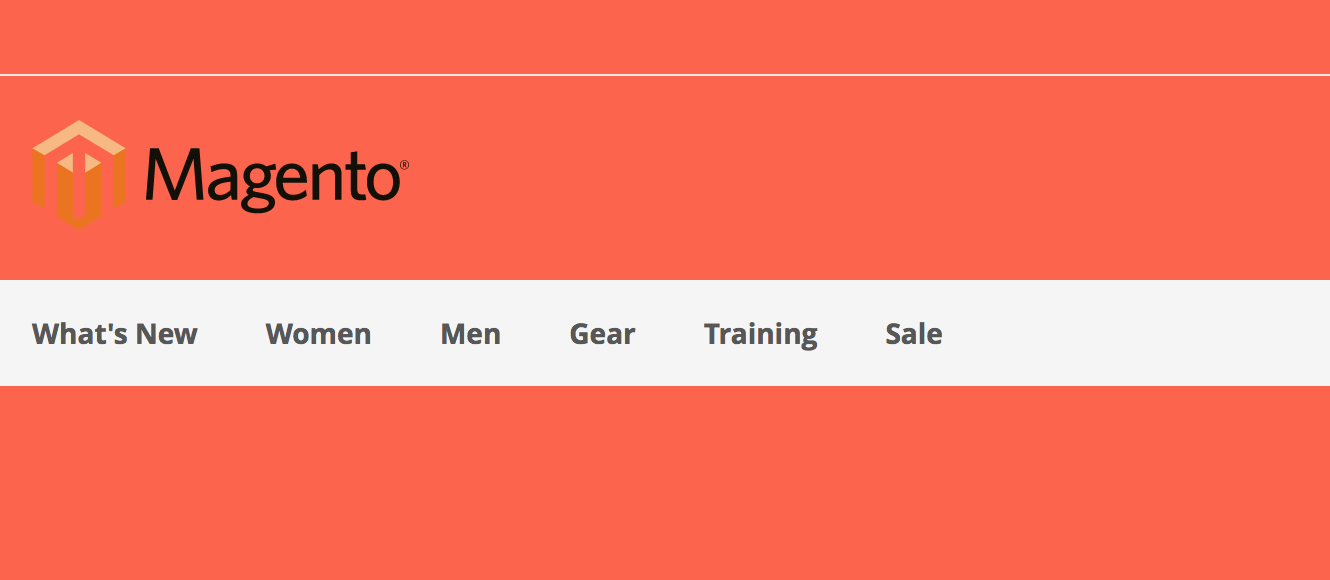
If you now visit the front end of your site and refresh the page you will now see that the new theme is applied. The logo will have changed, some of the colors will be different and most importantly, all of the Luma theme homepage content will be gone. Congratulations, you have now set up a custom child theme in Magento 2.2.
Homepage CMS Blocks
We have our theme set up and we can see that on the home page of the site, but where did the Luma content go? If you look into the way CMS blocks on the homepage are placed there, you will find they are set by the widget system (Content > Widgets). All widgets are scoped by theme and by changing the theme, we no longer have access to these blocks.

If we wanted to get these blocks back on our home page (or category pages for that matter) we would have to create new widgets that are scoped to our theme, but we are free to reuse the same blocks over and over. This gives us the freedom to reuse content but switch themes around and only have the content we decide to show up. This system is in place so that store owner can have multiple themes on one site that can be switch throughout the year without having to edit or change compiled files or code. CMS Block content only needs to be defined once and then for each theme you create new widgets that call the CMS Blocks and set the placement of them on the site.
The Curious Case of Cache
One thing we have not yet done after setting up our theme is to clear the cache. Caching can be tricky in Magento 2. By default when you install Magento 2, the built-in cache is turned on. This can wreak havoc on development if you don’t understand how cache is used by Magento 2 or when to disable or clear it.
With a default install, when you set a theme you do not have to clear the cache. Just refreshing the page does the trick. But there are many times that you will have to clear the cache and the coming changes we will do will require this. There are three ways to do this.
The first is in the admin under System -> Cache Management. By clicking the “flush Magento cache” button you will remove the cache. The second way to remove the cache is to use the built-in CLI by navigating to the root of your Magento 2 install in the command line and executing this command php bin/magento cache:clean. The third way is to remove the cache directory itself in the var directory. Each method will basically accomplish the same thing so it’s personal preference on how you accomplish it. I prefer to clear the cache from the built-in CLI, as I’m in the command line all day and it’s just one simple command with no waiting for a page to load or the possibility of deleting the wrong directory in the file system.

You might be wondering why we don’t disable the cache outright. I did this when I first started working with Magento 2, but after getting a better understanding of when and why to clear the cache, it’s a real time saver if you leave the cache on. Page load times without cache can be painfully slow. But, as a good sanity check, if you are making changes and they aren’t showing up as expected, disabling the cache can help to rule out a variable in the system.
I Have a Theme, What Can I Do With It?
Setting up a theme is just the start. Let’s take a quick look at a few things you can do with it.
First, We Style
The built-in styles system is a complex subject (see a pattern happening with all the complexity?) in this tutorial I will cover the very basics to get you up and running (we will be covering this system in full in a future article). The built-in themes use LESS as its CSS preprocessor. The LESS files that we will be writing will be compiled by Magento and served up to the browser from the pub/static/frontend directory.
To get started, let’s create the directory structure and file.
// file: app/design/frontend/CustomerParadigm/theme/web/css/source/_extend.less

body {
  background-color: tomato;
}
With this done we have created a file that will be “auto-magically” picked up by Magento and compiled into CSS with all the other CSS that our theme has and the theme we inherited from. The code is compiled into the pub/static/frontend/CustomerParadigm/theme/en_US/css/styles-m.css file. The reason the file _extend.less is picked up by the system is actually a little complex. There are certain files that Magento will scan a theme for, and if found, Magento will do things with them. In the case of _extend.less, it will take the code in this file and compile it down at the bottom of the collected CSS file that is rendered. Looking at the Less file that makes this call vendor/magento/theme-frontend-blank/web/css/styles-m.less you will see this code at the bottom for the file:
// file: vendor/magento/theme-frontend-blank/web/css/styles-m.less

//
//  Extend for minor customisation
//  ---------------------------------------------

//@magento_import 'source/_extend.less';
You will notice that @magento_import is not a Less directive, but a custom Magento declaration that will look to the theme that is inheriting from Blank and will generate a standard Less @import with the correct path. This lets Magento stay flexible with theme directory names and find the needed LESS files without having to know in advance what any theme name might be. There are other things happing in this file, but in a future article, we will cover it’s uses more comprehensively.
Getting back to the action we have created a LESS file and saved it, but if you were to clear your cache and refresh the page, you would be sorely disappointed with a lack of bright red on your site. Magento 2 on page load will check against what it expects to see in the pub directory and if a file is not there, Magento 2 will create it again based on all of its source files. Seeing that the styles-m.css file is there, it will do nothing. We have to remove it. There is no quick command for this in the CLI so we can delete it out of the file system with this command in the root of our Magento 2 install:
rm -rf pub/static/frontend/CustomerParadigm/theme/en_US/css/styles-m.css
But hold on, we can’t reload the page just yet. You might have noticed that I said “source” files. That does mean our theme files, but there are cached versions of our front-end files in the var directory in the view_preprocessed directory.
When Magento sees that there is no styles-m.css in the pub directory, first it will look to the var/view_preprocessed directory to see if there is a cached version of our styles. If it finds one, it will use those files to compile and not the one in our theme. So we have to remove that directory too with:
rm -rf var/view_preprocessed/
For good measure, we should also remove the cache. Now refresh the page and you will see the glory of tomato. This file now can host any styles you wish to place here to customize the site.
Second, We Extend
XML lives in the hearts of everyone on the Magento Core Team. If I had to guess, I think they all dream in XML it is widely used throughout Magento 2. For us, the XML system is a useful tool to construct the page we are building. Much of the Magento 2 page is built up of smaller files that are placed on the page using XML directives. If we understand this system we can move, remove, override and edit almost any element on the page with just XML. Let me show you an example.
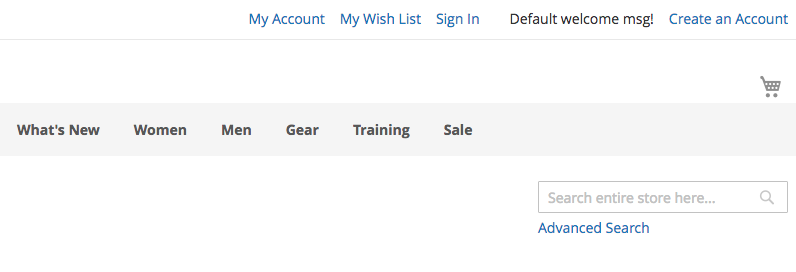
Let’s say you get a design for a site build and the client would like the search bar out of the header and moved into the main body of the site. There are a lot of ways to do this, but the most straightforward would be to use the XML system to “move” it. Create an XML file in the Magento_Theme directory.
// file: app/design/frontend/CustomerParadigm/theme/Magento_Theme/layout/default.xml

?xml version="1.0"?>
<page layout="1column" xmlns:xsi="http://www.w3.org/2001/XMLSchema-instance" xsi:noNamespaceSchemaLocation="urn:magento:framework:View/Layout/etc/page_configuration.xsd">
    <body>
        <move element="top.search" destination="content" before="-" />
    </body>
</page>
With this code in place, clear the cache and refresh the page. You will notice that the search bar is now in the body of the page (we are on the homepage of our Magento site for this example but the concept will work on any page). While this might seems a little underwhelming, note that with just one line of code we have moved an entire feature of our site to a new location without having to change anything else about the site. This kind of simplified customization makes constructing a custom design much more simple than in past versions of Magento, and other eCommerce solutions. Let’s take another example. In this same file add in this updated code:
// file: app/design/frontend/CustomerParadigm/theme/Magento_Theme/layout/default.xml

<?xml version="1.0"?>
<page layout="1column" xmlns:xsi="http://www.w3.org/2001/XMLSchema-instance" xsi:noNamespaceSchemaLocation="urn:magento:framework:View/Layout/etc/page_configuration.xsd">
    <body>
        <move element="top.search" destination="content" before="-" />
        <referenceBlock name="logo" remove="true"/>
    </body>
</page>
Here we have referenced a “block” and removed it from the page. Clearing the cache and refreshing it will show that the logo is now gone. Again, not necessarily practical, but you can see how effective this is to remove elements from the page without using any other system but the built in XML.
The next question you might ask is how to find the name of the element you are looking to edit. With this system, names are everything and unfortunately, there isn’t one good solution to finding an element’s name. Elements are defined and edited in different files all through the Magento system.
There are a few tools that can help. Commerce Bug is a tool that will break down the page of any Magento site into its elements. It’s not free, but it’s well worth the cost of you are developing on this platform.
Another solution is Mage Specialist’s debug toolbar. It integrated with the chrome dev tools and is set up using composer. Both will help track down the names of all the blocks on a page, as well as a host of other great info about a site.
Overriding Templates
After arranging the page with XML, we can take a look at the next layer deeper in the template system in Magento 2. These are the files are PHTML that contain a mix of PHP and HTML that get rendered on the page for site users to see. In Magento 1, these files could become sprawling files filled with hundreds of lines of code. Because so much of the page in Magento 2 is constructed modularly with XML, the core team also worked to simplify their templates to just the content. The best way to track down which template is using the built-in template hints. In the admin, navigate to Stores -> Configurations -> Advanced -> Developer -> Debug
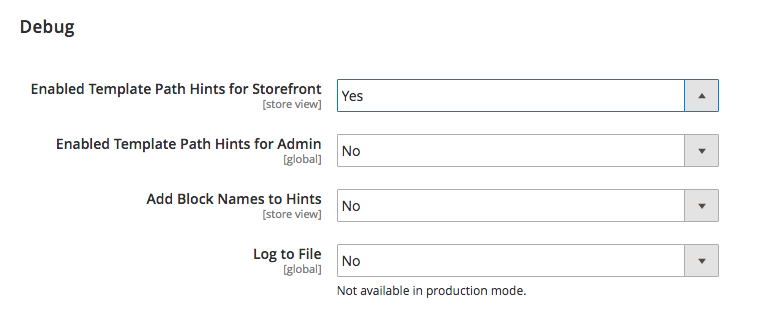
From here, set the “Enabled Template Path Hints for Storefront” to yes. Refreshing the page on the front end of the site will show you every template that is loaded on the page in bright red with the path and name for the template file. Looking over the page you will notice there are all kinds of elements being called in from all over the framework.

Looking at the file that is generating the welcome message (vendor/magento/module-theme/view/frontend/templates/html/header.phtml) you will notice there is very little code in this file.
// file: vendor/magento/module-theme/view/frontend/templates/html/header.phtml

<?php
/**
 * Copyright © Magento, Inc. All rights reserved.
 * See COPYING.txt for license details.
 */

// @codingStandardsIgnoreFile

/**
 * @var \Magento\Theme\Block\Html\Header $block
 */
$welcomeMessage = $block->getWelcome();
?>
<?php switch ($block->getShowPart()):
    case 'welcome': ?>
        <li class="greet welcome" data-bind="scope: 'customer'">
            <!-- ko if: customer().fullname  -->
            <span data-bind="text: new String('<?= $block->escapeHtml(__('Welcome, %1!', '%1')) ?>').replace('%1', customer().firstname)">
            </span>
            <!-- /ko -->
            <!-- ko ifnot: customer().fullname  -->
            <span data-bind='html:"<?= $block->escapeHtmlAttr($welcomeMessage) ?>"'></span>
            <?= $block->getBlockHtml('header.additional') ?>
            <!-- /ko -->
        </li>
        <script type="text/x-magento-init">
        {
            "*": {
                "Magento_Ui/js/core/app": {
                    "components": {
                        "customer": {
                            "component": "Magento_Customer/js/view/customer"
                        }
                    }
                }
            }
        }
        </script>
    <?php break; ?>

    <?php case 'other': ?>
        <?= $block->getChildHtml() ?>
    <?php break; ?>

<?php endswitch; ?>
It’s not possible to cover everything that is happening in the file in this tutorial. In it we have a mix of PHP, HTML, Knockout JS and a custom Magento JS system just to round it out. But what I would like you to take away from this is how streamlined this file is versus what existed in Magento 1. In Magento 1 the header.php file was over a hundred lines of dense code. Lots of functionality was tied up in this file, some that could easily conflict with each other if careless edits were made. The modular design of the templating system in Magento 2 is the other side of the coin to the XML system that we already looked at. By having smaller, more precise templates, moving those elements around the page becomes a possibility that doesn’t create conflicts or redundant code.
But sometimes just moving a element is not enough. We often need to change the content of a template, and that is a breeze in Magento 2. If you wanted to override this file, to place customizations in it, it’s as simple as copying it to our theme at this location:
app/design/frontend/CustomerParadigm/theme/Magento_Theme/templates/html/header.phtml
You now can edit this file to your heart’s content. One thing to note about this, however, is the way the Magento override system works means that there is a winner takes all approach to everything you do. If you have an extension on your site that is trying to customize an existing template, it is going to “lose out” to the theme. The theme has the highest priority in the system. So this means that if there is an update to Magento or an extension that changes a template file, this change will not show and might break some kind of functionality. Magento 2.2 is mostly stable at this point, and we can expect that little will change as the framework is updated. But understand that having a deft hand when making customization will pay for itself.
Closing Thoughts
We have covered a lot of ground here, but in truth, we have only scratched the surface of what you can do with theme development in Magento 2. In the coming weeks, I will cover more topics to give you a deeper understanding of all the technologies that are in the Magento 2 framework. Till then, play around with the system and see what different edits achieve the design you are looking for.

About Mike Stacey
Mike is a Lead Developer at Customer Paradigm.