![]() Easily synchronize inventory with your Magento 2.0 site, using CSV, XML or other flat files.
Easily synchronize inventory with your Magento 2.0 site, using CSV, XML or other flat files.
Designed for extremely fast performance, the system can process 10,000 records in under 10 seconds.
Tested to perform with more than one million records, the system was built by Customer Paradigm’s team of Magento Certified Developers.
Why did we build it? Customer Paradigm is a Magento solutions partner, and we’ve completed more than 10,53 projects since 2002. One of the most requested features we’ve had for eCommerce sites is a robust, reliable way to synchronize inventory with a Magento site. Most of the systems we’ve worked with in the past couldn’t handle large amounts of records. We built this system to handle 10,000, 100,000 or even 1,000,000 records, using a direct SQL connection profile.
Features for the Magento 2.0 Inventory Synchronization Module include:
- Set up unlimited synchronization profiles. Want to update inventory from multiple vendors? Set up a different profile for each, including different FTP credentials, data mapping and more.
- Synchronize with multiple inventory files, either placed on the local server, via remote http, remote FTP or remote SFTP.
- For each synchronization profile, you can set the system to run on a scheduled basis. For example, you can have the system synchronize each hour, three times a day, specific days of the week, or other times. The cron system allows the admin user to be able to schedule when each inventory synchronization will take place, using a menu-driven system.
- Customer Paradigm’s Magento 2.0 Inventory Synchronization script can add / update inventory levels, or simply replace them with the values in the file.
 The Magento 2.0 extension can work with CSV, Tab-delimited, text file with custom delimiters (i.e. pipe), or an XML file.
- The Inventory Synchronization module can read local files (i.e. on the same server as the Magento installation), reach out via FTP or sFTP, or via http post.
- The extension also supports multiple files. For example, an inventory csv file might be split into 10 different files due to file space; the extension supports wildcards in the file name. It can also be set to process all files, or just the most recent file on the server.
- Header Mapping: the system allows an admin user to be able to map the file headers to the SKU #, product ID, quantity and in stock flag. We’ve made it extremely easy!
- Test Mode: the system has a test mode where the admin user can test a sample file without actually updating inventory, to make sure it will work.
- Extensive Logging: the system will log each inventory synchronization, so that if there is an error in the file, you’re able to drill down and view the issue in the file.
- Email notifications for Cron. You can have the system email you when an inventory synchronization takes place (including if there were errors). You can set this up on a per data profile basis.
- Additional data in file? No problem. The system will ignore rows that contain SKUs that are not found in your Magento 2.0 catalog.
-
Pricing: Magento 2.0 – Inventory Synchronization Module:
Price: $195
Includes: License for production, staging + two development servers. Free updates.
Plus: we’ll throw in a 30 minute training session at no extra charge.
Magento Versions Supported:
- Magento Community Edition (CE): 2.0, 2.0.1, 2.0.2, 2.0.3, 2.0.4, 2.0.5, 2.0.6, 2.07, 2.1 Beta
- Magento Enterprise Edition (EE): 2.0, 2.01, 2.0.2, 2.0.3, 2.0.4, 2.0.5, 2.0.6, 2.07, 2.1 Beta
Installation / Setup / Training/ Configuration Available. If you would like us to help you install and configure the extension, we are happy to do this on an hourly basis for you. Please contact us >>
Customization Available. If you have special requirements for your Magento 2.0 Inventory Synchronization needs, please let us know. We can modify the extension to meet your business needs. For example, perhaps you want the system to automatically archive or delete files after processing them. Or, you may wish to have us synchronize prices at the same time. We can do this, but for user experience reasons, these features were not included in this extension. Please contact us >>
Video Demonstration of the Inventory Synchronization Module:
Watch a screen capture of the Magento 2.0 Inventory Synchronization Module, narrated by Jeff Finkelstein, founder of Customer Paradigm:
Inventory Synchronization in Magento 2.0: Benchmark Performance Testing:
Performance is key. We hate when extension dies after handling only 500 records. Customer Paradigm’s clients often need to synchronize inventory for 100,000 products, and wish to do this every hour. Our system can handle a request like this in just 10 seconds.
The Magento 2.0 Inventory Synchronization module has two modes:
- Mode 1: Magento Model Mode. This mode uses the Magento Model structure to interact with each product. While this is the most reliable method, it doesn’t perform well at scale. In some cases, this mode could take 30 seconds to synchronize inventory with 500 records.
- Mode 2: Direct SQL Mode. This mode interacts directly with the mySQL tables that handle inventory levels. This offers 20x speed improvement. We’ve built similar systems in the past that handle this, and while we normally would not offer a system that interacts directly with a database, we’ve examined how Magento handles inventory, and have tested this method extensively to make sure it’s extremely reliable and robust.
With Mode 2 (Direct SQL Mode), we’ve benchmarked a standard Magento 2.0 system, using the sample data.
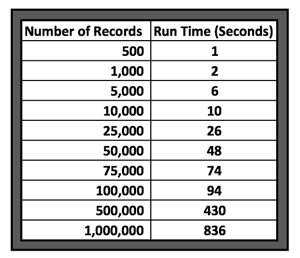
We ran this on a normal server, and found that 500 records in a CSV file (fetched via FTP) run in about one second. 10,000 records in a CSV run in about 10 seconds. This includes logging all of the results into a database, so if there is a problem, it will work. We also tested the file on 100,000 records (just over 1.5 minutes), as well as 500,000 records (430 seconds) and 1,000,000 records (836 seconds or 13.93 minutes):
We do recommend that if you are using larger data sets for inventory synchronization for your Magento 2.0 store, you’ll want to limit the extra columns in your file to just SKU, Inventory Level and Is_In_Stock columns. (This will reduce the size of the file, which will allow your server to have to spend less time parsing it and/or reduce memory requirements.)
In the high-performance direct SQL method, the system is designed to process records in groups of 8,000 at a time (rather than all). We came up with this 8,000 record at-a-time-limit based on the fact that most Magento 2.0 sites are set with a default setting of 16MB for packet sizes in MySQL. 8,000 records should only use approximately 1 MB of packet size for mySQL; we’ve tried to make sure that even smaller packet sizes will still allow large data sets to be process – especially if there are dozens and dozens of extra columns of data that the system needs to process.
Based on these settings, the speed for processing 100,000, 500,000 or even 1,000,000 records for inventory synchronization in Magento 2.0 proceeds along a linear progression:
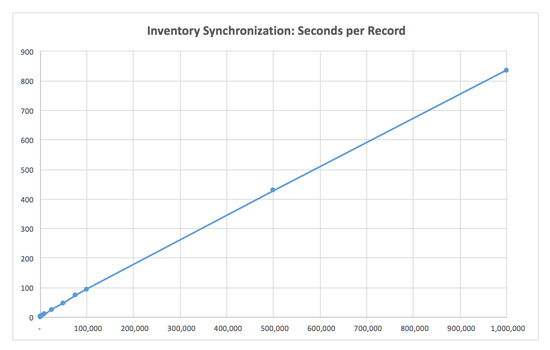
Other systems might be extremely fast with small data sets, but as the size of the data set grows, speed can sometimes slow down considerably. We work at high volumes, and slowing down with large data sets was not an option.
Inventory Synchronization Extension Overview:
The Magento 2.0 Inventory Synchronization Module by Customer Paradigm is a dynamic tool for merchants in need of a solution to update inventory levels and/or stock status from external sources (outside of Magento).
Managing inventory levels has never been easier.
The extension offers the ability to update your store’s inventory stock levels and stock status.
Multiple profiles can be configured to accept updates from any number of sources.
Each individual profile can be configured to accept an import file from one of four connection types to include: Local Server (your Magento 2.0 web server), HTTP (a direct URL), FTP, or SFTP. This provides the flexibility to reach out to remote locations and automatically update your inventory levels.
Each individual profile can also be configured to accept the most common file formats. These formats include: CSV, Tab Delimited, Text, and XML.
The profile creation process will allow you to properly map file headers to the appropriate data – allowing for different file headers from different sources.
Once a profile has been created, you can run the profile in test mode (to test import results before running live), live mode (manually executed by user), and CRON (run at regular scheduled intervals).
The CRON feature allows your storefront to automatically update your inventory without any further user interaction and can be setup to accommodate a wide range of import schedules.
A full record of all imports is maintained to provide tracking and transparency to changes being made.
This includes an individual product id or SKU lookup to see changes being made by all profiles on a single product.
These are just a few of the features contained within this extension.
How the Inventory Synchronization Extension for Magento 2.0 Works:
Step 1: Set up a New Inventory Sync Profile:
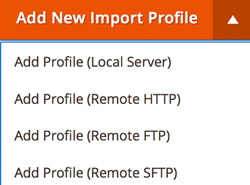
To add a new import profile, you first, choose where your data file is located:
- Local Server: Your data file might reside on your local server (i.e. in the /var/import/ directory of your Magento site).
- Remote HTTP: Or, you might access the data file that you wish to use for synchronization via a remote HTTP request. (Your server will likely need to be whitelisted for access control via it’s IP address.)
- Remote FTP or sFTP: Or, you may wish for the Magento 2.0 Inventory Synchronization Module to reach out via FTP or secure FTP (sFTP) to retrieve the file.
Based on the location of your data file that will be used for inventory synchronization, different options will be displayed on the next screens:
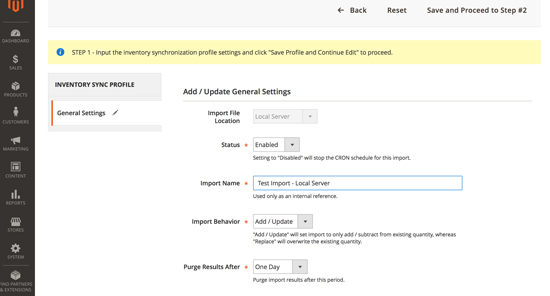
Screenshot of Step 1 – Add / Update General Settings – Click to View Larger Screenshot >>
As you’ve already selected the file location, you’ll next need to set the following fields:

If the status is “Disabled” you will not be able to run a live import manually, and the cron will not fire for this data profile. It’s a quick way to turn off an inventory data synchronization.
Next, add in a name for the import (this is used only for display purposes):

Select “Add/Update” or “Replace” for this inventory synchronization profile:

This is important in that it dramatically changes the behavior of the inventory synchronization behavior.These options are:
- Add/Update option will add/subtract whatever quantity is discovered in the import file(s) to your existing quantity.
- If the same SKU is discovered more than once in the import file(s), each occurrence will be processed starting at the top down within your import file.
- The Replace option will replace whatever quantity is discovered in the import file. If the same SKU is discovered more than once in the import file(s), the last occurrence will be the final values processed.
Note: “Add / Update” will use the file and will add additional inventory (or remove inventory) to your Magento 2.0 store’s existing inventory base.
Example: Suppose you have a SKU such as XYZ-123 that has 50 units in Magento’s inventory.
- If your data file contains a row with SKU = XYZ-123 and a Quantity = 100, then the Add / Update method will add 100 to the overall inventory (150 total)
- If your data file contains a row with SKU = XYZ-123 and a Quantity = -25, then the Add / Update method will remove 25 units from the overall inventory of the system. (25 total)
- If your data file contained both of these rows using the same SKU, the system will process them in order. In this case, Inventory would be 50 + 100 – 25 = 125.
Note: “Replace” will overwrite the existing quantity of inventory in your Magento 2.0 system.
Example: Suppose you have a SKU such as ABC-456 that has 50 units in Magento’s inventory.
- If your data file contains a row with SKU = ABC-456 and a Quantity = 100, then the Replace method will set inventory for this SKU to 100 units.
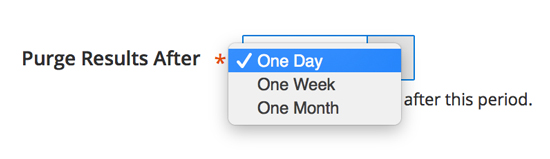
Purge Logging:
All inventory synchronization is logged into the Magento 2.0 database. If you are synchronizing 100,000 records five times a day, this could add quite a bit of size to your mySQL database.
Therefore, we allow you to choose when the logging should be purged (Day, Week or Month). This is set on a per-profile basis:
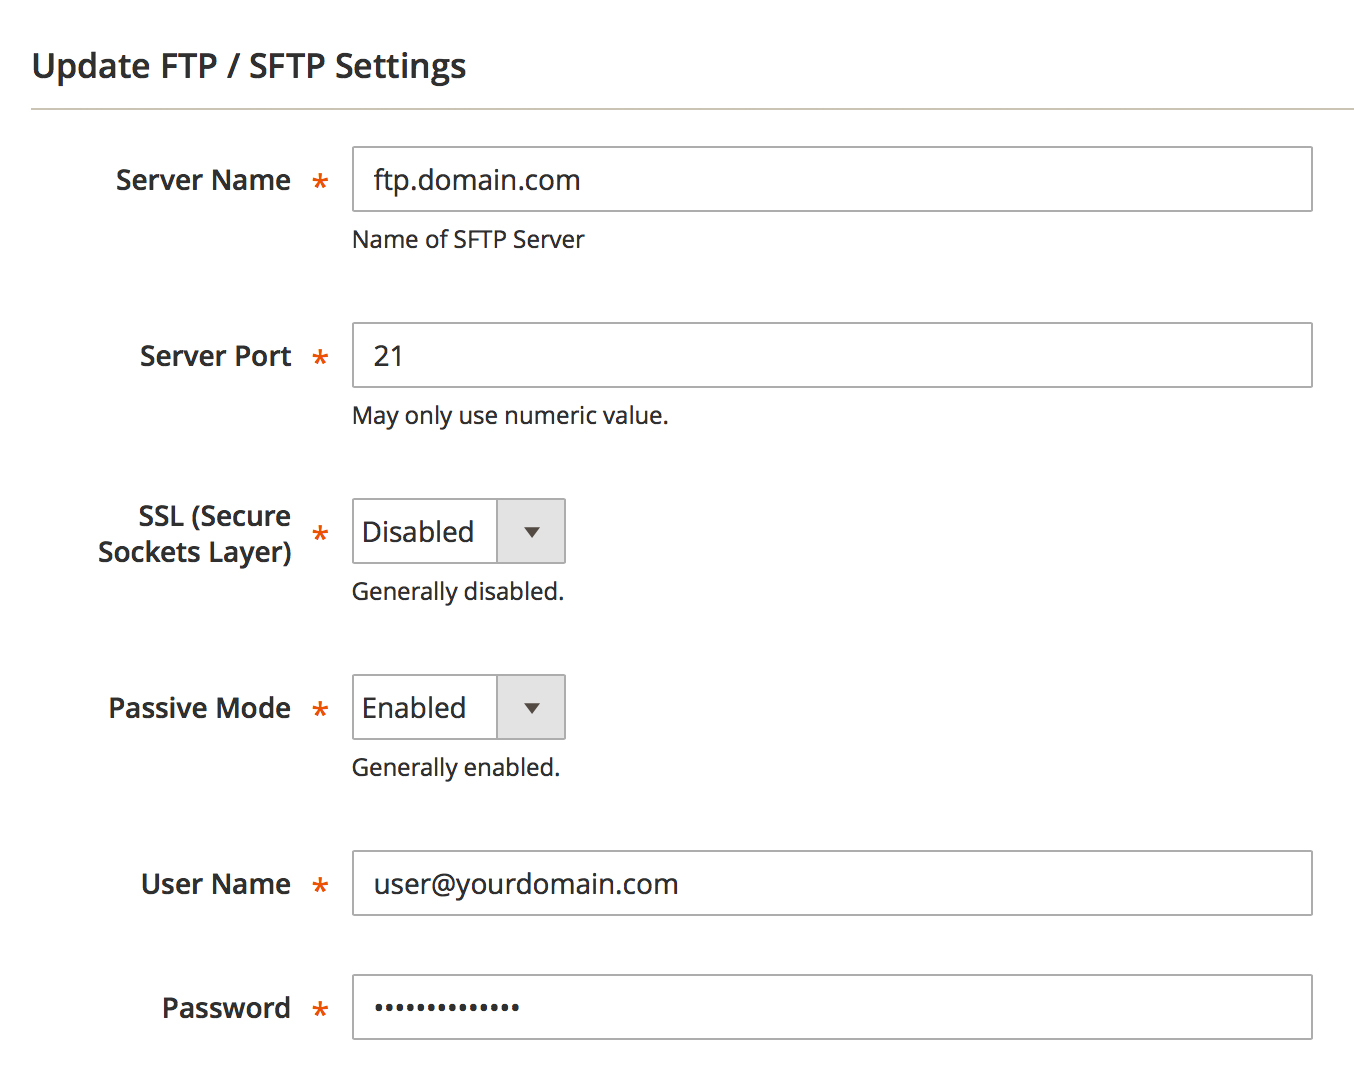
Step 2: Add / Update FTP or SFTP Settings:
If you’re using the FTP or SFTP method of retrieving your data file for inventory synchronization, the next step is to add in your FTP or sFTP settings:
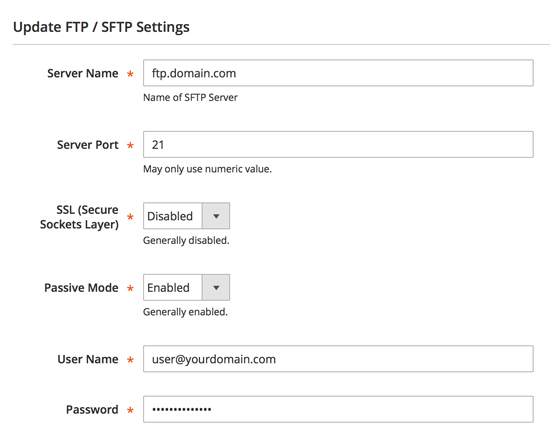
Screenshot – Update FTP / sFTP Settings – Click Here for Larger Screenshot >>
You’ll need to add in your server name, port number, if it’s a secure connection (SSL), mode, as well as your username and password.
Note – you will have the option to revise this information at any point after the initial setup.
- Server Name: This may be the IP address (xxx.xxx.xx.xxx) or the actual host name. Do not include any folder path in this area as you will be set that up in a later step.
- Server Port: This automatically defaults to port 21 for FTP and 22 for SFTP. These are standard default ports. Only change this if you are certain the connection requires a different port.
- SSL (Secure Sockets Layer): This option only appears for FTP connection types. Generally, this is disabled. Only enable if you are certain your FTP connection requires SSL.
- Passive Mode: This option only appears for FTP connection types. Generally, this is enabled. Only disable if you are certain your FTP connection does not require passive mode.
- User Name: This is the actual user name of your FTP / SFTP credentials.
- Password: This is the actual password of your FTP / SFTP credentials.
Once all required fields have been completed, please click the Save and Proceed to Step #2 button in the top right corner:

If you’re using the local server method, you’ll skip this step.
Step 3: Update File Path:
If you’re using the FTP or SFTP method of retrieving your data file(s) for inventory synchronization, we’ve made the process easy.
The system will find the root folder, and then use the + buttons to expand the folders to get to the correct directory.
If you have a lot of folders, this process may take a few extra seconds.
You can refresh a particular folder by collapsing and expanding the folder.
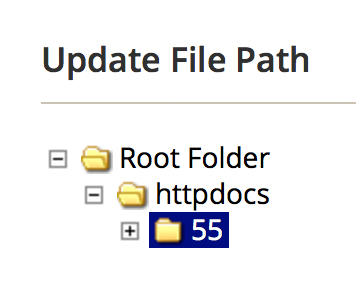
The root folder should be initially selected. For local server connections, this will represent the root Magento folder. For FTP and SFTP connections, this will represent the base folder when you initially login.
To expand the selection, you simply click the + button. The menu will refresh with all additional subfolders.
You can continue to expand various subfolders until you reach the final folder where your import file(s) reside. Once this folder is shown, you simply click on the folder name to select (it will be highlighted in blue). An example of this is shown above.
Import note – only one folder may be selected per profile. To process import files in more than one folder, please setup an individual profile for each folder.
HTTP Post Method:
If you’re using the HTTP post method, you’ll instead enter in the file path URL:
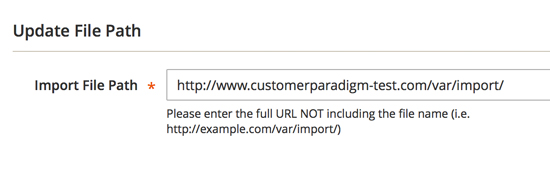
When using HTTP as your connection, there are limited abilities to scan the destination folder for available files. This connection type does not present a drop down file structure. You must enter the full URL to where the import file is located (without the actual file name as this will be entered on in a later step).
Important Note: When using HTTP connections, the remote file will need to have appropriate read/write privileges to access the file.
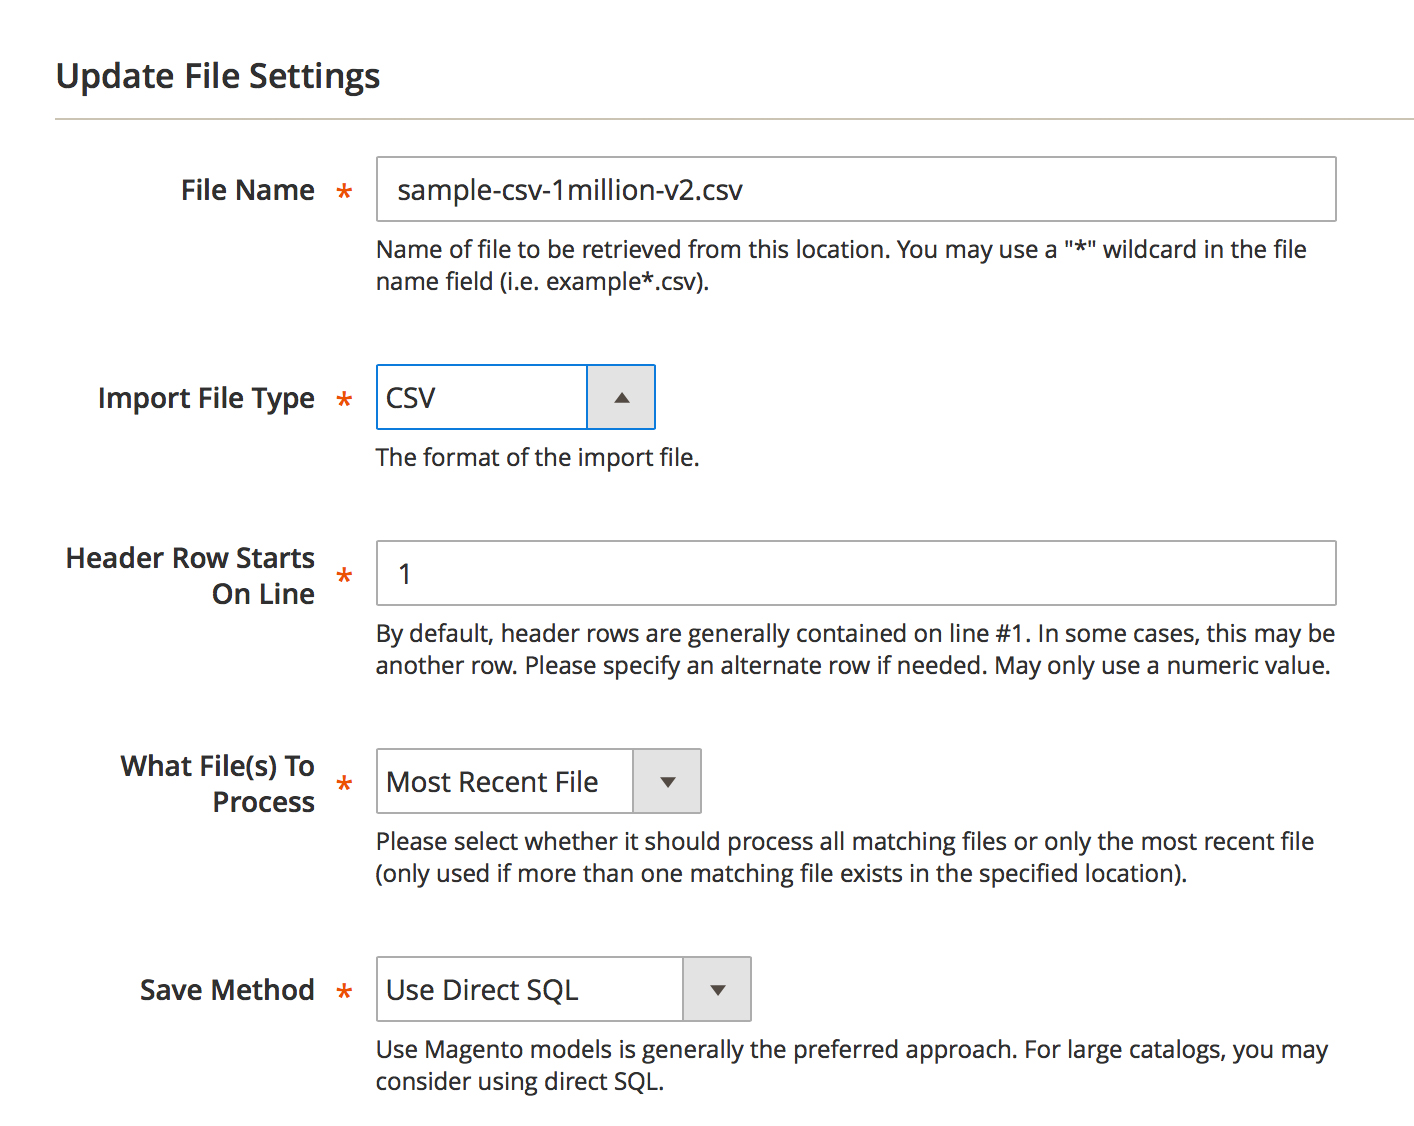
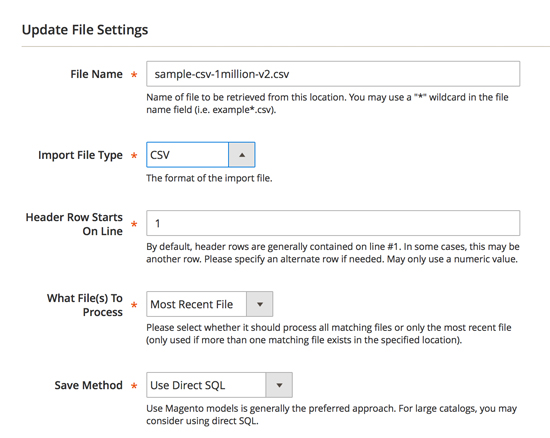
Step 4: File Settings:
In step 4, we get to the file settings:
Screenshot – Update File Settings – Click Here for Screenshot >>
In more detail, here’s more detail about each section:

File name: enter in the name of the file that you would like the system to process.
Process Single File:
If you enter in a name, such as sample-csv-1million-v2.csv as the file name, then the system will process just this file. It will save the date stamp for when the file was created, and will not re-import this file unless the date stamp for the file is changed. This allows a system to write a new file with the same name each day, and then have the system using cron (see below) re-process it.Process Multiple Files Using Wildcard:
Let’s say that you want to have your Magento 2.0 inventory synchronized with multiple files. Perhaps the file has the date in it. You can use a * symbol in the file name as a wildcard, so that any file that matches example*.csv will be processed. For example, example-02-02-02.csv will be processed if a wildcard like this is in place.You can use a wildcard for these import types: Local Server, FTP, and SFTP. Wildcards are not supported for the HTTP import method
Again, you can use wild cards in the file name such as example*.csv. It will process all matching files.
Important note – if there is more than one matching import file, the files will be processed based on their respective “Last Updated” timestamp from oldest to newest. This means the newest file will contain final precedence.
File Type:
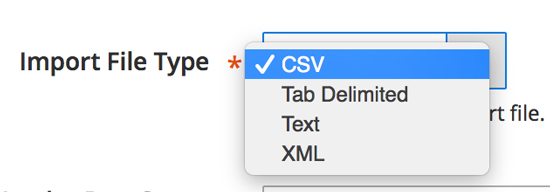
This is where you are able to select the file type you want to use to synchronize inventory with your Magento 2.0 system.
The supported file types are:
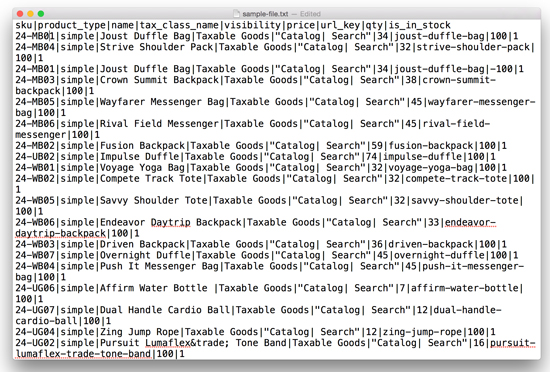
- CSV (Comma Separated Value). Columns are separated by a comma “,” symbol. You are able to use double quotes ” as a text qualifier around some or all of the fields.
- One issue with CSV files is that if you have a name, such as Bob Frank, Jr., columns can shift if you aren’t using double quotes as a text qualifier.
- If you frequently have commas in your data set, our recommendation is to perhaps use a different type of delimiter.
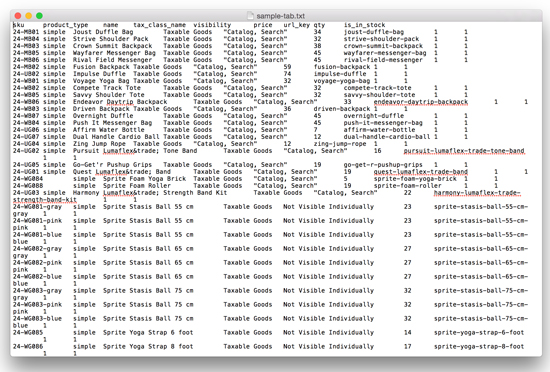
- Sample CSV file – Download Sample File >> (Note: this sample file uses the Magento 2.0 Sample Data as an example)

- Tab Delimited File.
- Columns are separated by a tab field.
- Sample Tab Delimited File – Download Sample File >> (Note: this sample file uses the Magento 2.0 Sample Data as an example)
- Text File. Columns are separated by a delimiter that you can define.
- Personally, I prefer to use the pipe symbol “|”, as that doesn’t occur commonly in most data sets.
- You could also use the semi-colon “;” or colon “:” as a delimiter.
- Important note – in the event of a text file, the delimiter is limited to a single character.
- Sample Text File – Pipe Delimited Values – Download Sample File >> (Note: this sample file uses the Magento 2.0 Sample Data as an example)
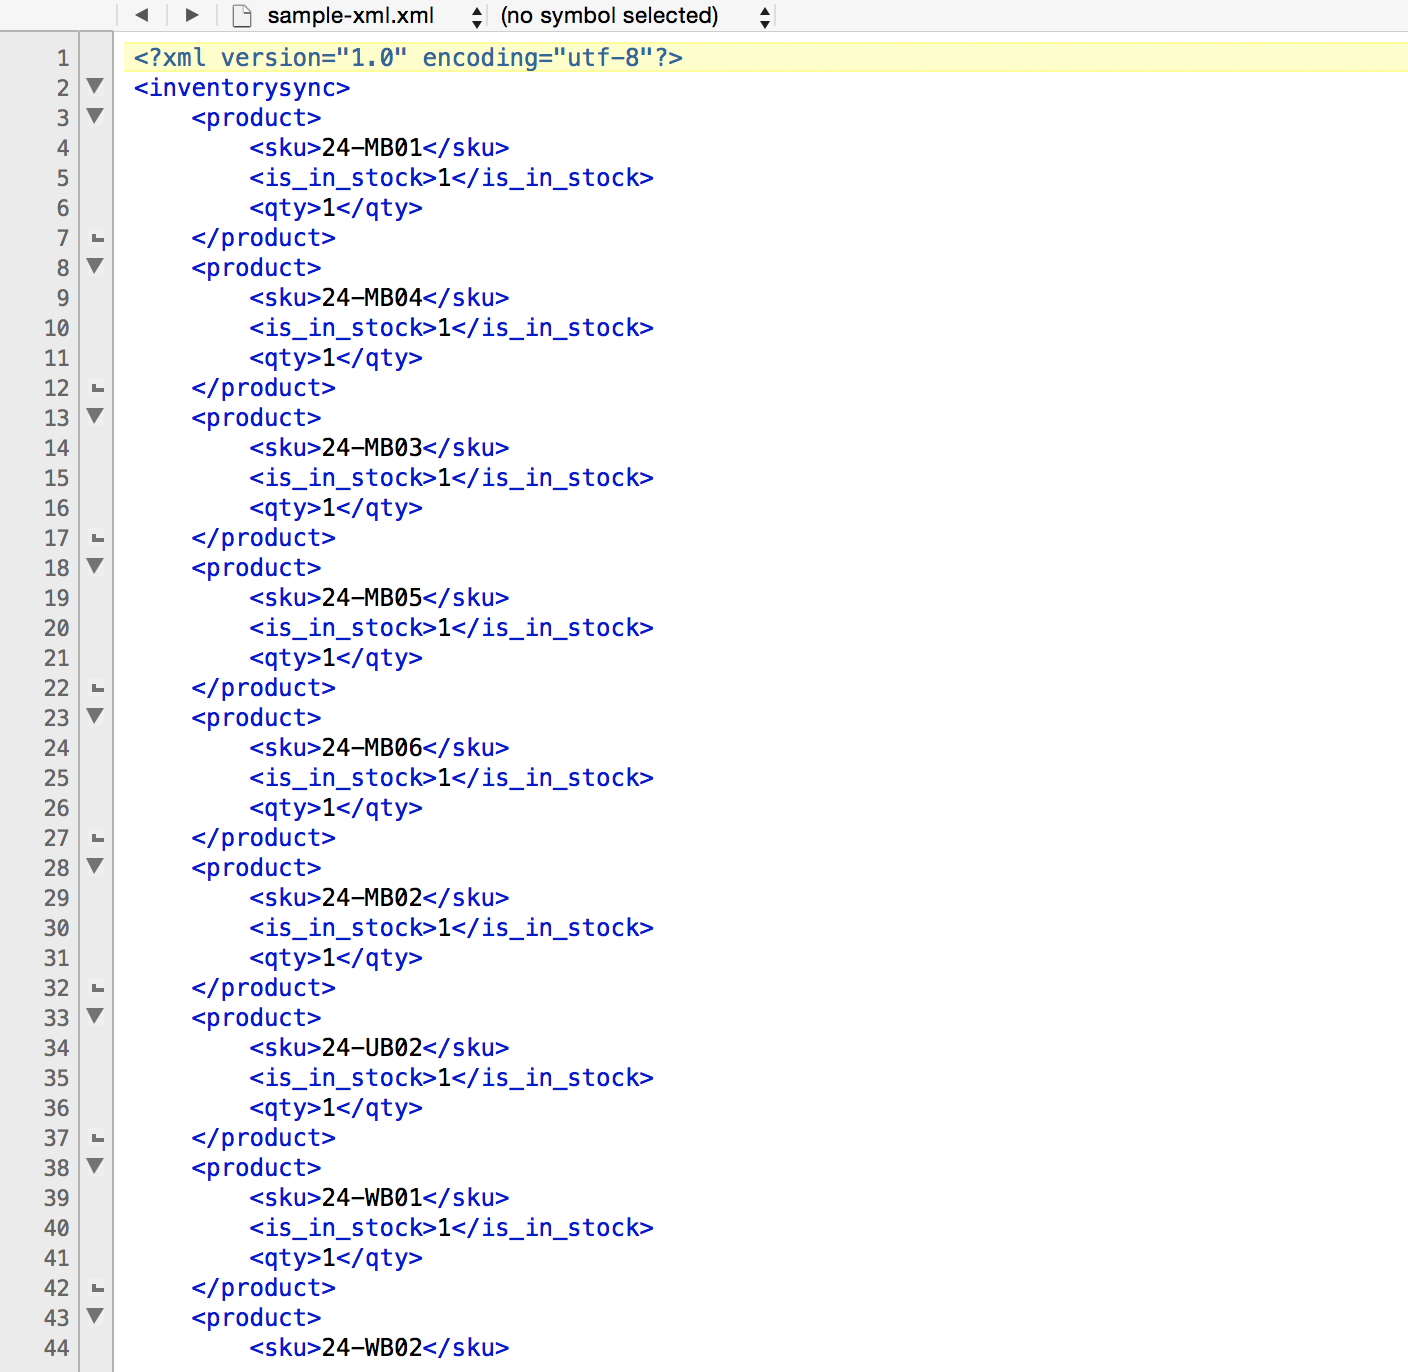
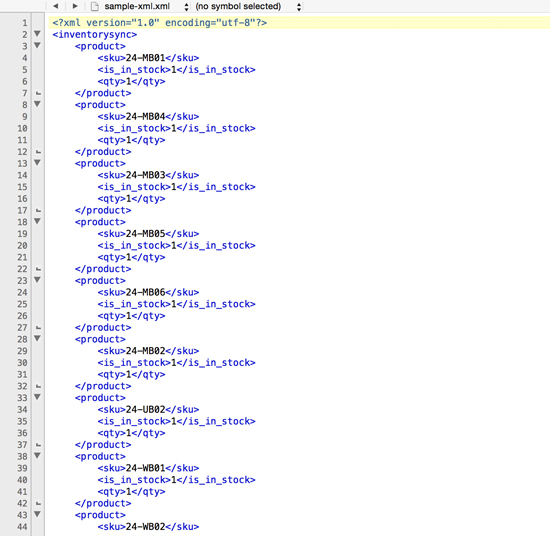
- XML File.
- Data is structured in a nested pattern, such as below.
- Sample XML file – Download Sample XML >>
Header Row:
Most data files will have a header row that starts on line 1 of the file.
However, some systems will put other information at the beginning of the file, such as a time stamp or other information.
Important notes:
- The first line of your import file is considered row 1, so this field must contain a positive value (one or greater).
- Only data contained in rows below the header row will be processed.
Set the header row with just an integer:

What File(s) to Process:

This is important when using a wild card in the file name and there is possibly more than one file that could match.In such a case, you have the option to select from the following:
- Most Recent File.
- This will only process the most recent matching file using the “last updated” timestamp from the file.
- All Matching File(s).
- This will process all matching file(s).
- In the event of multiple matching files, they will be processed in order using the “last updated” timestamp from the file starting at the oldest date to newest date.
Save Method:

Generally, it is recommended to use the built in Magento models for updating. Using this approach, it will trigger various “events” to notify the system of the changes (an example would be a site re-index).The downside is this process is relatively slow.
If your import file sizes are large, there is an option to Use Direct SQL.
This will write the updates directly to the database and will perform much quicker.
Important note: times will vary depending on your server configuration and other factors, but a rough estimate to help you guage the time of each method would be approximately 3 products per second using the Magento models approach vs. 100+ products per second using the Direct SQL approach.
Step 5: Retrieve Headers from File:
In this step, the Magento 2.0 Inventory Synchronization system reaches out via HTTP, FTP, SFTP or to the local file on the server, and finds the column headers.
This allows you to easily “map” the columns in the data file to the correct columns in your Magento 2.0 inventory system.
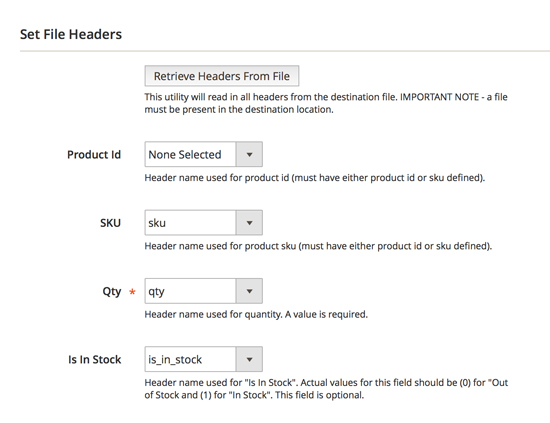
Set File Headers – Click Here for Screenshot >>
For example, for the SKU column, you can select “sku” from the list of headers:
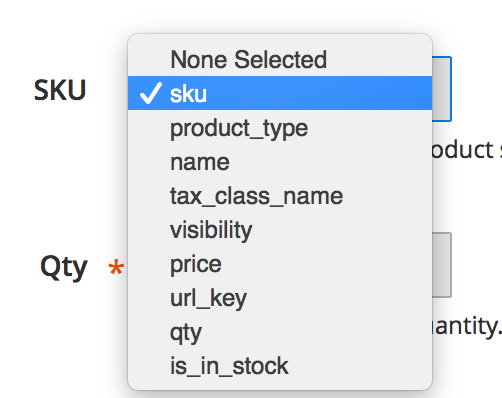
As mentioned previously, your import file must contain a row of headers to properly map to your catalog.The header names can be named in any fashion you would like as you map the header name from your import file to the appropriate field.
To start, please click the Retrieve Headers from File button as shown above.
This will reach out to the import file and read in the row you specified as your header row.
If you receive the error, “Unable to locate headers in file. Please check the file / connection settings and try again,” this indicates it could not (a) connect to the remote server or (b) could not find a matching file located in the folder.
Please verify a file matching the file name exists in the selected folder. In addition, please check the credentials (if FTP or SFTP connection) to ensure these are correct and try again.
Once you receive the message you have successfully retrieved headers, you are ready to map your file headers to the proper data field. Each of these fields are described below:
- Product Id (optional)
- Please select the header column that contains the product id in your product catalog.
- Leave the default “Not Selected” option if this column does not exist.
- SKU (optional):
- Please select the header column that contains the sku in your product catalog.
- Leave the default Not Selected option if this column does not exist.
- Important note – you must map at least one product id or sku column to proceed. This is required to identify the product in your catalog.
- Qty (required)
- This is a required field.
- Please select the header column that contains the qty to update.
- Is In Stock (optional)
- If you have a column in your header file that contains the stock status (in stock / out of stock) flag, please select that column here.
- If set, it will adjust the is in stock flag for the respective product.
- Important note – the data in this column must contain either a 0 (out of stock) or 1 (in stock) to be processed. Any other value will be ignored and not processed.
Important note – if a SKU is referenced more than once in an import file with the is in stock flag, the final row (from top to bottom) will hold final precedence.
Step 6: Run TEST Import for Inventory Synchronization:
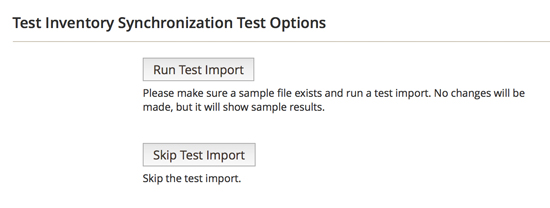
This step is designed to allow you to run a test import.
It will record the results and show what would have been adjusted had it been run in live mode.
This is highly recommended prior to running in live mode to ensure the expected results.
In this step, you must press the Run Test Import or Skip Test Import button as shown below. If you elect to skip the test import, it will automatically proceed to the next step.
Important note: while running in test mode, no updates will be made to your catalog. This is only intended to demonstrate what would have been edited to verify the results before running in live mode.
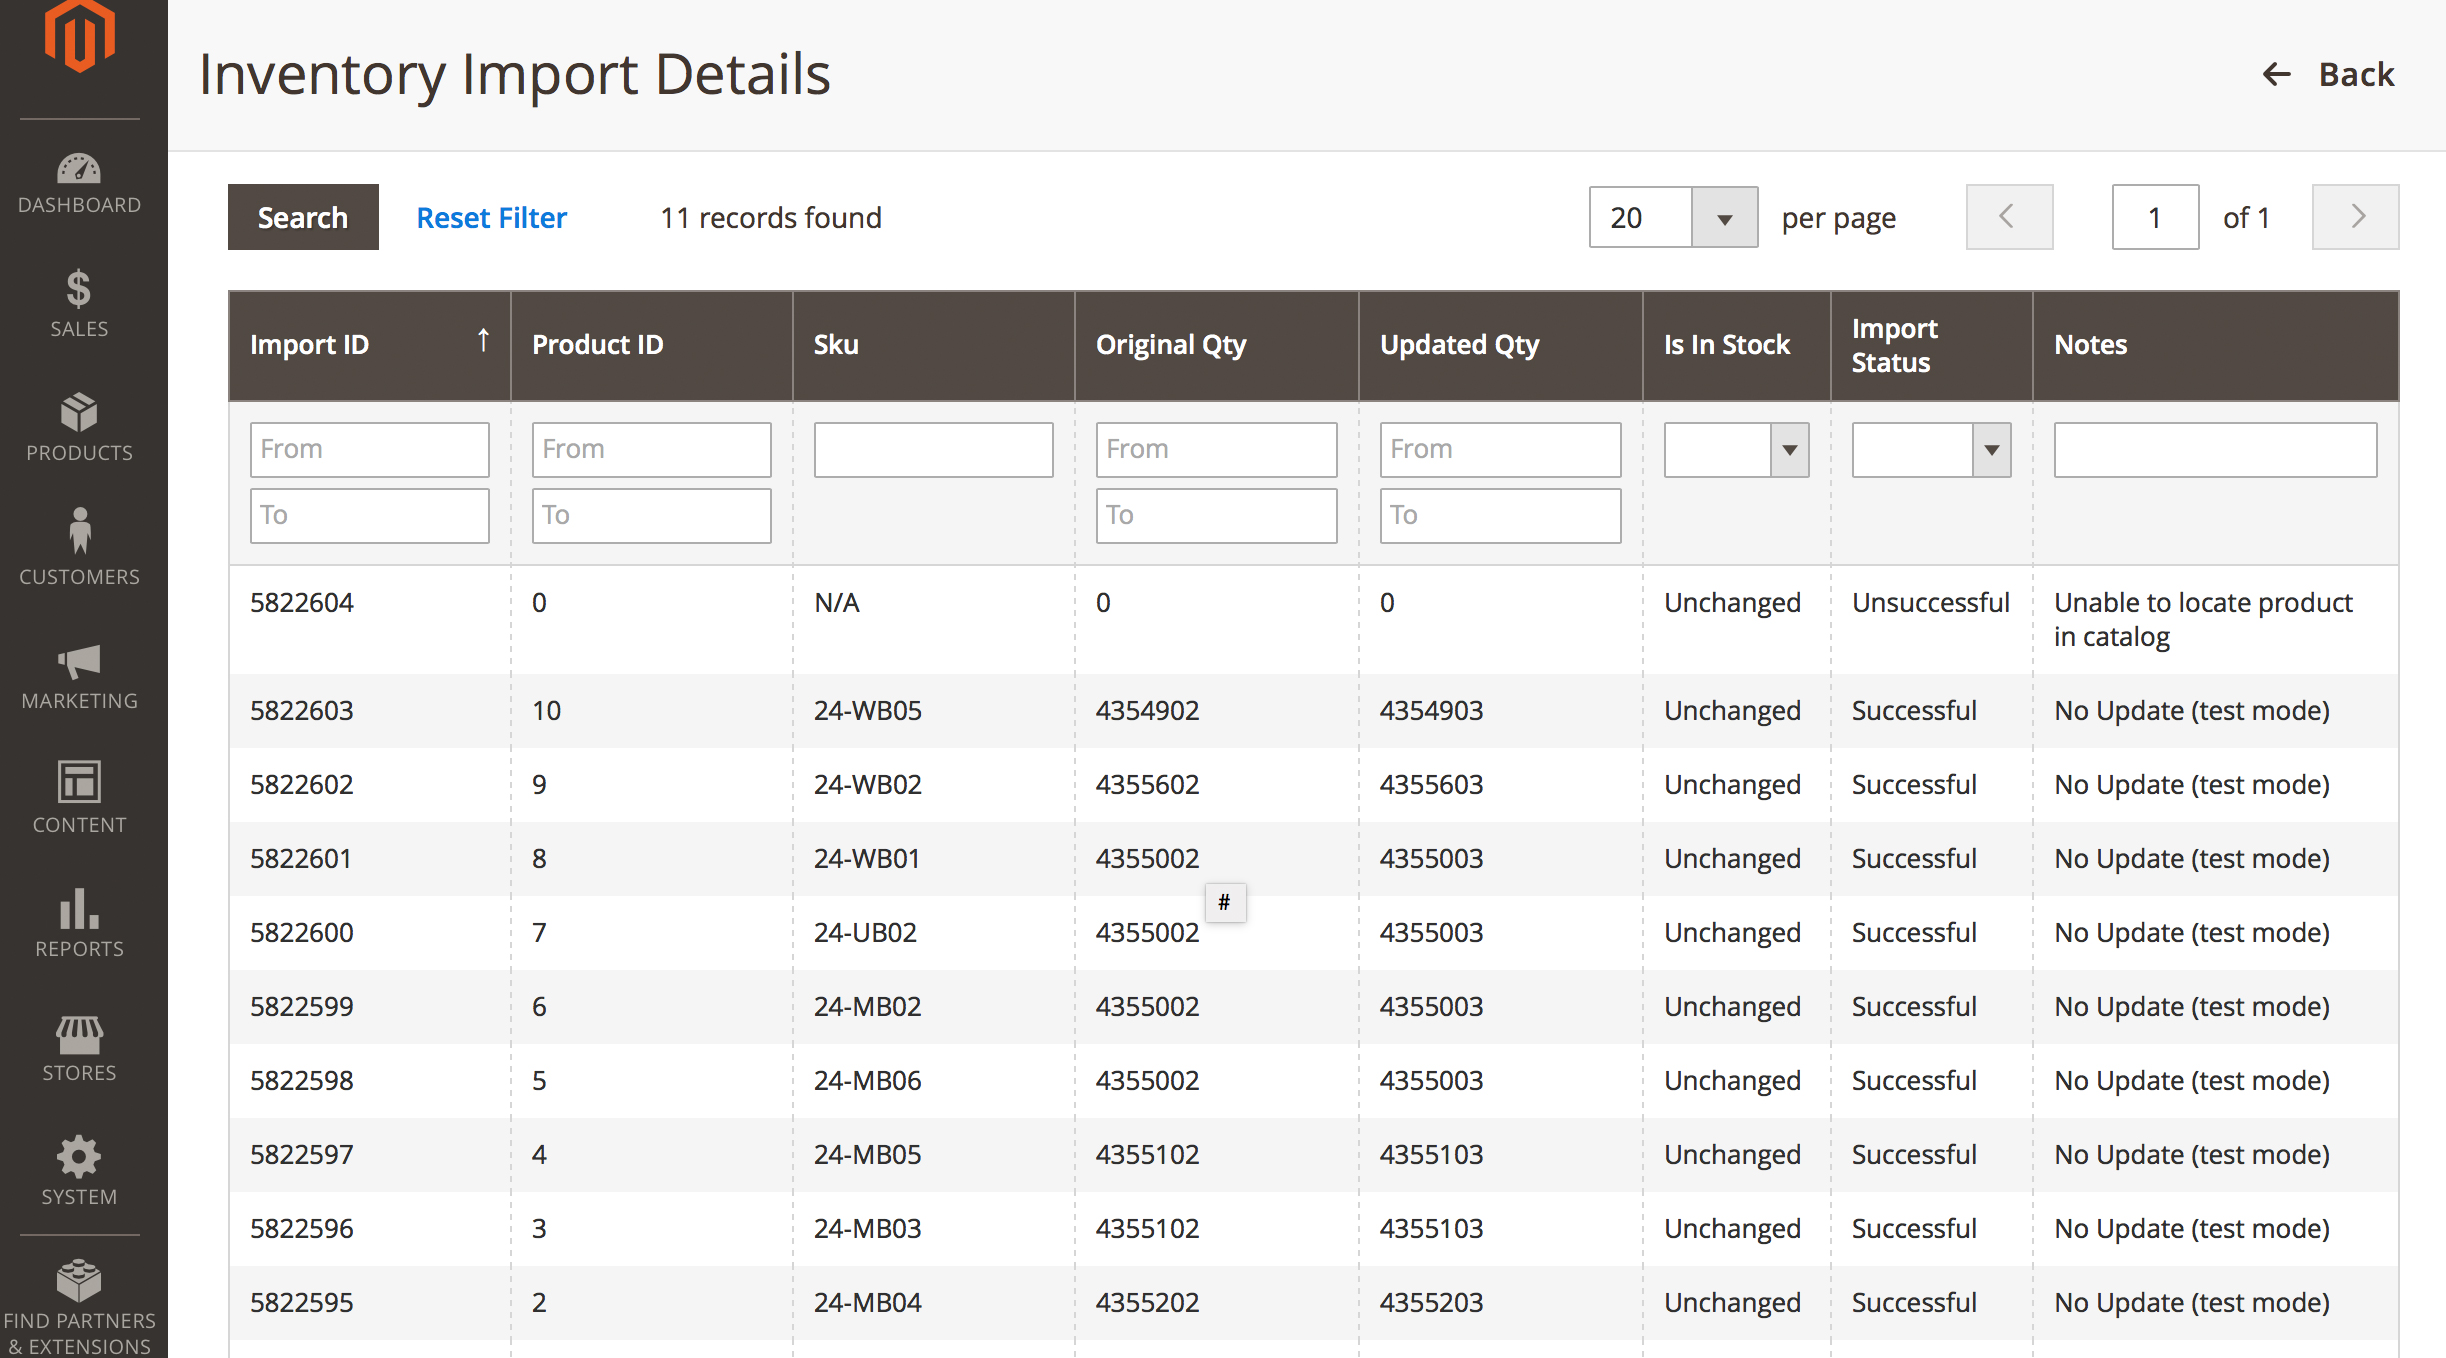
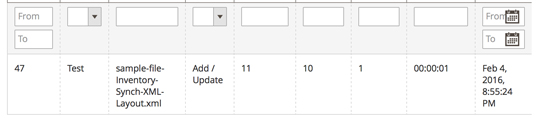
If the test was successful, a message like this will appear (you may have different number of rows and products):

Below, you’ll also see that the test was logged, but no changes were actually made. Note the grid says “test” in the Mode tab:
This step will only appear if you elected to Run Test Import in Step 5. Of you elected to Skip Test Import, please skip ahead to Step 7.
This step will show the results of the test mode. The initial grid that appears as shown below will provide a great deal of information about the data that was processed. Please review carefully and ensure the results appear accurate.You can drill down into each SKU in more detail to see what was changed (or would have been changed, had it not been a test). You’re able to search by SKU, original quantity or updated quantity, whether a product is in stock, it’s import status, product ID, or in notes:

Inventory Import Details – Test Mode – Click Here for Larger Screenshot >>
Press “Save Changes and Continue” to save the profile and proceed to the next step, Cron.
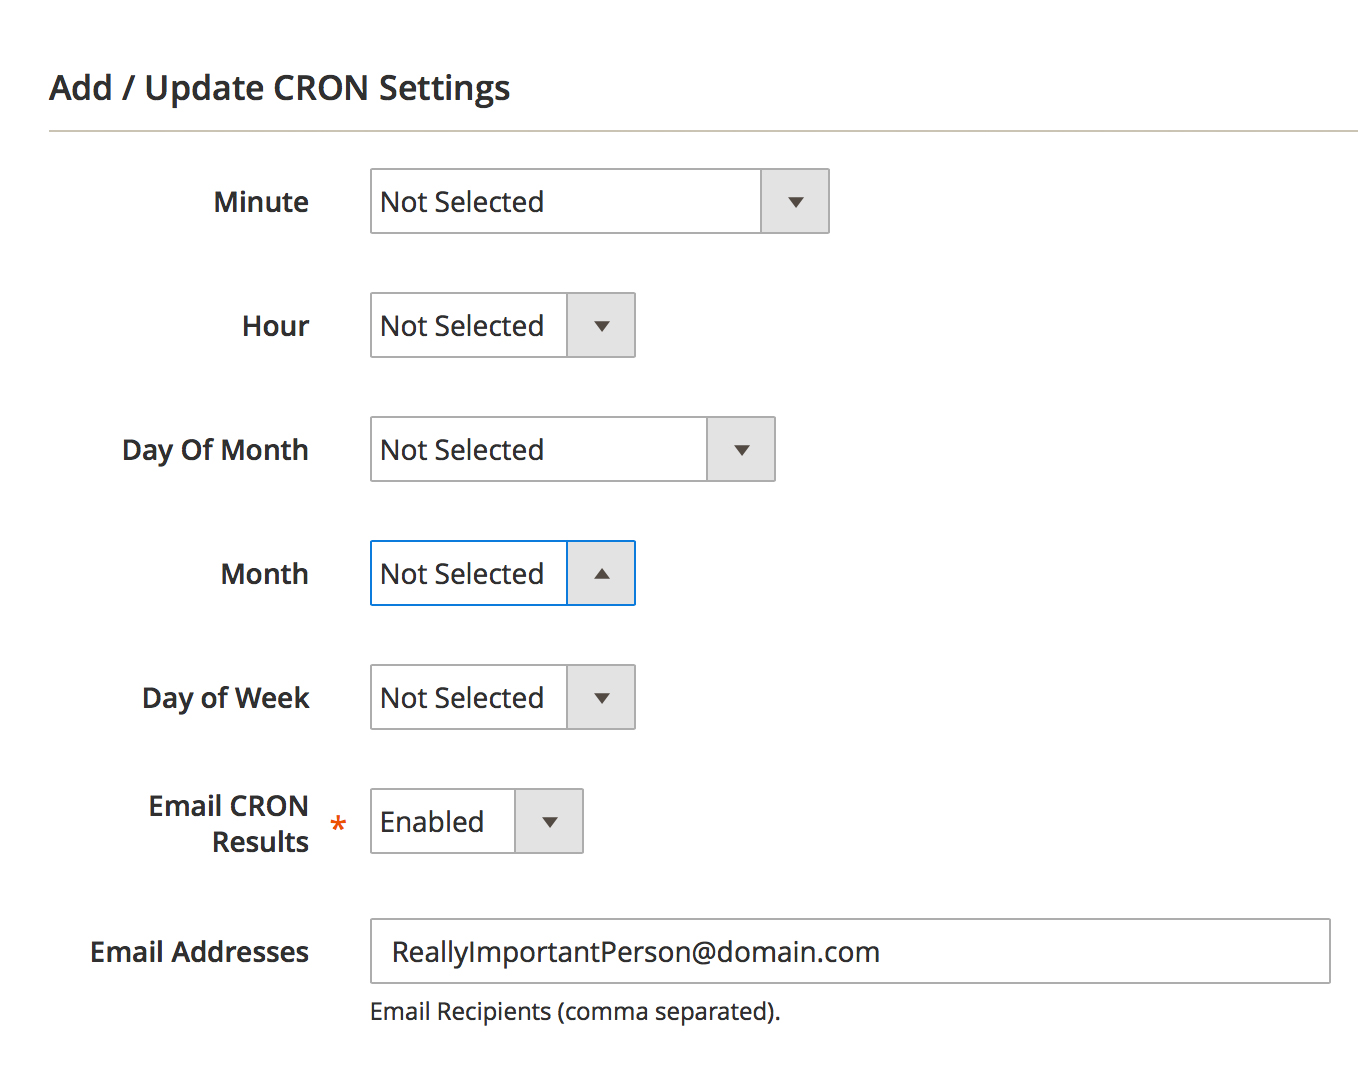
Step 7: Set up CRON for Inventory Synchronization in Magento 2.0:

Add / Update Cron Settings – View Larger Screenshot >>The final step to setup a profile is optional.
CRON allows you to run this profile by system CRON – or at regular scheduled intervals without any user further user interaction.
You may skip the CRON settings and set this at any point later.
To skip this optional step, simply leave all fields with the default Not Selected option and click the Save and Proceed to Step #8.
To setup CRON settings, simply enter the desired times you would like this profile to be executed (the maximum frequency is once every 15 minutes) as shown below:
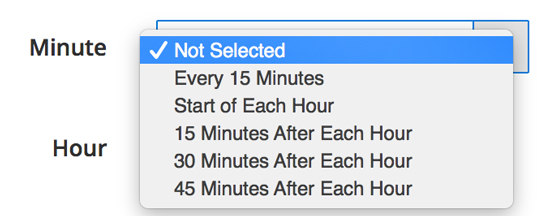
Minute: Set Cron to run:
- Every 15 minutes
- Start of each hour
- 15 minutes after each hour
- 30 minutes after each hour
- 45 minutes after each hour
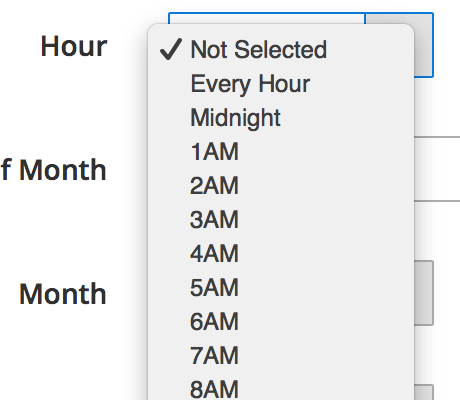
Hour: Set Cron to run:
- Every Hour
- Midnight
- 1 am, 2 am, 3 am, etc…
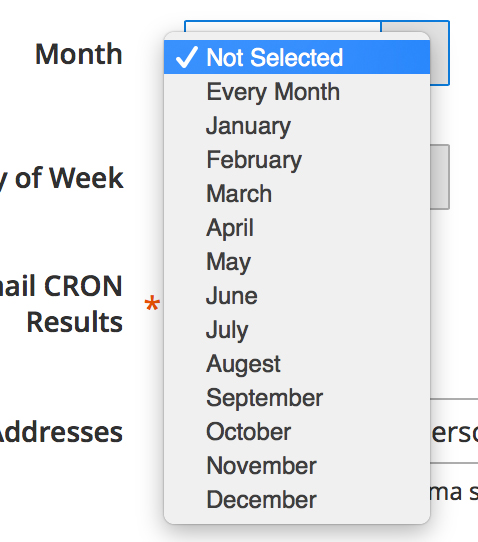
Month: Set Cron to run:
- Every Month
- Only run in January
- Only run in February, March, April, etc
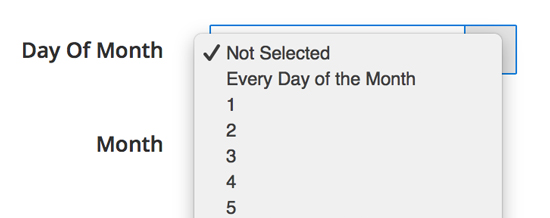
Day of the Month: Set Cron to run:
- Run every day of the month
- Only run on a specific day of the month (i.e. the 2nd day of the month)
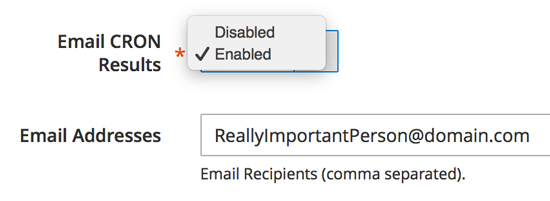
Email Cron Results:
If you’d like to receive an email each time the cron runs and processes the inventory profile for your Magento 2.0 store, you can have the system do this.
If you’re running the script every 15 minutes, this might be too frequent; if you’re only doing one inventory synchronization process per day or week, this will let you know if a script is successful or if there are errors.
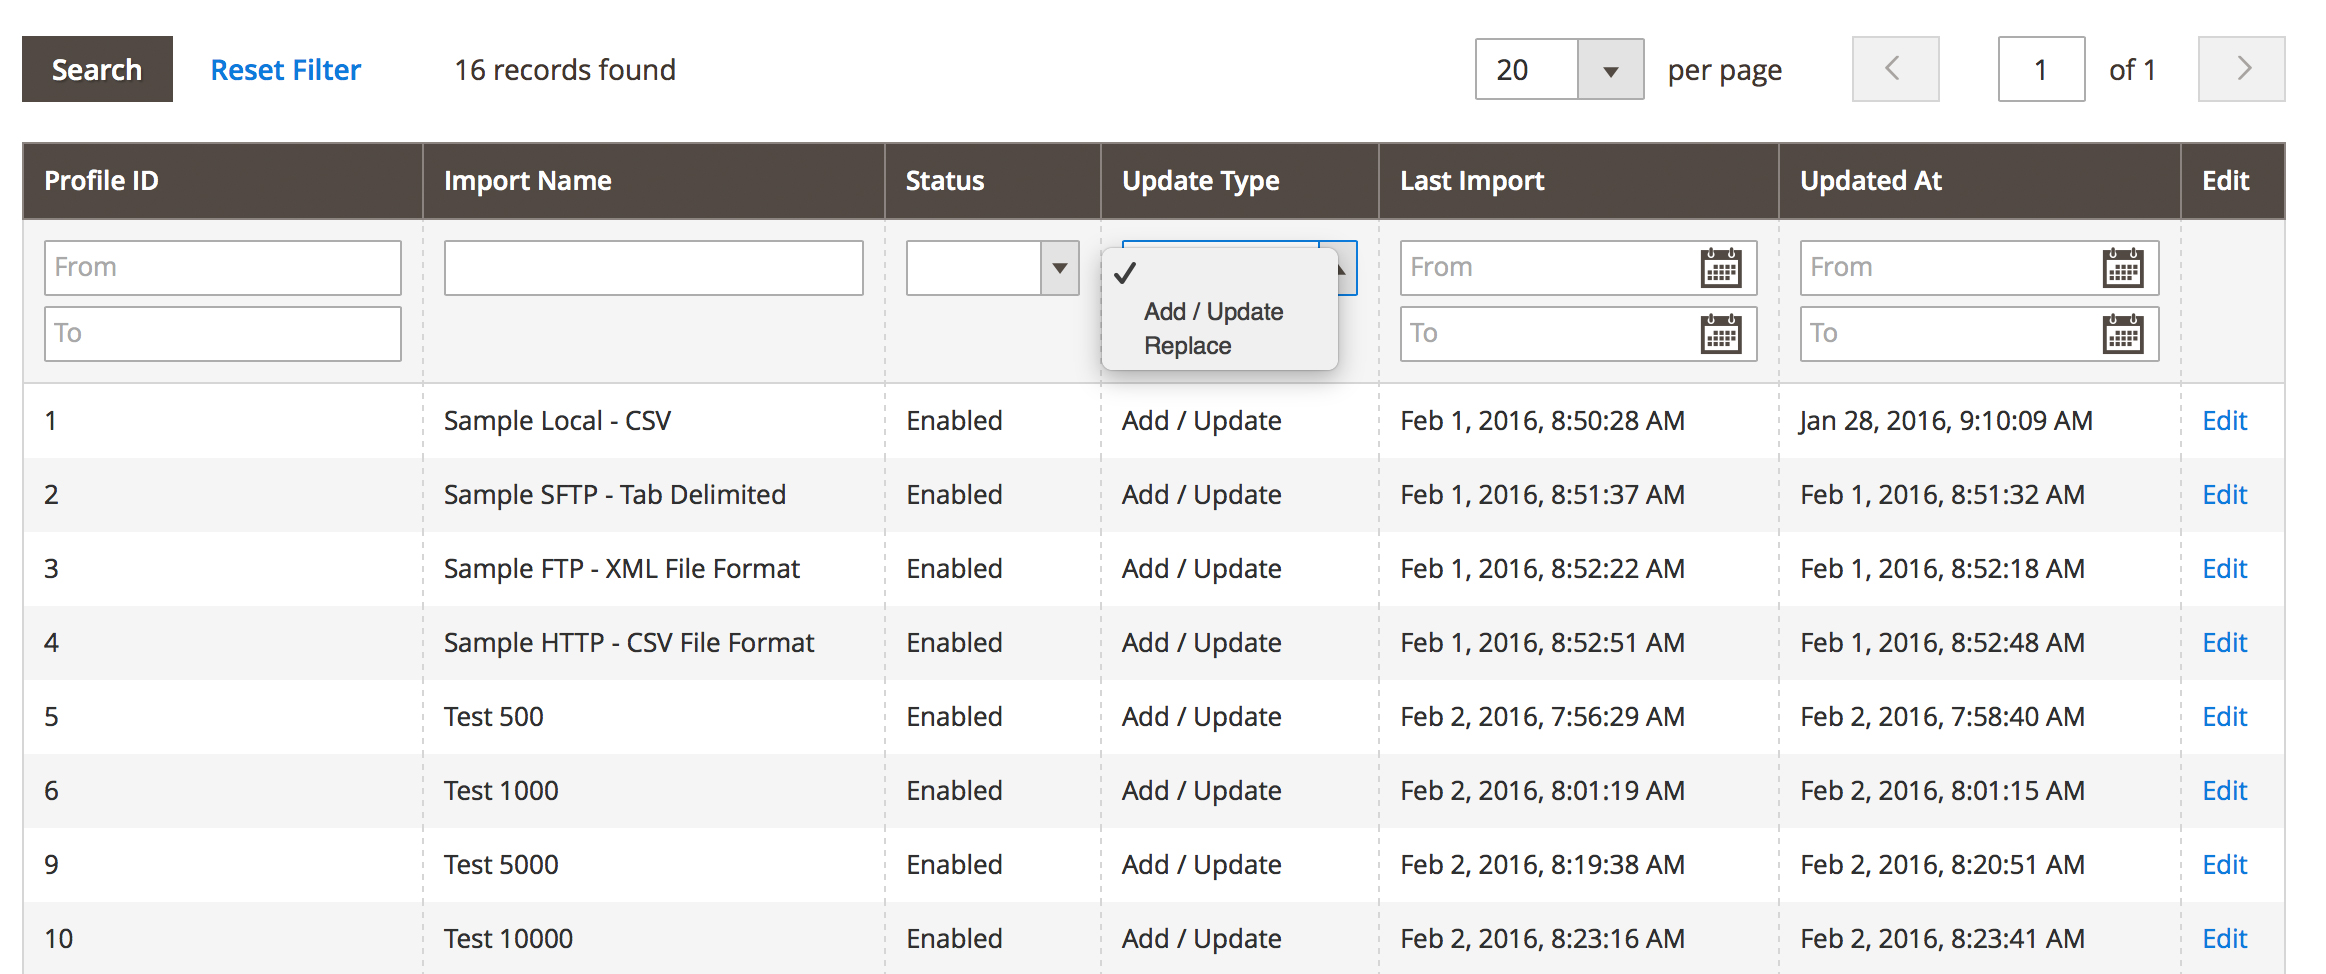
Step 8: You’re done!
You can set up additional import profiles, or edit existing ones from the main Inventory Synchronization area. Although this list of features was fairly exhaustive, the system is designed to be intuitive and easy to use.
You can view the results and drill down into the log files quickly and easily:
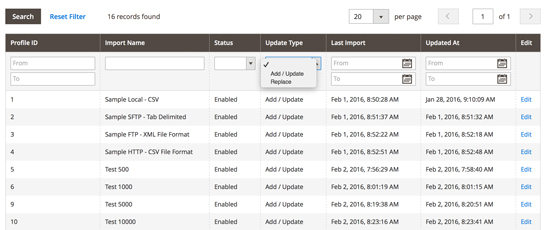
Inventory Synchronization Profiles – Click for Screenshot >>
User Documentation – Manual
Want to learn more?
Read the Inventory Synchronization for Magento 2.0 User’s Guide here >>
FAQ – Common Questions about the Magento 2.0 Inventory Synchronization Module
Q: There is an import file in the destination location but when I try to run the profile, it states that no file is found?
A: To prevent processing the same file over again, the profile compares the Last Updated timestamp on any matching file in the destination folder against the timestamp the profile was last run. If the profile was last run at a time that is newer than the Last Updated timestamp, it will skip this file.
Q: When I try and collect headers in profile setup step #4, it simply states no file was found?
A: This is the result of (a) no matching file in the destination folder or (b) the file does not have proper permissions to be processed or (c) the credentials used to connect are not valid. Please check that a matching file exists in the destination folder, has proper read privileges, and that your credentials are listed properly.
Q: What if there is more than one row in a file that contains data for a given SKU?
A: The behavior of the import in this circumstance depends on your profile settings. If you selected Add/Update under the General Settings tab, it will process each row and continue to update the SKU for each row processed. This means it will add/subtract from your available quantity with each reference. If you selected Replace under the General Settings tab, the last row (from top to bottom) will take precedence and be used to edit your catalog.
Q: How can I see changes made to a SKU across all profiles?
A: A feature has been added called “Search All Results” that provides this functionality. Please see section 5.3 of the user manual for more information on this.
Installation of the Inventory Synchronization Extension – Magento 2.0:
Before using the Inventory Synchronization extension in your Magento 2.0 store, it must be properly installed to unpack the required database tables and notify Magento to the existence of the extension.
How to Install Extension:
To install the Magento 2.0 Inventory Synchronization extension, please follow these steps:
- (Recommended) Run a backup of the code base and database.
- Download the installation package.
- Unpack the installation package and upload to your store’s root folder.
- Using SSH, login and navigate to your store’s root folder.
- Enter the following command: php -f bin/magento module:enable CustomerParadigm_InventorySync
- Then enter the following command: php -f bin/magento setup:upgrade
- Please flush system cache by navigating to System->Tools->Cache Management from the admin panel.
- Log out and log back into the admin panel.
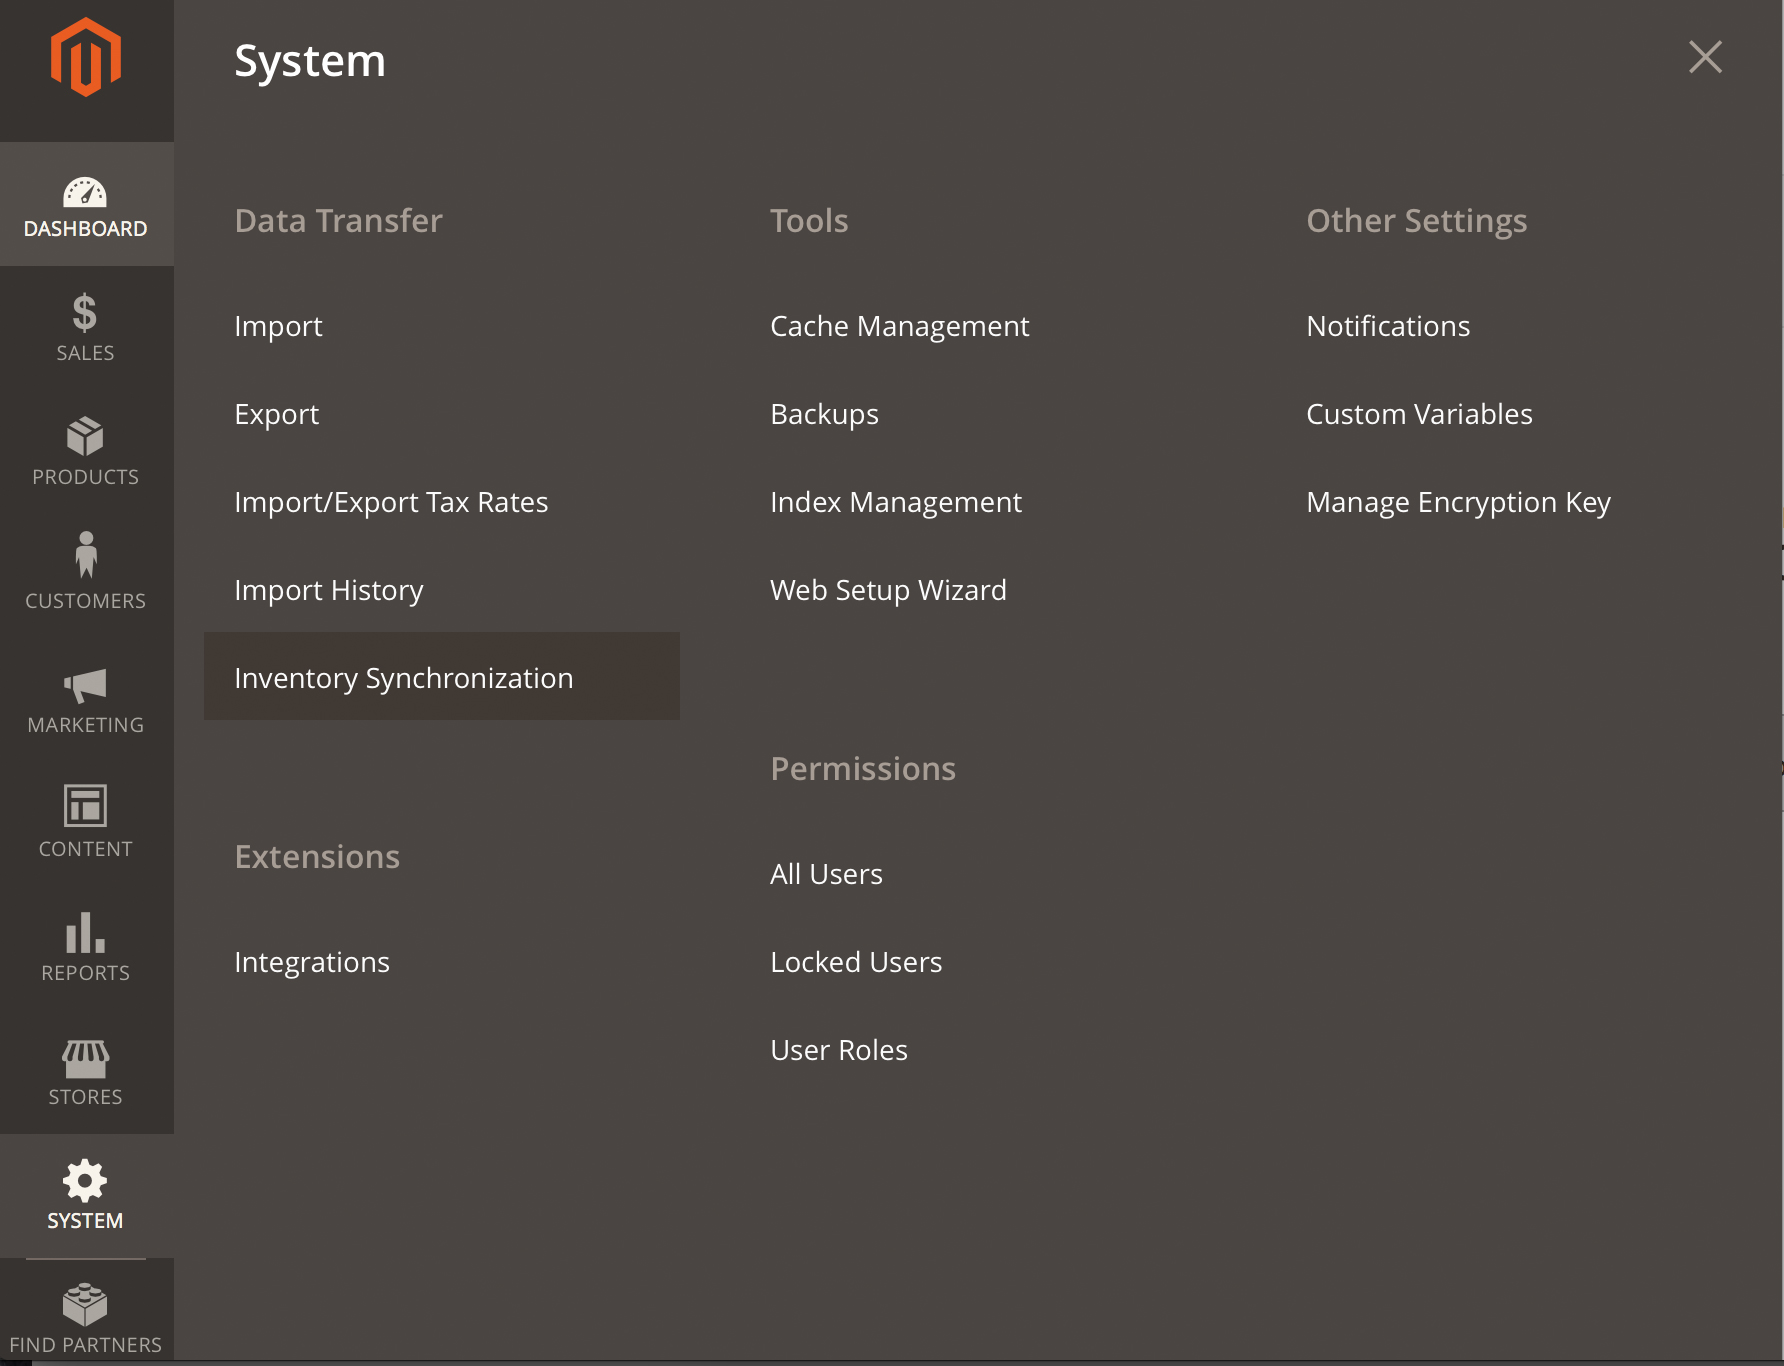
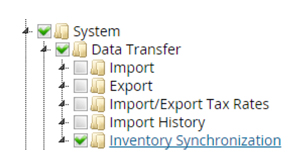
- If you have successfully processed these steps, you should now see the Magento 2.0 Inventory Synchronization extension by navigating to System -> Data Transfer -> Inventory Synchronization from the admin panel.
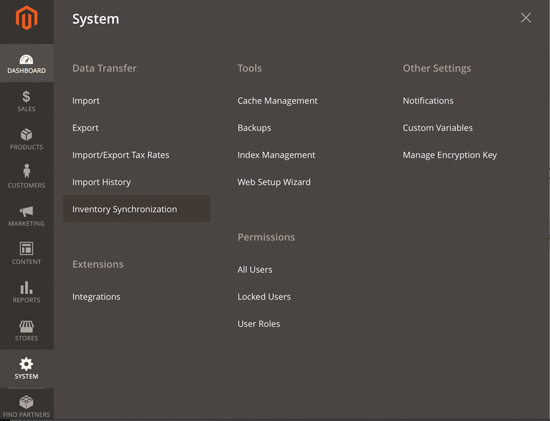
View Larger Screenshot of Inventory Synchronization Menu – Click Here >>
ACL SETUP
ACL stands for “Access Control Log” and allows the admin user to restrict access to the functionality of this extension by identifying what users have rights to utilize this extension. What follows are instructions on how to setup ACL for various users.
How to Setup ACL:
Once the extension has been properly installed, it is advised to setup the ACL (Access Control Log) for all users who will have access to use this extension.
To setup users, Navigate to System->Permissions->User Roles.For each user group that will have access to this extension, follow these steps:
- Click on the user group.
- Select “Role Resources” tab (under “Role Information” on the left hand side of screen).
- Scroll down the resource list and locate “Inventory Synchronization” resource (under System->Data Transfer).
- Check the “Inventory Synchronization” box and click the “Save Role” button.
After the ACL Setup is complete, you are ready to proceed to creating a profile. To locate the extension, please navigate from the Admin panel to System->Data Transfer->Inventory Synchronization.
Uninstall / Removing the Inventory Synchronization Extension – Magento 2.0:
Perhaps this module doesn’t work for your Magento 2.0 site. One of the most annoying things in the past is that once a module or extension is installed, it’s next to impossible to remove from your system. (That’s why we often see many, many extensions that have been turned off, but are still part of the code base.)
We make it easy to remove the extension.
Magento 2.0 does not have a fully defined mechanism with which to fully uninstall an extension. What follows is a detailed list of steps to fully remove the code and custom database tables associated with this extension:
How to Uninstall Extension:
To uninstall the Magento 2.0 Inventory Synchronization extension, please follow these steps:
- (Recommended) Run a backup of the code base and database.
- Using SSH, login and navigate to your store’s root folder.
- Enter the following command:
php -f bin/magento module:uninstall CustomerParadigm_InventorySync
Please flush system cache by navigating to System->Tools->Cache Management from the admin panel.
To ensure the extension has been disabled, please navigate (from the admin panel) to System -> Data Transfer and make sure the Inventory Synchronization link no longer exists.
You may now delete all of the code associated with the extension located (from your Magento root folder) at: app/code/CustomerParadigm/InventorySync.
Here’s a code tree showing the various levels of code:

This only leaves the custom database tables remaining. Using your preferred DB tool (or command line), you can remove the following tables:
- cp_inventorysync_cron
- cp_inventorysync_headers
- cp_inventorysync_main
- cp_inventorysync_results
- cp_inventorysync_results_detail
- cp_inventorysync_settings
Once the extension has been disabled, the code has been removed, and the DB tables have been removed – the extension has been fully removed.