Magento 2 platform has several different types of products to choose from when setting up your eCommerce store. One of these product types is a Virtual Product. Virtual Products are non-tangible products such as memberships, warranties, services, or subscriptions.
Virtual Products can be purchased on their own, or as part of Grouped or Bundled Product. For more information on grouped, simple, and bundled products be sure to check out our product guides.
In this guide, we will walk through the creation of a new virtual product on a Magento 2 store.
Getting Started
Before starting the creation of your virtual product, you’ll need to have the following required pieces of information:
- Product Name
- Price
- SKU (this will automatically be generated from your Product Name if left blank)
We suggest having Images (if applicable) and Description ready as well, but these can be added after your initial setup.
Creating Virtual Products
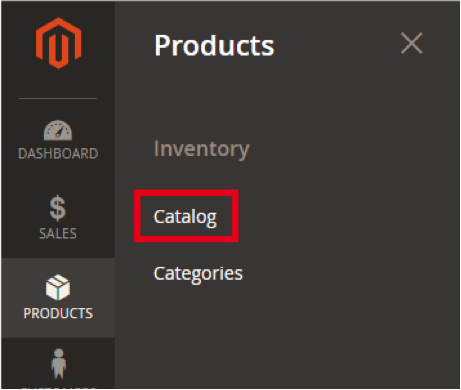
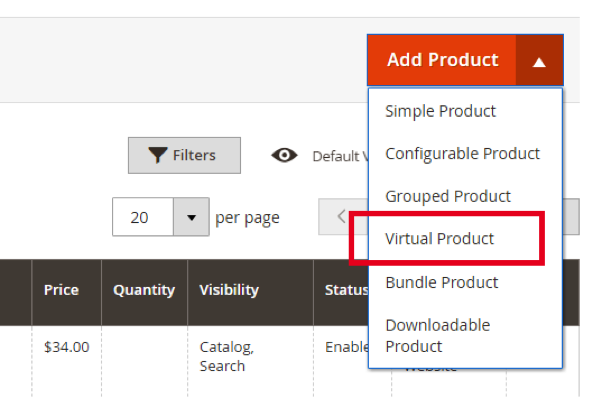
Step 1 – Add Product:
- From the Dashboard, select Products > Catalog
- Next, click the Add Product button at the top right
- This will open a drop-down with different product types to choose from – select Virtual Product from this list
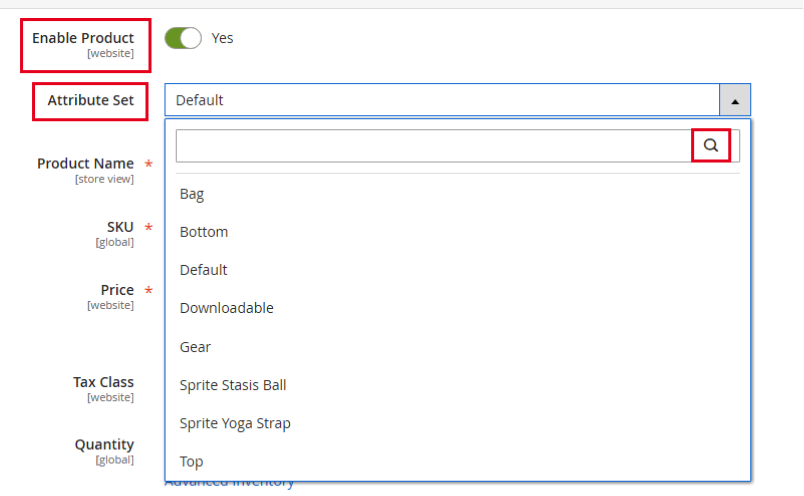
Step 2 – Product Details:
Now, you’ll begin adding the basic information about your product. At the top, you’ll see Enable Product with a toggle switch – this indicates if the product is enabled and viewable on your site, or is disabled and cannot be seen on the front end. You can toggle this to be disabled while you’re setting up your product and making changes until you’ve completed the product and are ready for it to be viewed by your customers.
The next item you’ll see is a drop-down selection for Attribute Set. Clicking this opens the drop-down, which you can then search for the attribute set you’d like to associate with this product. To learn more about creating and setting product attributes, be sure to check out our guide.
Next, you’ll see more fields for information to enter in about your Virtual product:
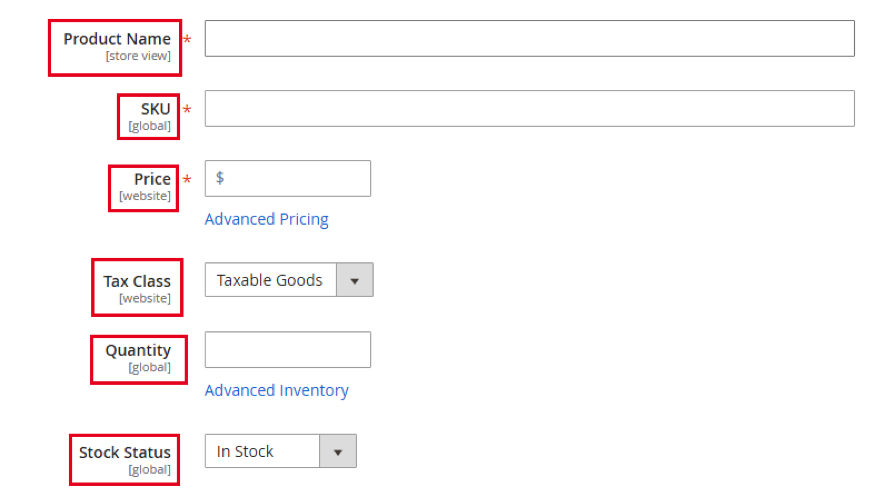
- Product Name: The name of your product that will be displayed to your customers.
- SKU: This is where you can manually enter the SKU for your product. (NOTE: If nothing is entered here, a default SKU will be generated for the product, based on the product name.)
- Price: The price of your product.
- Tax Class: This can be set to either Taxable Goods or None
- Quantity: Set how much of this product is available.
- Stock Status: Click this drop-down to mark this product as In Stock or Out of Stock.
NOTE: Because this is a Virtual product that does not have a weight associated with it, you can leave the Weight field empty and select This Item Has No Weight from the drop-down next to it.
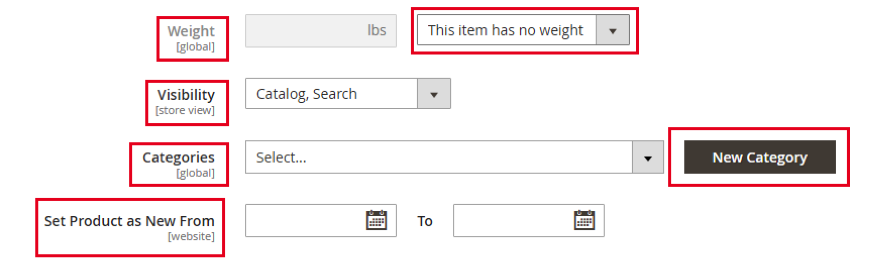
- Visibility: This determines where and how you want the product to appear on the front end of your site:
- Catalog, Search: (Default) Will appear in both catalog and search results
- Not Visible Individually: Will not be listed in the catalog
- Catalog: Will appear in the catalog listing but will not appear in search results
- Search: Will appear in search results but will not appear in catalog
- Categories: Start typing in this box to select the category or categories that your product will fall under. For example, if your new product is a service, and you have a category called “Services” you can type in services and then select this category when it appears.
- If you need to create a new category for this product, click the New Category button and follow the steps to create a new category to apply to your Virtual product. (Learn more about creating categories in this guide.)
- Set Product as New from Date: Select date that this product will first appear in the New Product block on the homepage of your site
- Set Product as New to Date: Select the end date that this product will appear in the New Product block on the homepage
Step 3 – Fill out the Content Section:
The next drop-down section you’ll see is the Content section. Here, you can add in details about your Virtual product.
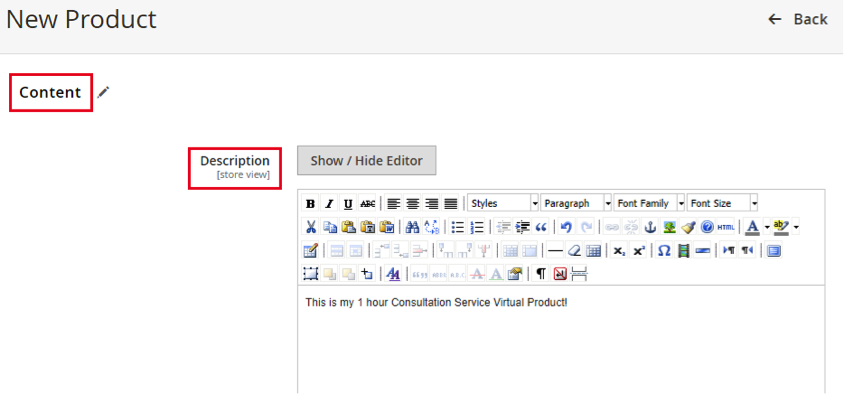
This content will appear in the Details tab of your product page.

This section also includes a Short Description input box to enter a smaller note detailing your product.
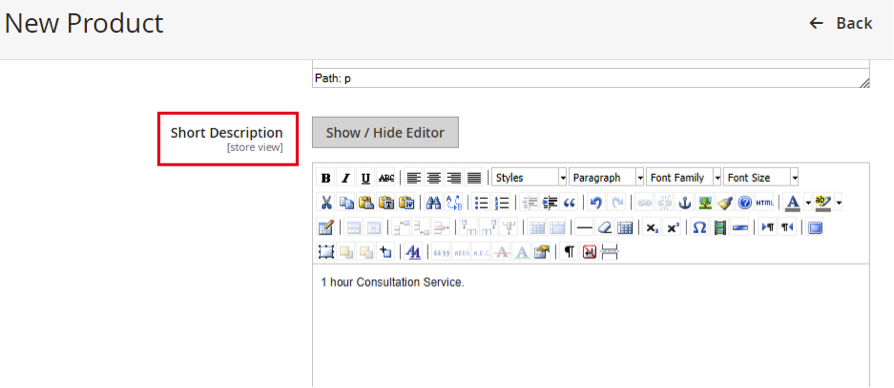
This will appear under the Add to Cart button on the front end of the product page.
The next drop-down section you’ll see is Configurations. You would click the Create Configurations button if you were going to create different options for the product, such as different colors to choose from or different size. However, since this how-to is for creating a Virtual product only, skip over this section.
Step 4 – Add Images and/or Videos:
The next drop-down section to edit is Images and Videos.
- Click the “Click here or drag…” box in this section (or drag items from your desktop and drop in this area) to select additional product photos to add to this product that will display on the product page
- You can also click the “Add Video” button to the right to select a video from your desktop to upload, which will display on the product page

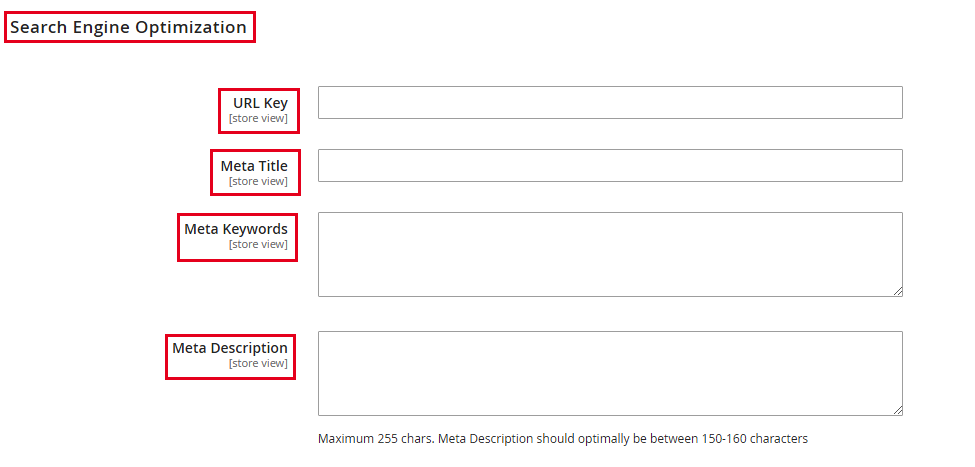
Step 5 – Search Engine Optimization:
The following section to enter information for your Virtual product is Search Engine Optimization. This area allows you to update the metadata and additional information for your product.
- URL Key: Magento will automatically create an initial URL key based on the product name
- www.yourstore.com/consultation-service
- Meta Title: The title that shows in the title bar of a browser tab, along with the title displayed within search engine results
- Meta Keywords: The keywords that are relevant to your product
- Meta Description: A few short sentences describing your product, which search engines can pick up on and crawl to rank your site – this area should be no longer than 255 characters
- Meta Descriptions are not visible to customers on the front end of your site\
Step 6 – Related Products, Up-Sells, and Cross-Sells:
The next area to make additional selections that are connected to your Virtual product is Related Products, Up-Sells, and Cross-Sells. While not required, selecting products to add to these sections can put more of your products in front of your customers and further show what your site has to offer.

To learn more about setting up Related Products, Up-Sells, and Cross-Sells check out our guide.
Step 7 – Customizable Options:
Customizable Options are quick and easy customizations you can apply to your Virtual product without setting up a Configurable Product. This gives you the flexibility to create a product with multiple options without having to create separate products for each variation. To add a new option, click the Add Option button:
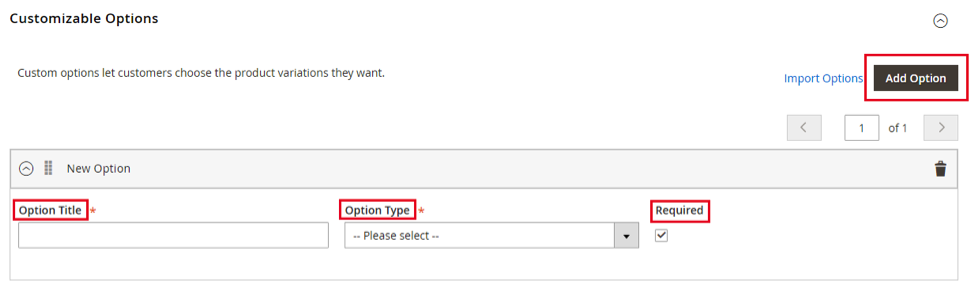
- Option Title: Add a title for your option
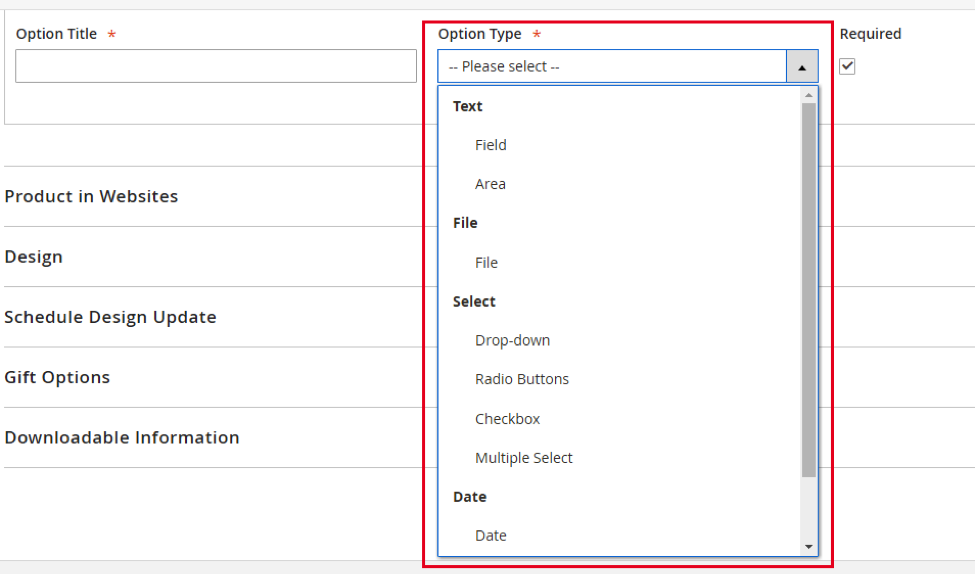
- Option Type: Select what type of option this is, such as a Text field, Checkboxes, Radio buttons, etc.
- Check the box under Required if the option is required for the product to be purchased
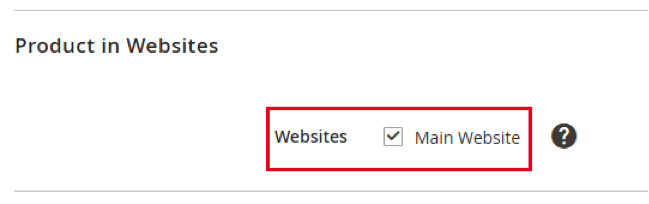
Step 8 – Products in Website:
The next section you’ll see when creating your new Virtual product is Products in Website. If you have multiple websites within this Magento 2 installation, this section allows you to choose which of your websites you’d like this specific product to appear on for your customers.
Step 9 – Design:
Following the Products in Website section, you’ll see the Design section.
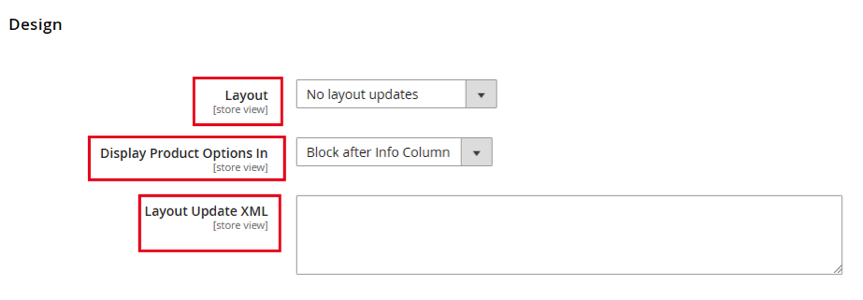
- Layout: You can choose a different layout/theme for this specific product page
- Display Product Options In: Choose whether the product options appear in an info column or in a block after the info column
- Layout Update XML: Here you can enter XML code to customize the theme for this product page
Step 10 – Schedule Design Updates:
Following the Design section, you’ll find Schedule Design Updates. This area allows you to make temporary changes to the style of this product page. This can be useful for a seasonal update or promotion.
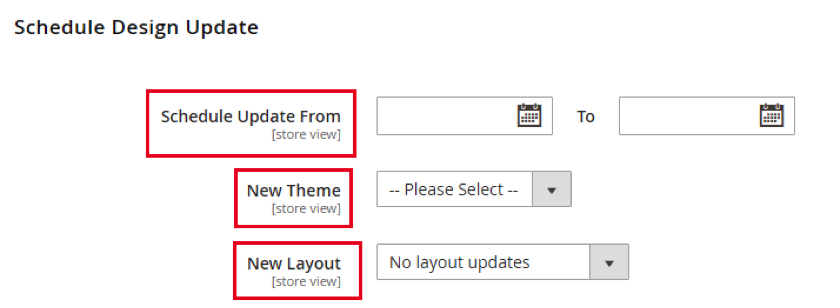
- Schedule Update From/To: Select when you’d like this appearance change to start and end
- New Theme: Select which theme you’d like this page to change to during this time
- New Layout: Change the layout of the product page for this time
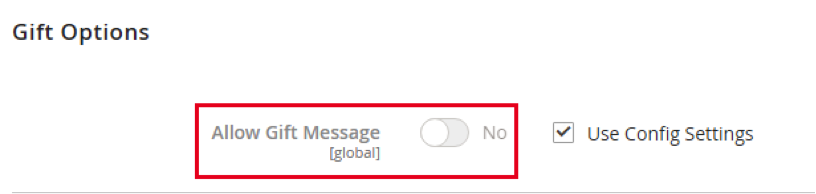
Step 11 – Gift Options:
The second to last section within your new Virtual product creation is Gift Options. In this section, you can toggle Allow Gift Message to Yes to allow a gift message to be left on this product during the checkout process.
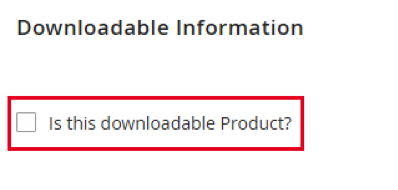
Step 12 – Downloadable Information:
The final section of your new Virtual product is Downloadable Information. This allows you to select if this product is a Downloadable Product. Typically, Virtual products are services or subscriptions which don’t require a download. However, this option is available to you if you’d like to have your Virtual product be Downloadable as well.
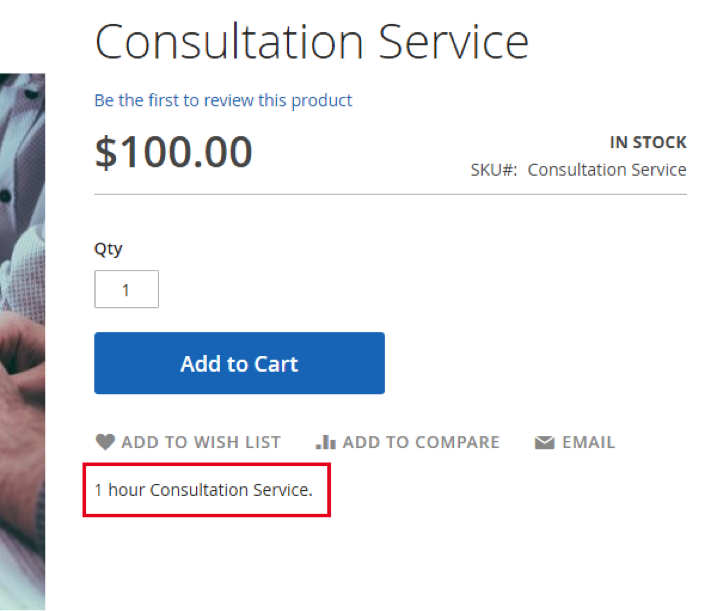
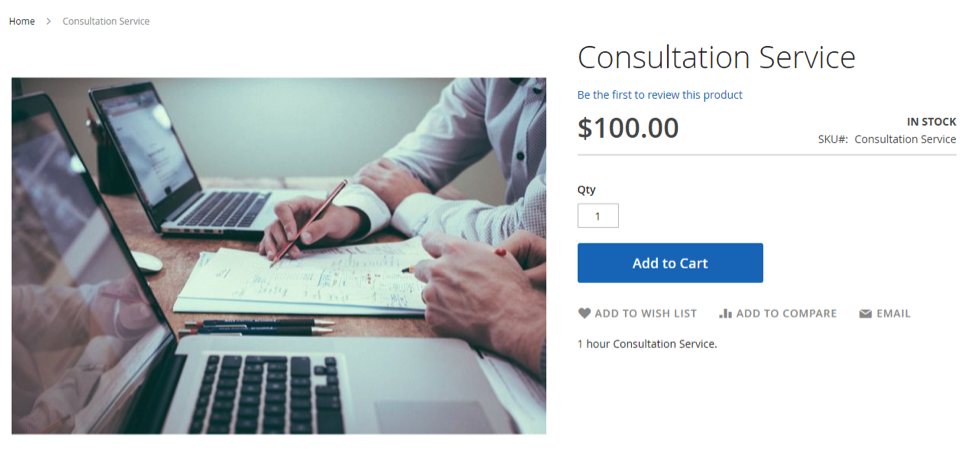
Final Product
You have now successfully gone through the necessary steps to set up a new Virtual product for your Magento 2 site! This product is now searchable and ready to be purchased by your customers. Here is how the final product will appear to your customers:
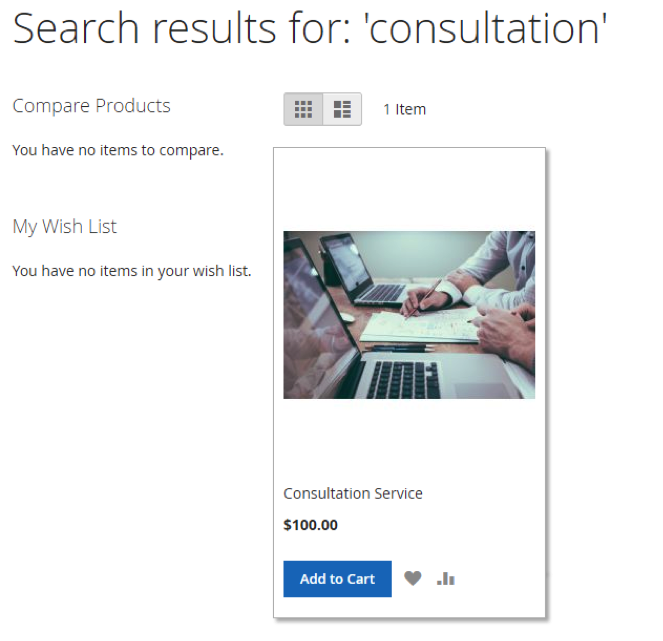
Because we selected the visibility of this product to appear in search results, here is how your Virtual Product will appear on the Search Results page:
Important Note: Because this item is a Virtual product it will not show Shipping Options on the Cart or Checkout page unless there is also a tangible product in the Cart as well.
Closing Thoughts
Virtual products are a great way to offer products to your customers that don’t require shipping, downloading, or delivery.. This allows you to display your products and their information in a way that is easy to navigate for your customers, while at the same time providing you with full control over details and customization that fit your needs as the store owner.
If you have any questions or comments about setting up Virtual products, other product types, or other administrative settings in Magento 2, we’re here to help! Fill out our contact form today to connect with us – let us know what your goals are and how we can help you achieve eCommerce success!