Javascript in Magento 2 can be confusing, and many changes have been made to how the platform handles Javascript from Magento 1 to Magento 2.
At the September 2017 Colorado Magento Meetup Lead Developer, Mike Stacey lead the conversation on implementing Javascript in Magento 2 including, the differences between Javascript in Magento 1 and Magento 2 and Require JS and how to use it.
Want to check out our slides from this meetup? Head on over to our Slideshare!

Getting Started
So, you have cracked open a new copy of Magento 2 and you are thinking about implementing some Javascript. This is a fairly straightforward goal. Open up some script tags, write a little JS, save the file and off you go to the next task.
After a while, some strange things start to happen. You can’t put your finger on it, but the page sometimes just doesn’t seem to load right. You might be using a little bit of jQuery for that slider or maybe you are referencing some other library you loaded in the head of the page with some XML configuration files.
But no matter how much you debug, you can’t seem to figure out why it is the load order of the JS assets aren’t loading right. Not all the time, but every so often you load the page and you get some odd error in the console that reads “jQuery is not defined” or something of the sort.
The good news is, you aren’t crazy!
Using the old methods of working with Javascript misses a very important piece of the Magento 2 loading process. In this blog post, I’m going to explain all the details of how to load Javascript files into the framework correctly and explore a few of the superpowers that the Magento core team has hidden in their system. The goal is, at the end of this you are going to walk away with an advanced understanding of one of the most pivotal components in the Magento 2 framework.
Require JS
There are two main things we have to understand to get Javascript working in Magento 2. Require JS and how to use Require JS. Taking the first question first…
What is Require JS?
From the official site:
“RequireJS is a JavaScript file and module loader. It is optimized for in-browser use, but it can be used in other JavaScript environments, like Rhino and Node. Using a modular script loader like RequireJS will improve the speed and quality of your code”
That sounds really smart, but that quote doesn’t really explain what it is doing and how it get’s that thing done. The phrase “file loader” doesn’t really explain the importance that Require JS has. Simply put, in Magento 2, Require JS manages every Javascript file that exists in the system. It knows where in the file system it lives, it controls the places it’s loading and it sets the priority of when it’s loaded in the DOM.
Require JS is woven into every aspect of how Magento 2 uses and accesses Javascript. While it is still technically possible to use Javascript using script tags in your template files, all of Magento 2 is dependent on the Require JS system to manage which Javascript assets are loaded onto the page and when they are loaded onto the page. If you choose not to use this system, it’s a roll of the dice when it comes to using Javascript successfully in Magento 2.
What is Require JS doing in Magento 2?
It’s best to understand this system by looking at the browsers. When the page of a Magento 1 site loads, in the head of the document there is a laundry list of all the Javascript files that the page has been configured to use.
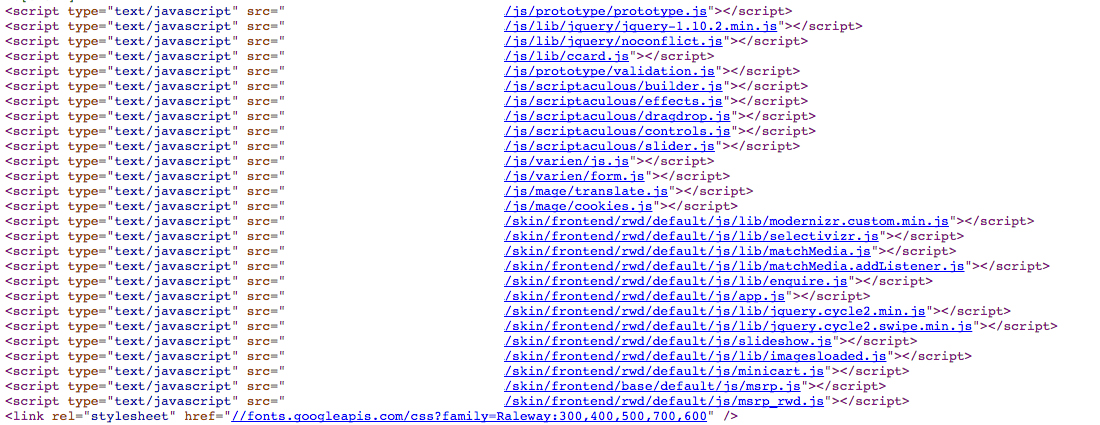
This system (the industry standard in 2008) was the cause of endless problems. It was very common on Magento 1 sites to see multiple versions of jQuery loaded on a page. Most 3rd party modules with any amount of front-end functionality relied on jQuery, and as a result, each installed module would import jQuery (which was not a library dependency when Magento 1 was written).
This led to endless amounts of conflicts and HTTP requests for files that were already loaded. Those with a history of Magento 1 development know of the ever-shifting jQuery.noConflict() calls in hopes that on the next page refresh your console errors would vanish.
The solution Magento decided on to resolve this problem was to use Require JS to take control of the loading of JS files by the framework, not developers.

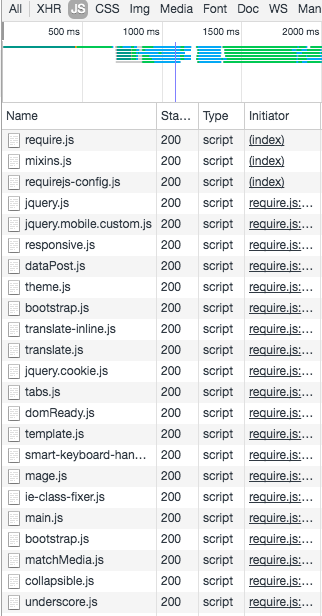
Looking at the source code on a Magento 2 site, you can see that there are only 3 Javascript files loaded on the page. These 3 files manage all the Javascript for every page on the site. With Require JS, you use configuration files to “define” or “require” the dependencies of your script (or your script itself) and then let Require JS call those files for your specific Javascript code. What this does is remove the need to control what files are loading on what pages. All dependencies (like jQuery or another library) will be called only when needed by the Javascript code that is on that page by Require JS. This means that if there is no jQuery being using on a site’s page, jQuery as a library won’t be loaded.
Those with a history with Magento will recognize this as just another step in the Magento’s philosophy of configuration first. Using these config files (specifically requirejs-config.js), Require JS will merge all config files together when the static content is compiled on your site. If you were wondering what the setup:static-content:deploy command is doing in the CLI, this is one of its jobs, and when compiled it will create a master configuration file of all the disparate files in pub/static/_requirejs/frontend/{{vendor_namespace}}/{{theme}}/en_US/requirejs-config.js.
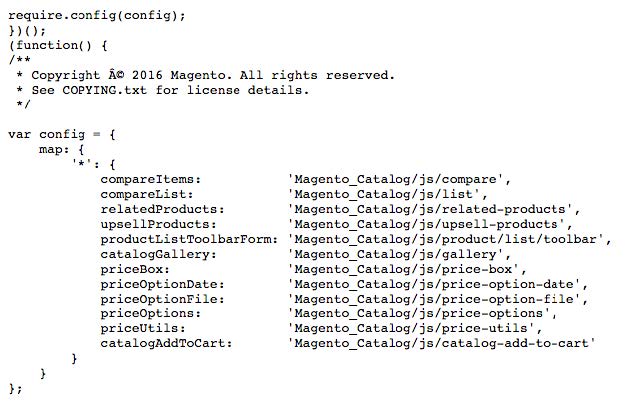
Looking at the page source, we have a “config” that outlines what files need to be loaded to have the rest of the script under its function. Each line in the code pictured is an individual “module” that is called using the names in mapping you see in the image. You can think of this as a key/value pair, where the name is the first element and the path to the file is the second. Actually, you don’t have to think of it that way, that is exactly what this is.
When the page is loaded, all the Javascript that is rendered in the HTML document will define the assets it needs and Require JS will load it in the background. Inside the network tab of the bowser, you can see the files that are actually loaded on the page. Here we have the jQuery library but also dozens of other JS file.
This is really important to understand, that we as developers are not in control of the order or placement of these loaded files. One of the greatest anxiety of Javascript development on any platform is load order. When is the document loaded? When is my file loaded? Do the elements on the page exist when I need them?
In a small system, such as a simple WordPress site or a custom Laravel site, this isn’t too much a problem. But think about what this would look like if you were building a site that 100,000 developers would have to use. Then you need to have that system work out these issues with every custom site build, with a limitless number of unknown files? Magento’s solution was to not leave this up to the end developer.
So What?
This system serves two main functions. The first being the reduction of page weight. While JS files are small in size in most cases, in a page speed-obsessed world, every little bit helps. When a page can consist of any number of elements (given the flexible nature of Magento and varying needs of merchants) the process of adding an Add To Cart button onto a page doesn’t necessitate anymore code then what that element needs.
The second (and more important) is creating a modular system of dependency loading. With this in mind, the core team worked to create Javascript files that do more abstract functionality. If you take a look into the Javascript files in the core, there will be dozens (even hundreds) that all take up a little slice of the whole Javascript pie. Each file then gets called by other files that then get called by the template files that in the end execute that final code. The concept of converting large files into smaller modules of code that perform simplified functionality is the result.
What this means for Magento 2 is we have more freedom to move elements around on the page, as well as the site, knowing that the dependencies will be self-contained. This frees up Magento 2 to work towards being a “fully modular” framework.
Get Your Cape
That leads up to one of the superpowers of Require JS. It stores its config files in a way that makes all modules defined accessible from anywhere else in the application. To find the definition of “jquery” (using a search like “find . -name ‘requirejs-config.js’ | xargs grep -r ‘jquery'”) you will find that this is loaded in “vendor/magento/module-theme/view/base/requirejs-config.js”. But once loaded, any other module in the system can now use that instance of jQuery.
It also means that we can load in our own libraries and dependencies into the framework without worry of name space conflicts and global variables causing havoc on our pages.
So we have solved a big problem with the use of Require JS. But is all that worth it? Well in the case of Magento 2, there really is no other choice. This new iteration of the platform is Javascript powered in a way Magento 1 never was. To accomplish a truly modular system the idea of just “dealing with” Javascript conflicts is too much to ask. These kind of errors aren’t even an option for a platform like Magento. So good or bad, right or wrong, a system like Require JS had to be used.
So, How Do You Use It?
I’m going to move in a backward direction explaining how to set up your files correctly. The idea being it’s best to know why a config file needs to be set up when you know what you are configuring. We’re going to take a look at a very common request, the inclusion of a slider into the homepage of a site. Magento has moved past the use of a slider on the homepage of an eCommerce shop, but that hasn’t stopped clients from requesting them. For the rest of this post, we are going to make the assumption that you have a working Magento 2 install loaded with the default sample data running a child theme using the Luma theme as its parent. Of course this information will work across any setup you have, but if you are following along you will want this set up.
The first thing we need to do is jump into the homepage of our dev site in the admin (content -> blocks -> home -> select edit under the actions column). Inside here we will be placing our call to the slider and defining our images. I’m reusing the same image that is in the default Luma theme, but feel free to use any images you like.
<div class="blocks-promo" id="homepage-top-slider">
 <div>
  <a class="block-promo home-main" href="{{store url=""}}collections/yoga-new.html">
   <img src="{{media url="wysiwyg/home/home-main.jpg"}}" alt="" />
   <span class="content bg-white">
    <span class="info">New Luma Yoga Collection</span>
    <strong class="title">Get fit and look fab in new seasonal styles</strong>
    <span class="action more button">Shop New Yoga</span>
   </span>
  </a>
 </div>
 <div>
 <div>
  <a class="block-promo home-main" href="{{store url=""}}collections/yoga-new.html">
   <img src="{{media url="wysiwyg/home/home-main.jpg"}}" alt="" />
   <span class="content bg-white">
    <span class="info">New Luma Yoga Collection</span>
    <strong class="title">Get fit and look fab in new seasonal styles</strong>
    <span class="action more button">Shop New Yoga</span>
   </span>
  </a>
 </div>
 <div>
</div>

<script type="text/x-magento-init">
{
	"*": {
		"Magento_Theme/js/custom-slider": {
			"target": "#homepage-top-slider"
		}
	}
}
</script>
The only thing here to note is the use of the script tag to “call” our code. You will notice that we are using a “type” that is custom to Magento 2 – type="text/x-magento-init. This line is explained in much greater depth by the great Alan Storm here. But for now just know that this is telling Magento that we are going to be using its built-in Javascript rending system. Magento will read this and then look to the file we are pointing to in our theme (Magento_Theme/js/custom-slider.js) and if it finds it, it will render that file onto this page and pass in the “target” parameter into that file. The * in the script could be the targeted HTML element itself, you will see that a lot in core code, but for us we are targeting anything on the page.
With that in place, lets save the page and then move to our theme and create the aforementioned Javascript file (app/design/frontend/CustomerParadigm/theme/Magento_Theme/web/js/custom-slider.js). Notice that the file path and the call to the file path are different. It’s a convention in the Magento 2 Javascript system to leave out parts of the path that are taken for granted (something I feel is a hindrance to learning and de-bugging this system) and so the “web” is left out as well as the “.js”. Inside that file, we will have the call to the slider and its parameters.
// File: app/design/frontend/CustomerParadigm/theme/Magento_Theme/web/js/custom-slider.js

define([
    'uiComponent',
    'jquery',
    'slick'
], function (Component, $) {
    'use strict';

    return Component.extend({
        initialize: function () {
            this._super();
            this._slider();

        },
        _slider: function() {
            var target = this.target;
            $(target).slick({
                adaptiveHeight: true,
                autoplay: true,
                autoplaySpeed: 2000,
                arrows: false,
                infinite: true,
                slidesToShow: 1,
                slidesToScroll: 1,
            });
        } //_slider()
    });
});
Here we have a good distillation of what a Javascript file in Magento 2 looks like. At the top we have the define of the dependencies that we will need in the file we are using. We are calling in the the uiComponent as the object that will be returned. We have jquery and then we have the slick slider itself. From there we pass the uiComponent into the script as Component and jquery as $ in an anonymous function.
The next part of the file might seem a little odd at first if you aren’t versed in a lot of “modern” Javascript, but you have a return statement that is returning the rest of our script inside the .extend() functions inside an object. It’s beyond the scope of this post what all is happening here, but just keep in mind that with all things Require JS in Magento 2, you have to return an object for every file that is called. The use of the uiComponent object means that we can extend that object and use it to act as the mediator that will facilitate the returning of our script. There are several ways in which this can be done in Magento 2, this is just one that works well in this context (it’s a worthwhile exercise to look through the core code and see all the different ways that this system is used. Doing a search for x-magento-init will bring up lots of examples). From there we run an initialize to first call this._super() and then our slider code. this._super() is a utility function very similar to PHP’s parent, where it will call the object that is being extended. There is much more to this, but time restricts us from going too deep. Just understand that by calling “this._super()” we are calling the parent object. After all that, we finally call our slider code, in the same way we would have in Magento 1, targeting the elements id, attaching slick and then passing in the parameters we want for that sliders functionality.
You might have noticed this line:
var target = this.target;
This is the passed in value that came from the cms page in the admin "target": "#homepage-top-slider". By passing this to our Javascript file, we can turn this script into the driver for any slider we might want on our site. Lets say we have 4 separate pages that require a slider with different images. We would be able to create these 4 pages in the same way we have with our homepage, and pass in the target element’s id of each to the same Javascript file. This reduces complexity, as well as makes the control for each slider centralized into one place.
We now have the call to the slider’s declaration in the home page and we have the file that runs the script, now we just need the slider itself. While there are many great sliders out there, I really love Slick, and that is what we will be using here. Get it from Ken Wheeler’s site. Once you download the files, upload the Javascript file to the same location as our other file (app/design/frontend/CustomerParadigm/theme/Magento_Theme/web/js/slick.min.js). Also grab the css file from the download that we need for the styles (app/design/frontend/CustomerParadigm/theme/Magento_Theme/web/css/slick.css). We need to load these styles into the site, and we will do that by simply calling it in the head of the site with some xml (app/design/frontend/CustomerParadigm/theme/Magento_Theme/layout/default.xml).
<!--File: app/design/frontend/CustomerParadigm/theme/Magento_Theme/layout/default.xml-->

<?xml version="1.0"?>
<page xmlns:xsi="http://www.w3.org/2001/XMLSchema-instance" xsi:noNamespaceSchemaLocation="urn:magento:framework:View/Layout/etc/page_configuration.xsd">
	<head>
		<css src="css/slick.css" />
	</head>
</page>
There are a lot of ways to use css in Magento 2, and we don’t have time to cover them all. There is an included LESS file with Slick that can be used with Magento 2’s build in LESS compiler, but for simplicity we will just load our styles in the head.
The next step is to “register” the Javascript file with Require JS so it knows where to find it and load it. That happens in the requirejs-config.js file (app/design/frontend/CustomerParadigm/theme/requirejs-config.js). For each theme (or module) you only need one living in your theme’s root, and will manage all the Javascript files. In ours, we just have the simple registration of the Slick slider so that it can now be used site wide.
// File: app/design/frontend/CustomerParadigm/theme/requirejs-config.js

var config = {
    map: {
        '*': {
            slick: 'Magento_Theme/js/slick.min'
        }
    }
};
After adding these new files, we are going to have to recompile (so the files can be copied over to the pub/static folder), so run the php bin/magento setup:static-content:deploy from the root of your site and after it’s done clear the cache for good measure with php bin/magento cache:clean. When you refresh your homepage, you should now have a fully working slider.
Closing Thoughts
The way Javascript is implemented in Magento 2, while it may take you a little while to get used to, is leaps and bounds ahead of Magento 1. Require JS brings order and organization, not to mention ease of use, when it comes to Javascript and Magento. I hope with the information outlined in the post you have a better understanding of the “why” the system is set up the way it is and you are now able to begin correctly implementing your Javascript ideas.
Want to join us for our next Colorado Magento Meetup? Learn more and RSVP here!
Need help with your Magento store? Our team of Certified Magento Developers is here for you. Connect with us today and start reaching your eCommerce goals!

About Mike Stacey
Mike is a Lead Developer at Customer Paradigm.