|
Today, I’m going to run through a review of the new Nexcess cloud hosting system.
They’ve created an easy to use system that includes auto scaling (in case you have a ton of users hit your site), as well as built in caching and accelerator support.
When I was at the Magento Imagine conference a couple of weeks ago, the folks from Nexcess ran me through the new system. Below, I’ve gone through the account set up, run speed tests, and have outlined why this might be a great option – especially if you need hosting that can auto scale auto-magically, as well as having a phone number to call if you need support.
For more information, you can visit here >>

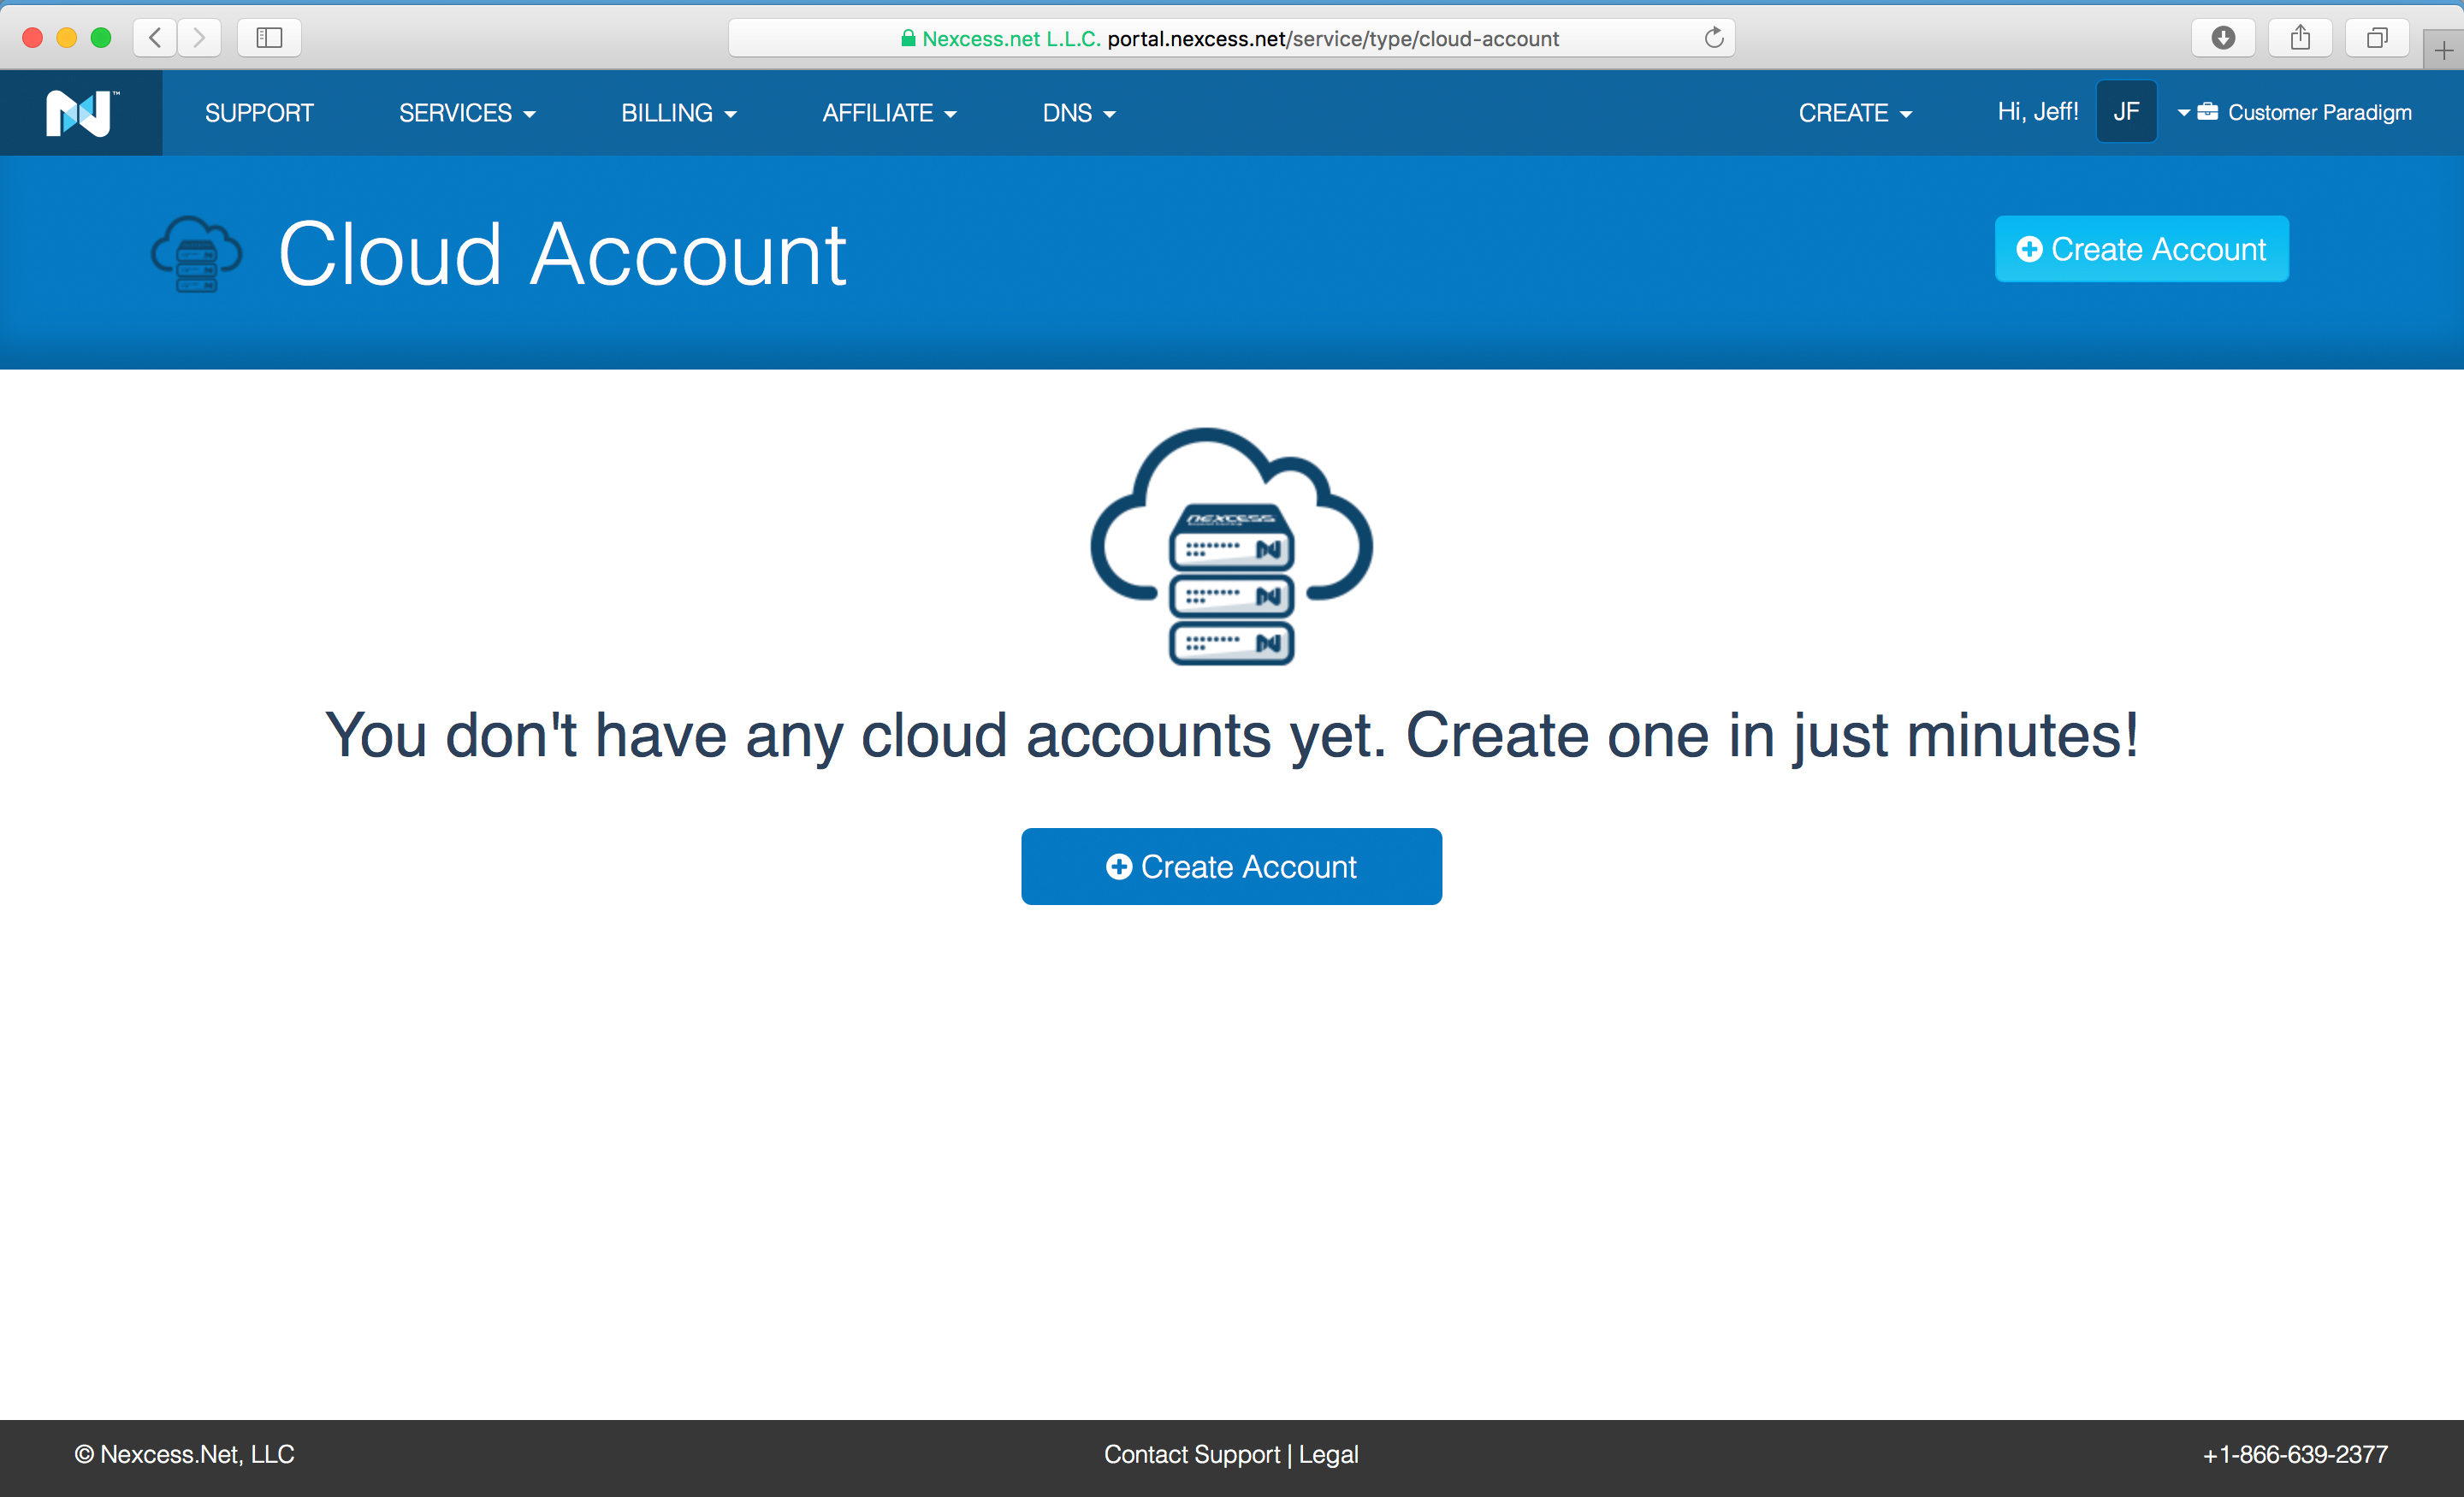
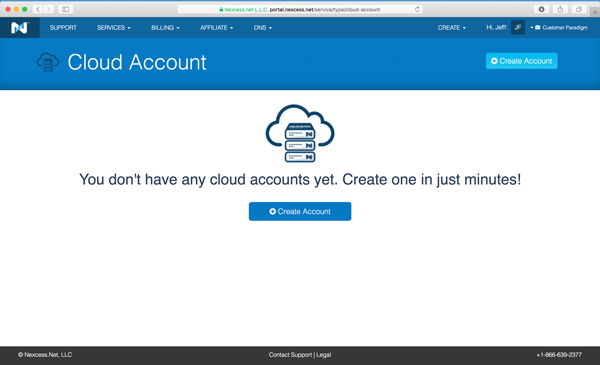
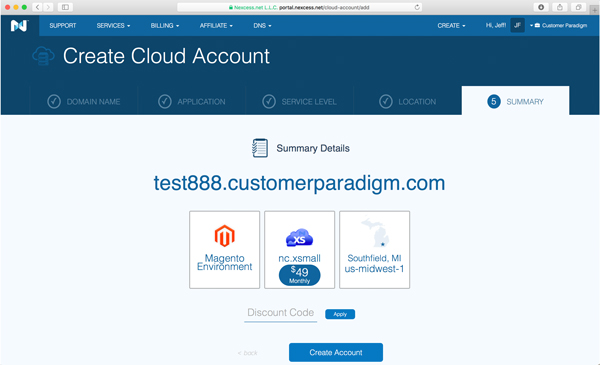
Step 1 – Create A Cloud Account.
Creating a cloud account is pretty quick and easy, and is all menu driven:
View larger screenshot >>
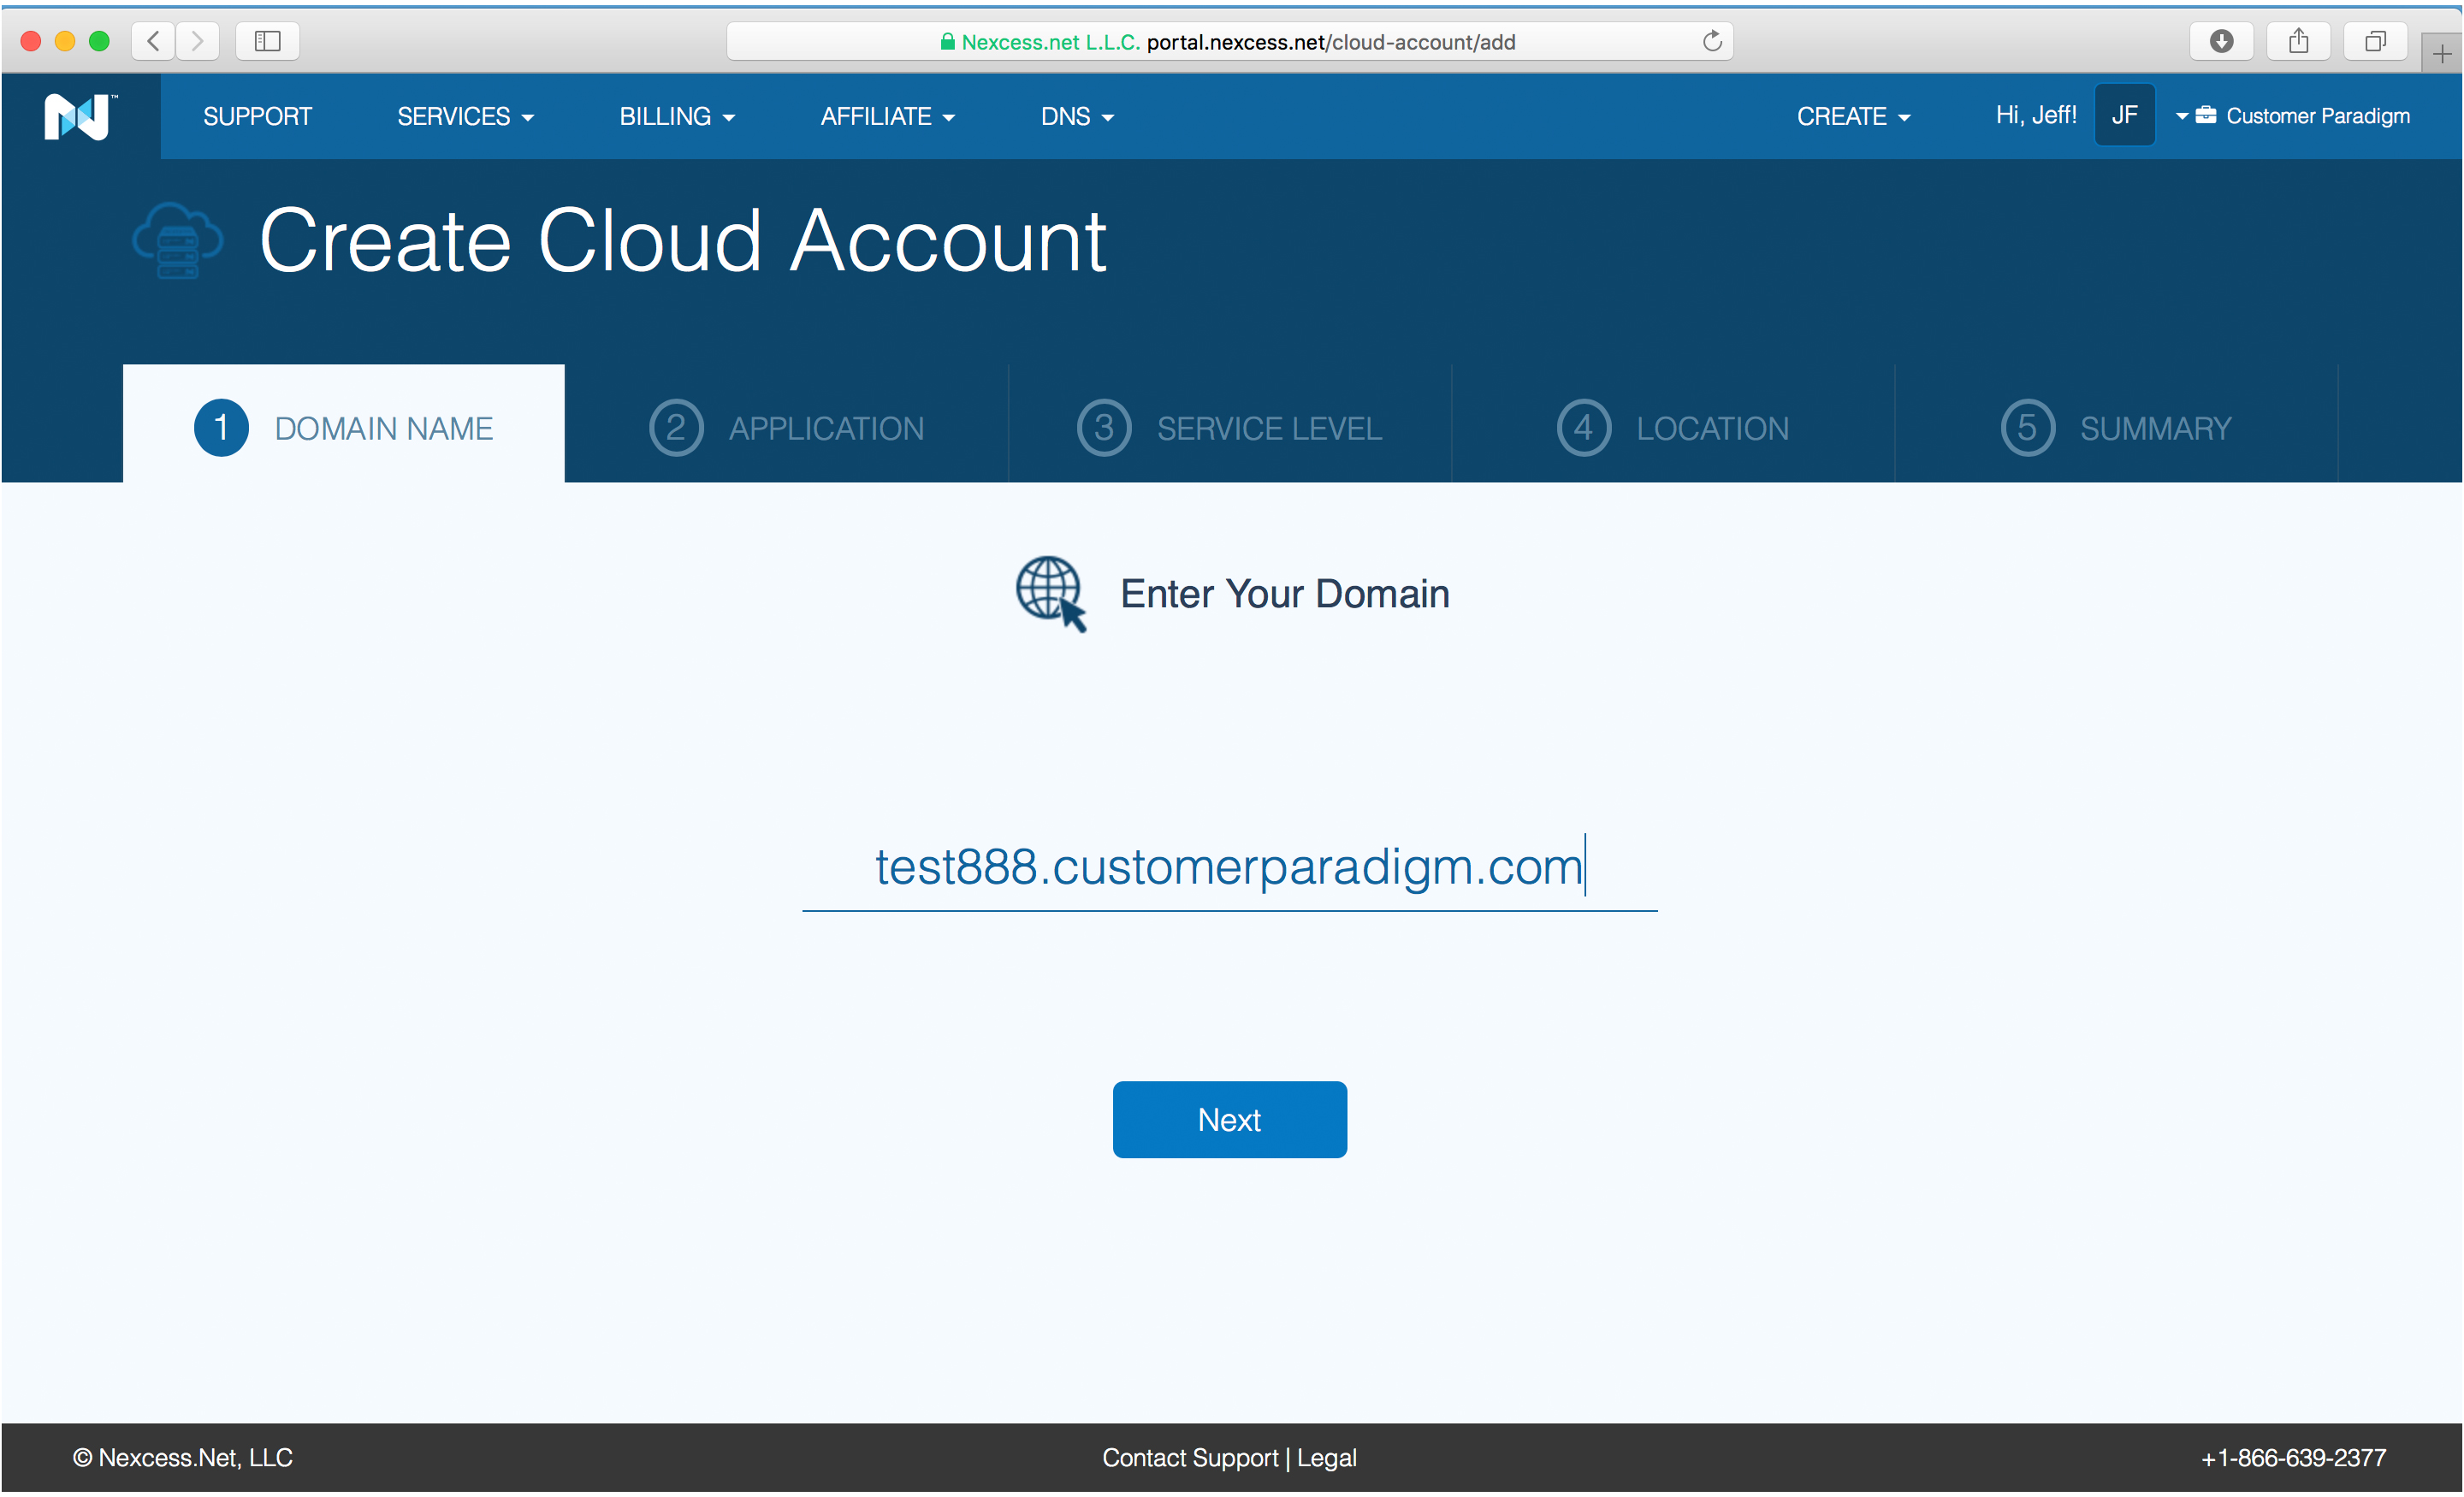
Step 2 – Enter Your Domain.
Next, you enter in your domain name. In this case, I’m using the test888.customerparadigm.com domain:

View larger screenshot >>
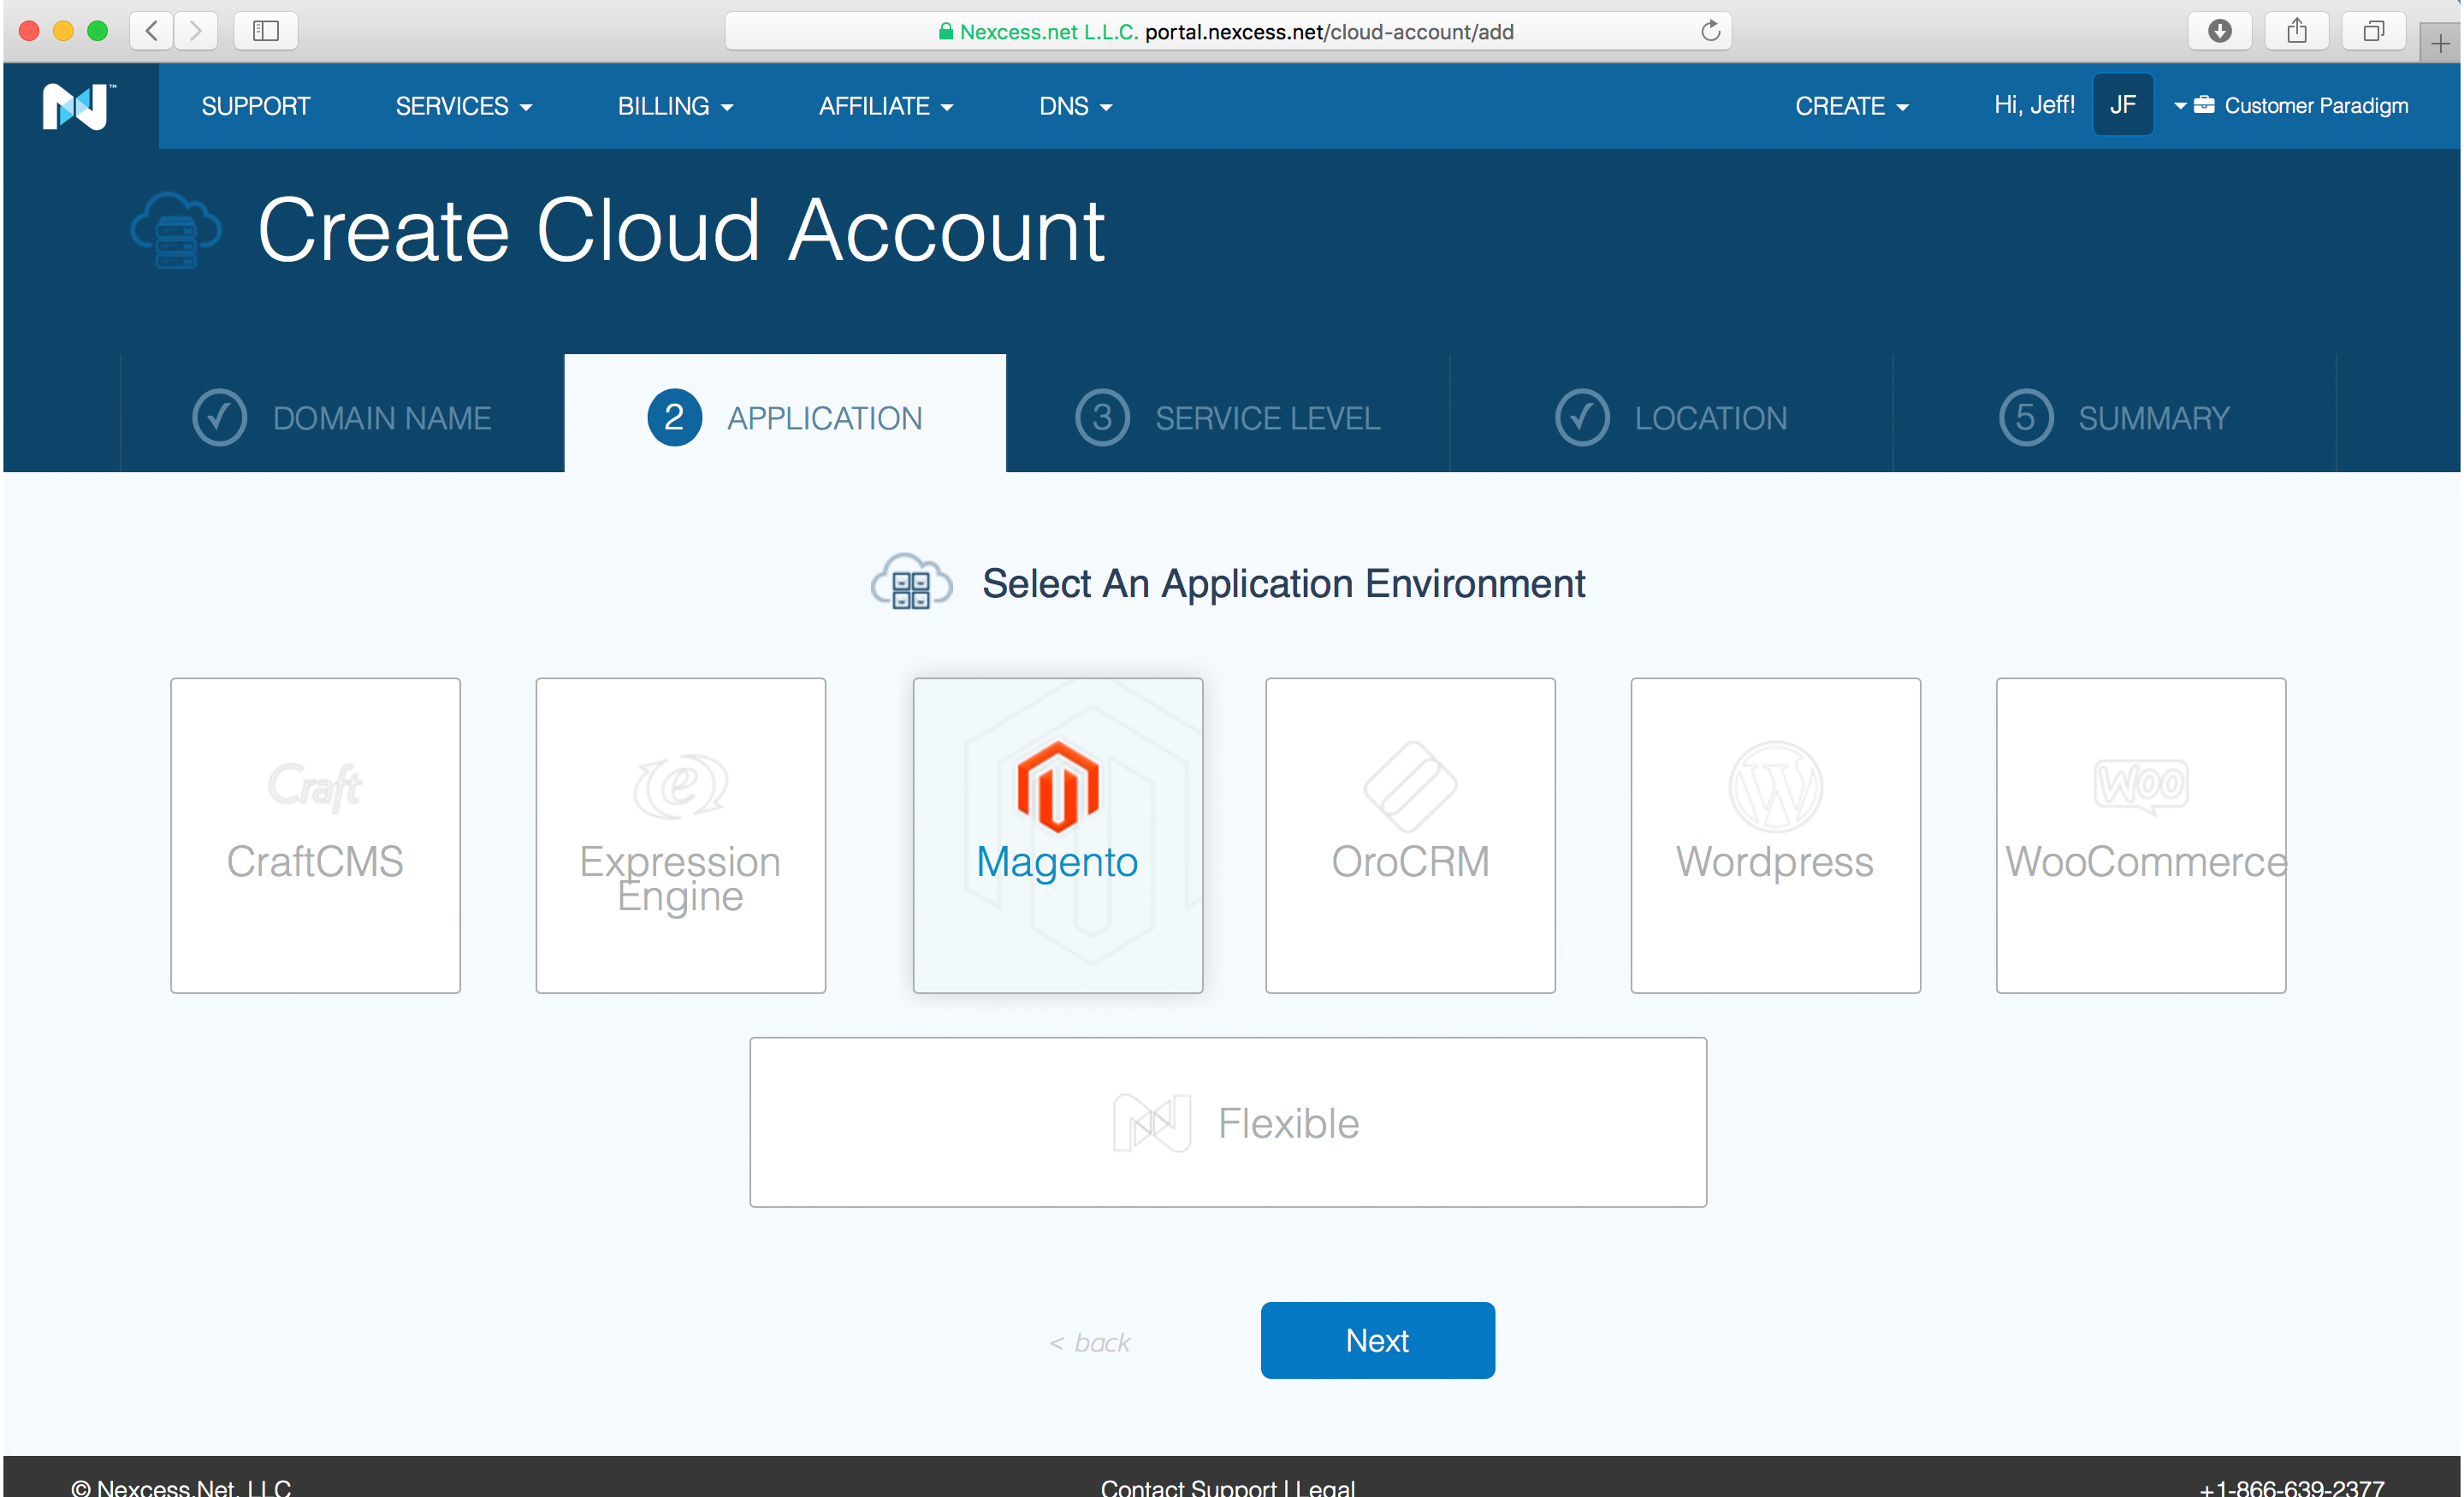
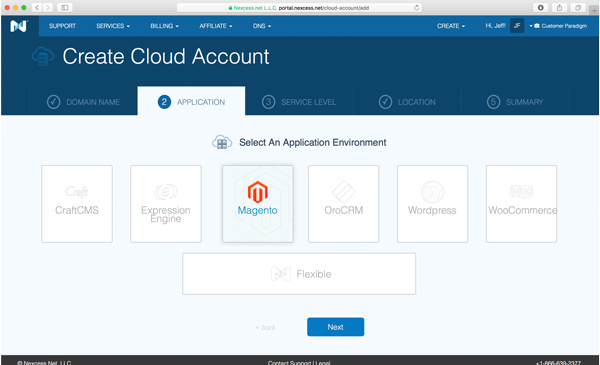
Step 3. Select An Application Environment.
You can select CraftCMS, Expression Engine, Magento, OroCRM, WordPress, WooCommerce, or a flexible plan, where you can choose the server configuration.
I, of course, chose the Magento option:
View larger screenshot >>
You can select the auto-install, where it will also install a full, base version of the latest version of Magento (in this case, 2.2.4, which had been released earlier that week). Or, you can simply have it spin up an optimized environment for a Magento site, and you can upload your own site that you’ve built out elsewhere.
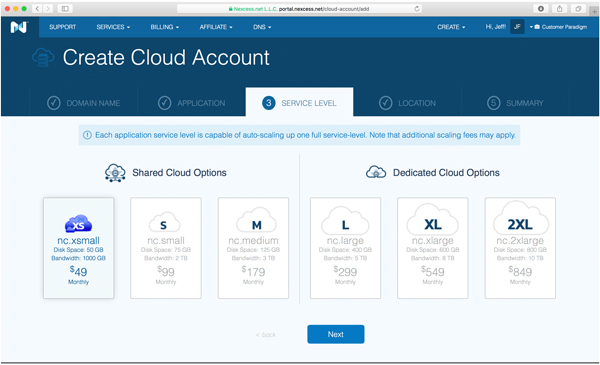
Step 4. Size of cloud server.
I chose the most inexpensive option, the nc.xsmall at $49 per month:
 View larger screenshot >> View larger screenshot >>
Now I do realize that other cloud hosted servers of a similar size may be less expensive, but something like AWS does not come with 24×7 tech support, as well as auto-scaling, caching, daily backups and acceleration.
Here’s the confirmation page:
 View larger screenshot >> View larger screenshot >>
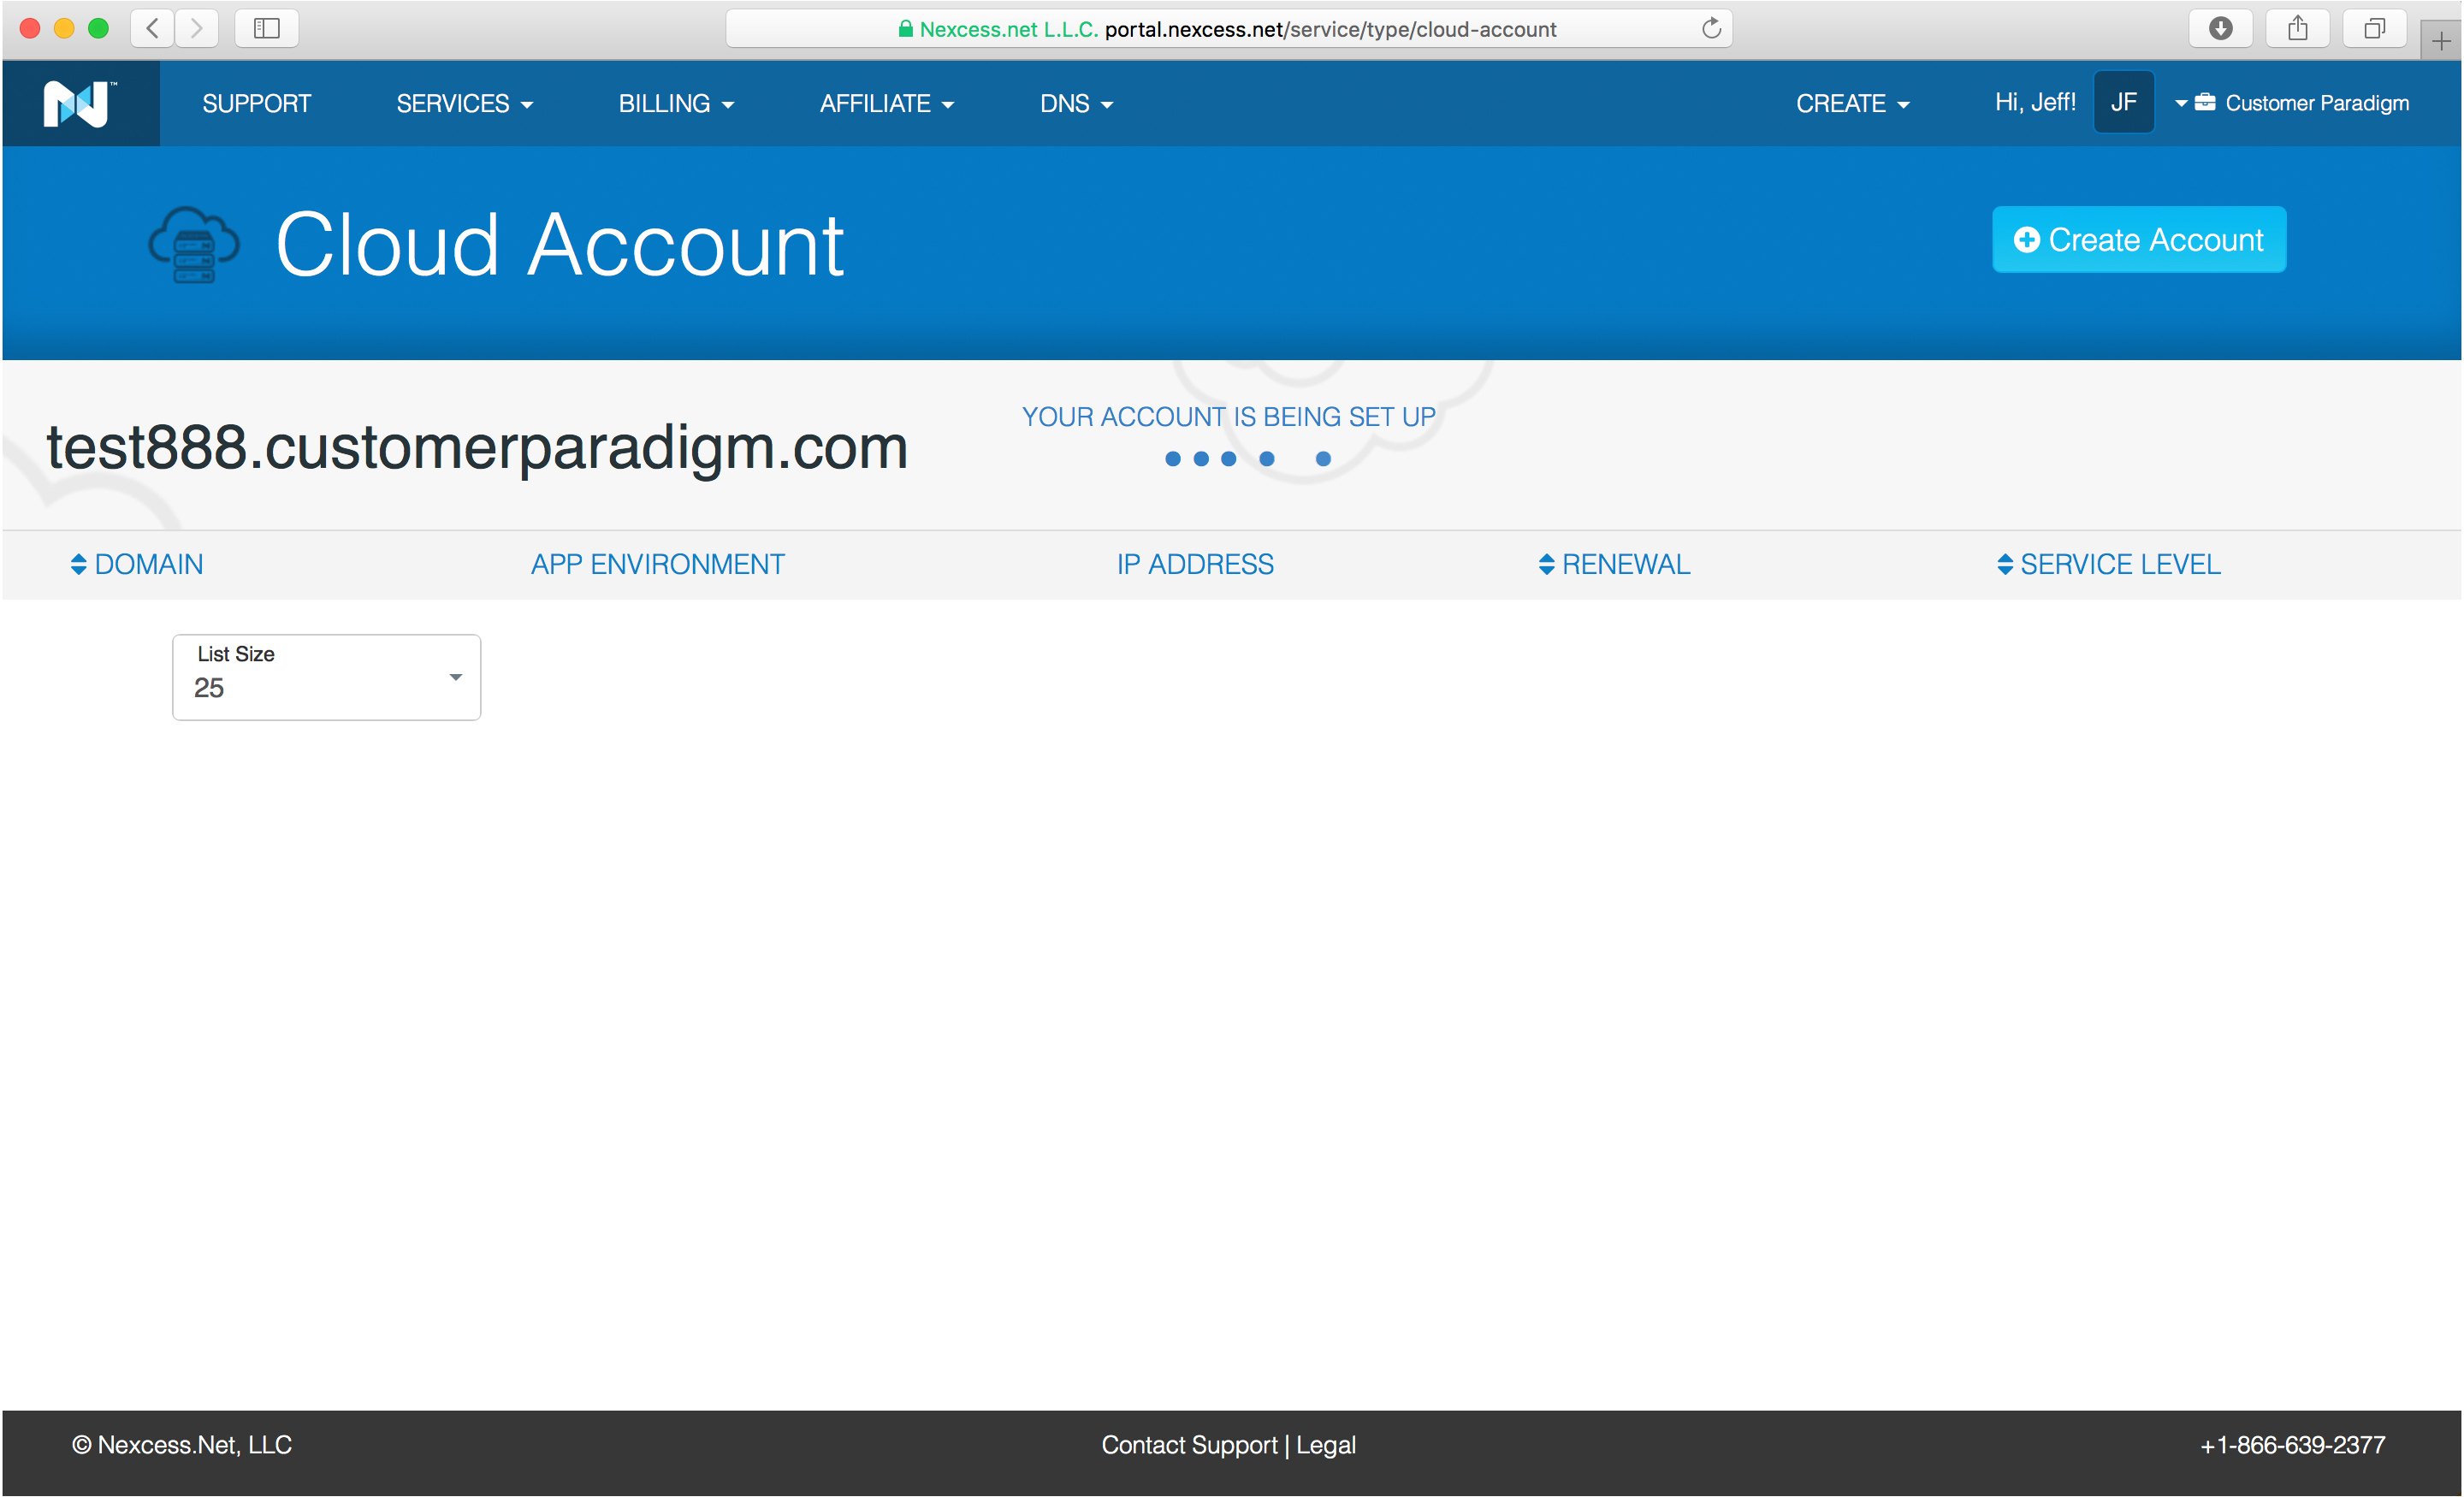
Step 5. Cloud account is being set up.
It took just a couple of minutes for the account to be set up, including the server environment to be provisioned, mySQL databases to be setup, and the Magento application to be installed:
 View larger screenshot >> View larger screenshot >>
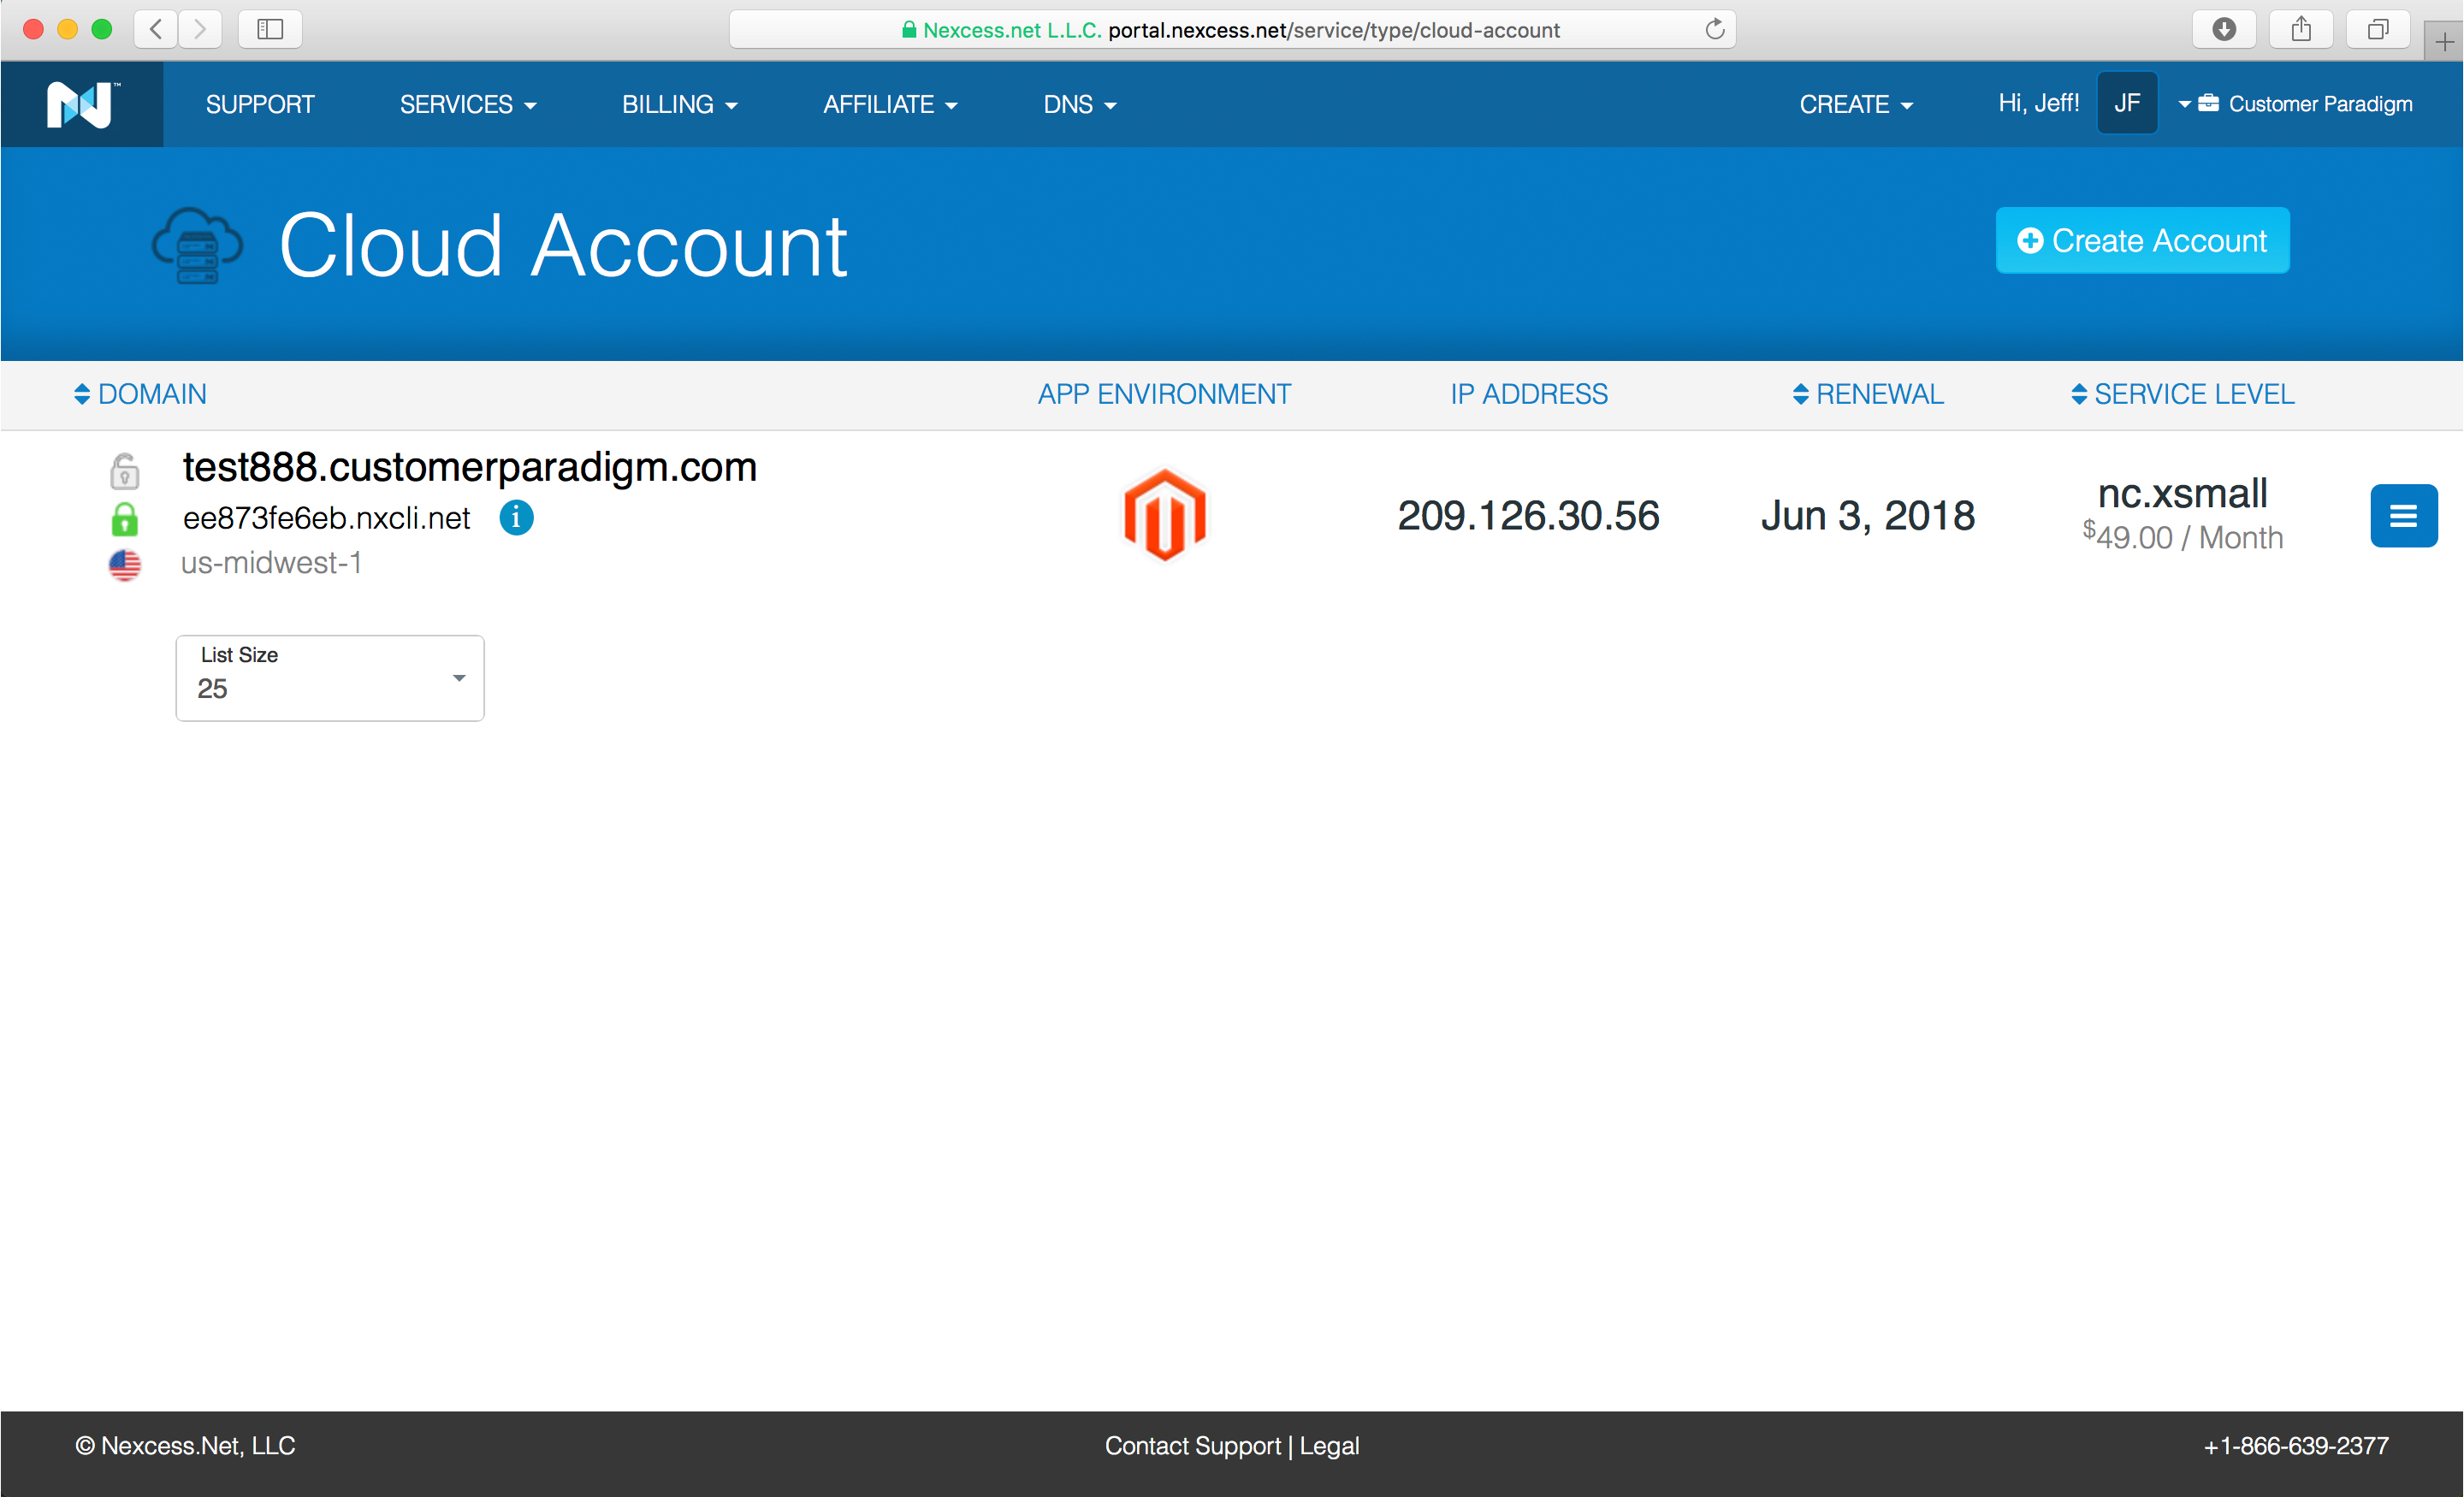
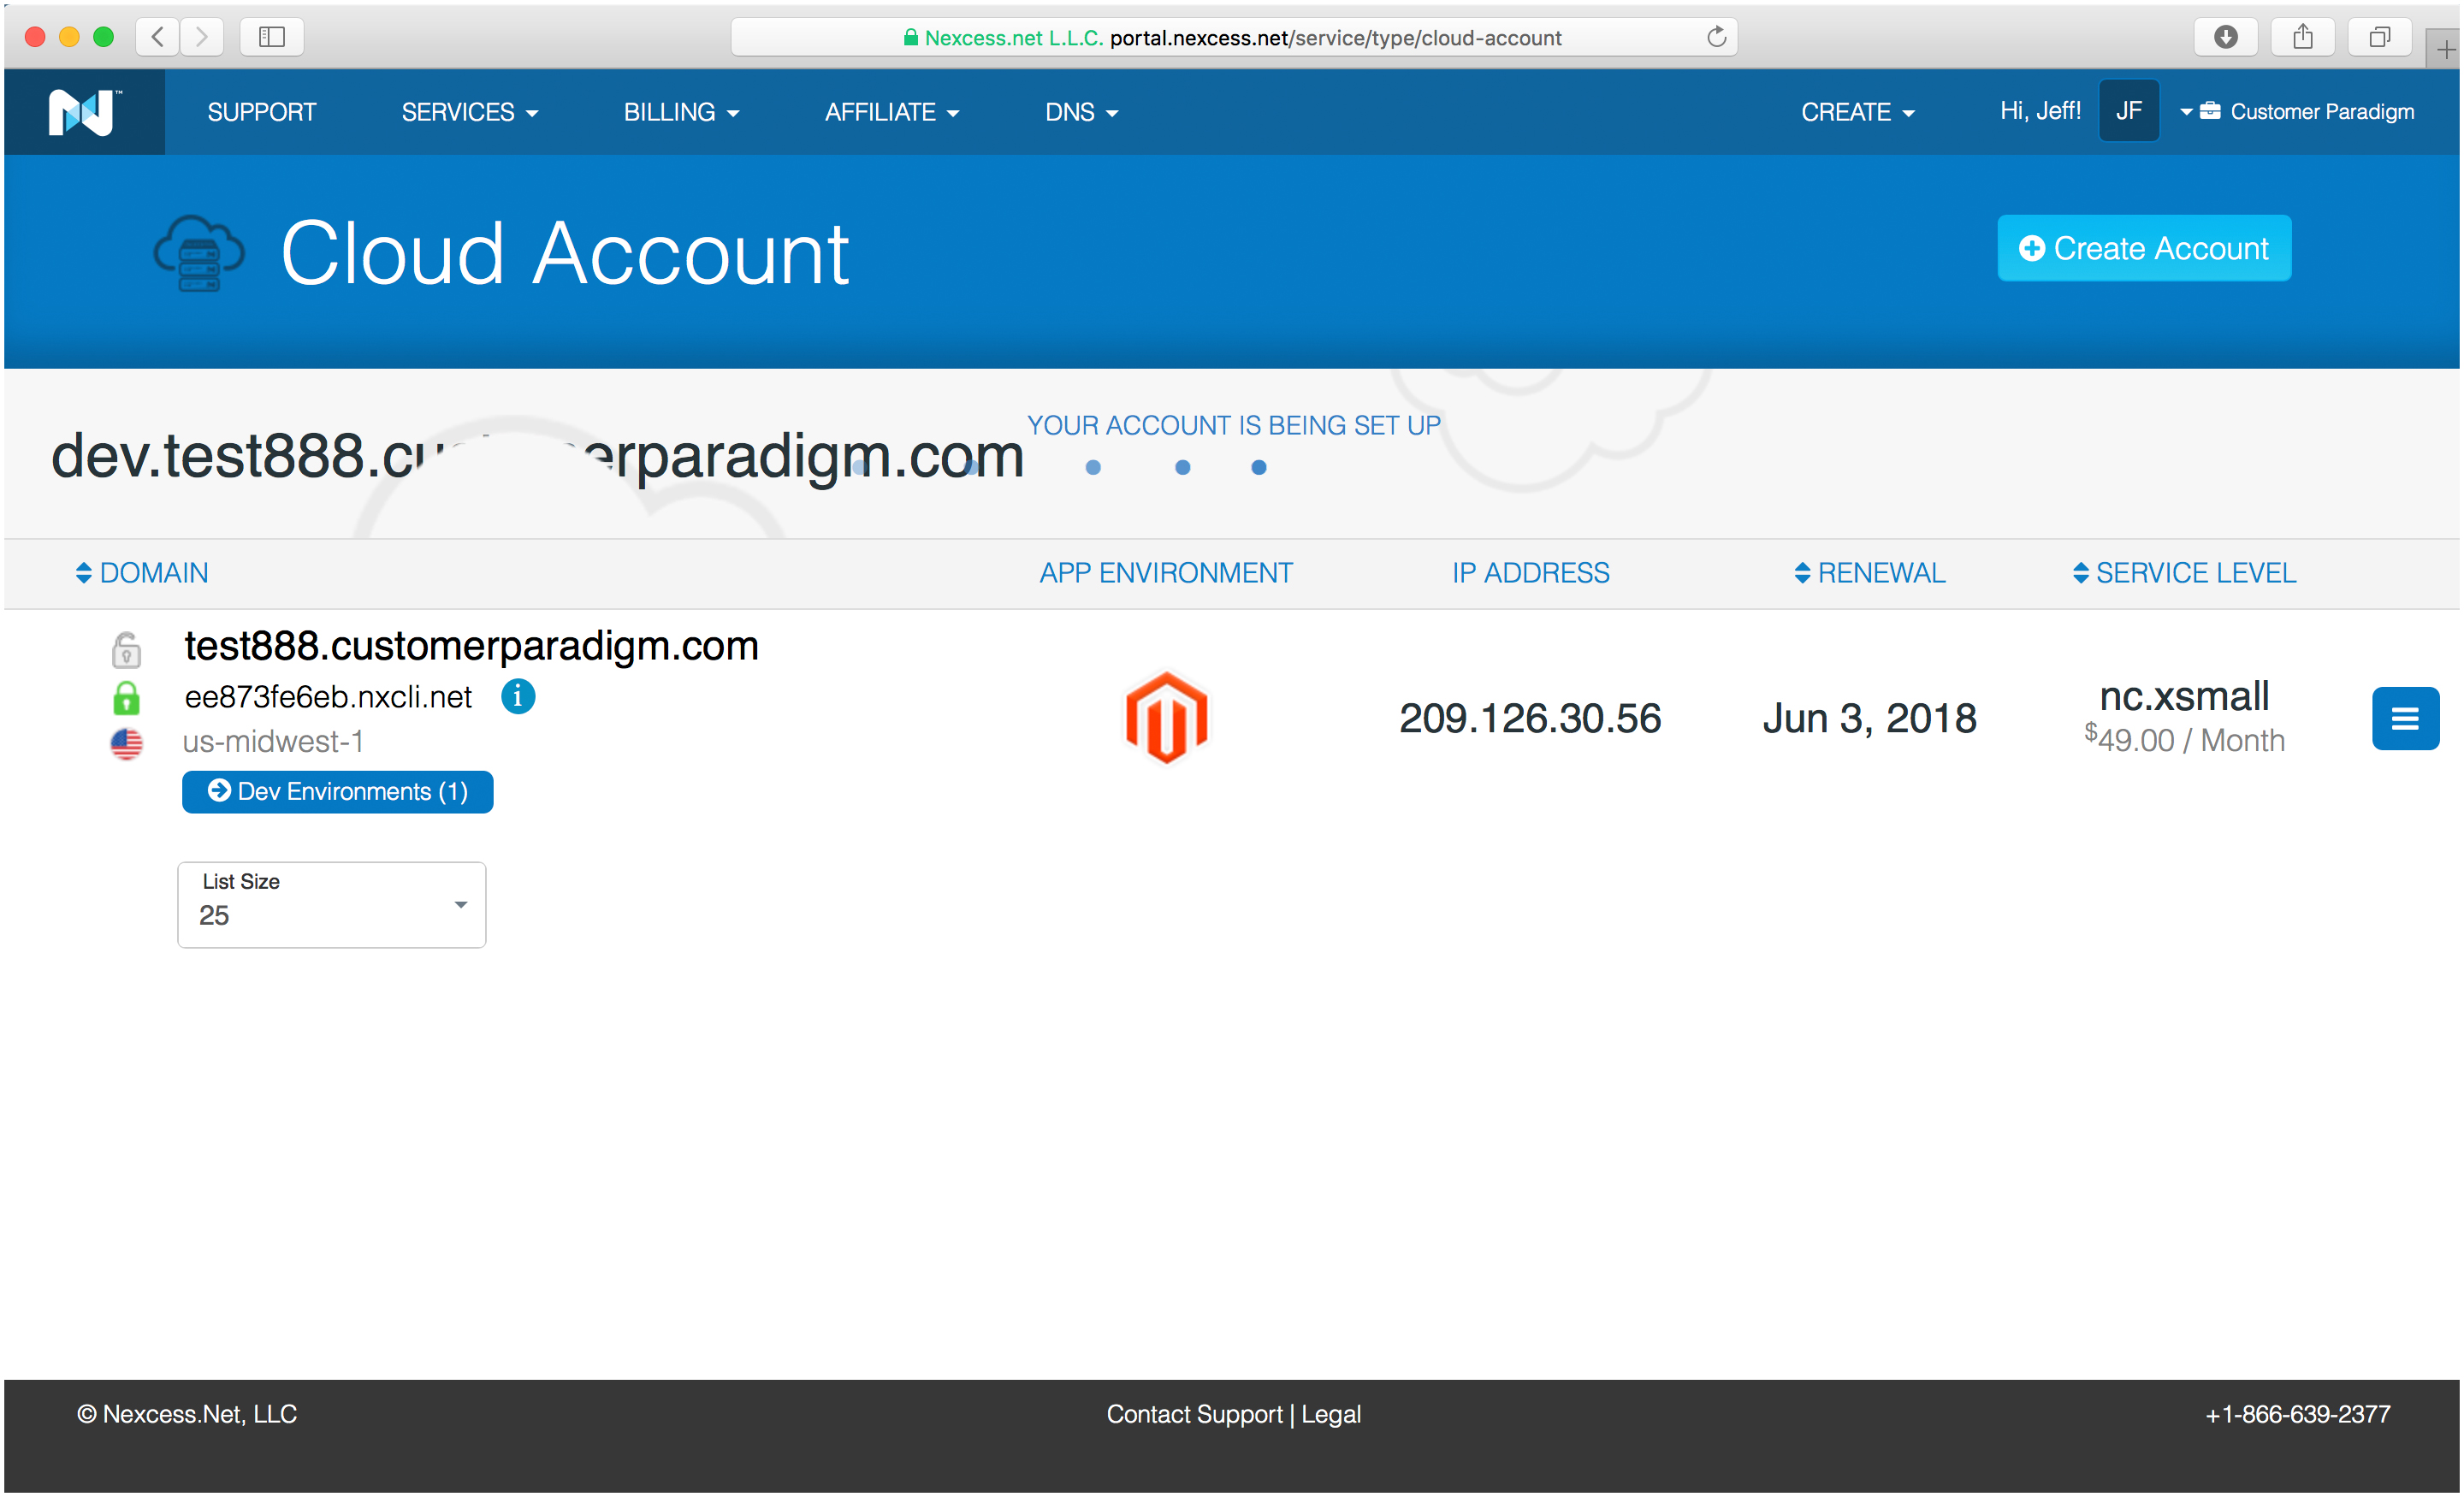
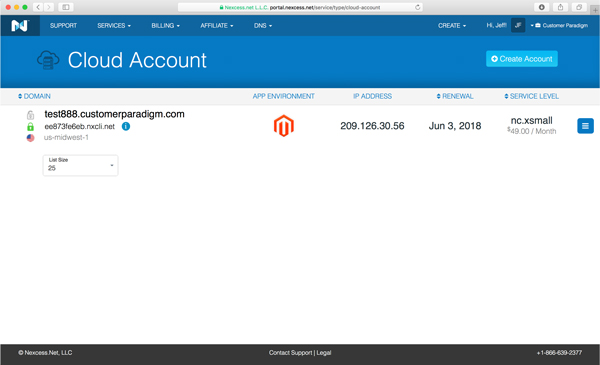
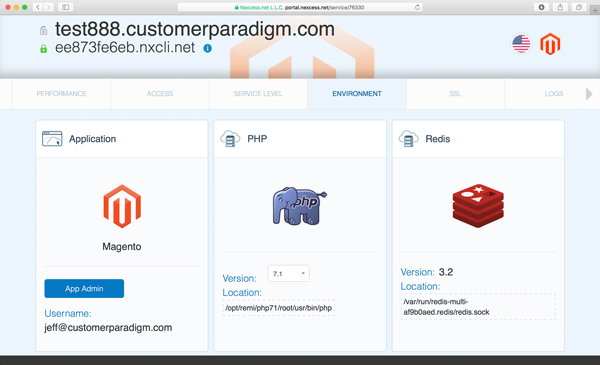
Step 6. Cloud account is active.
Once the cloud account was active, it listed a few key pieces of information:
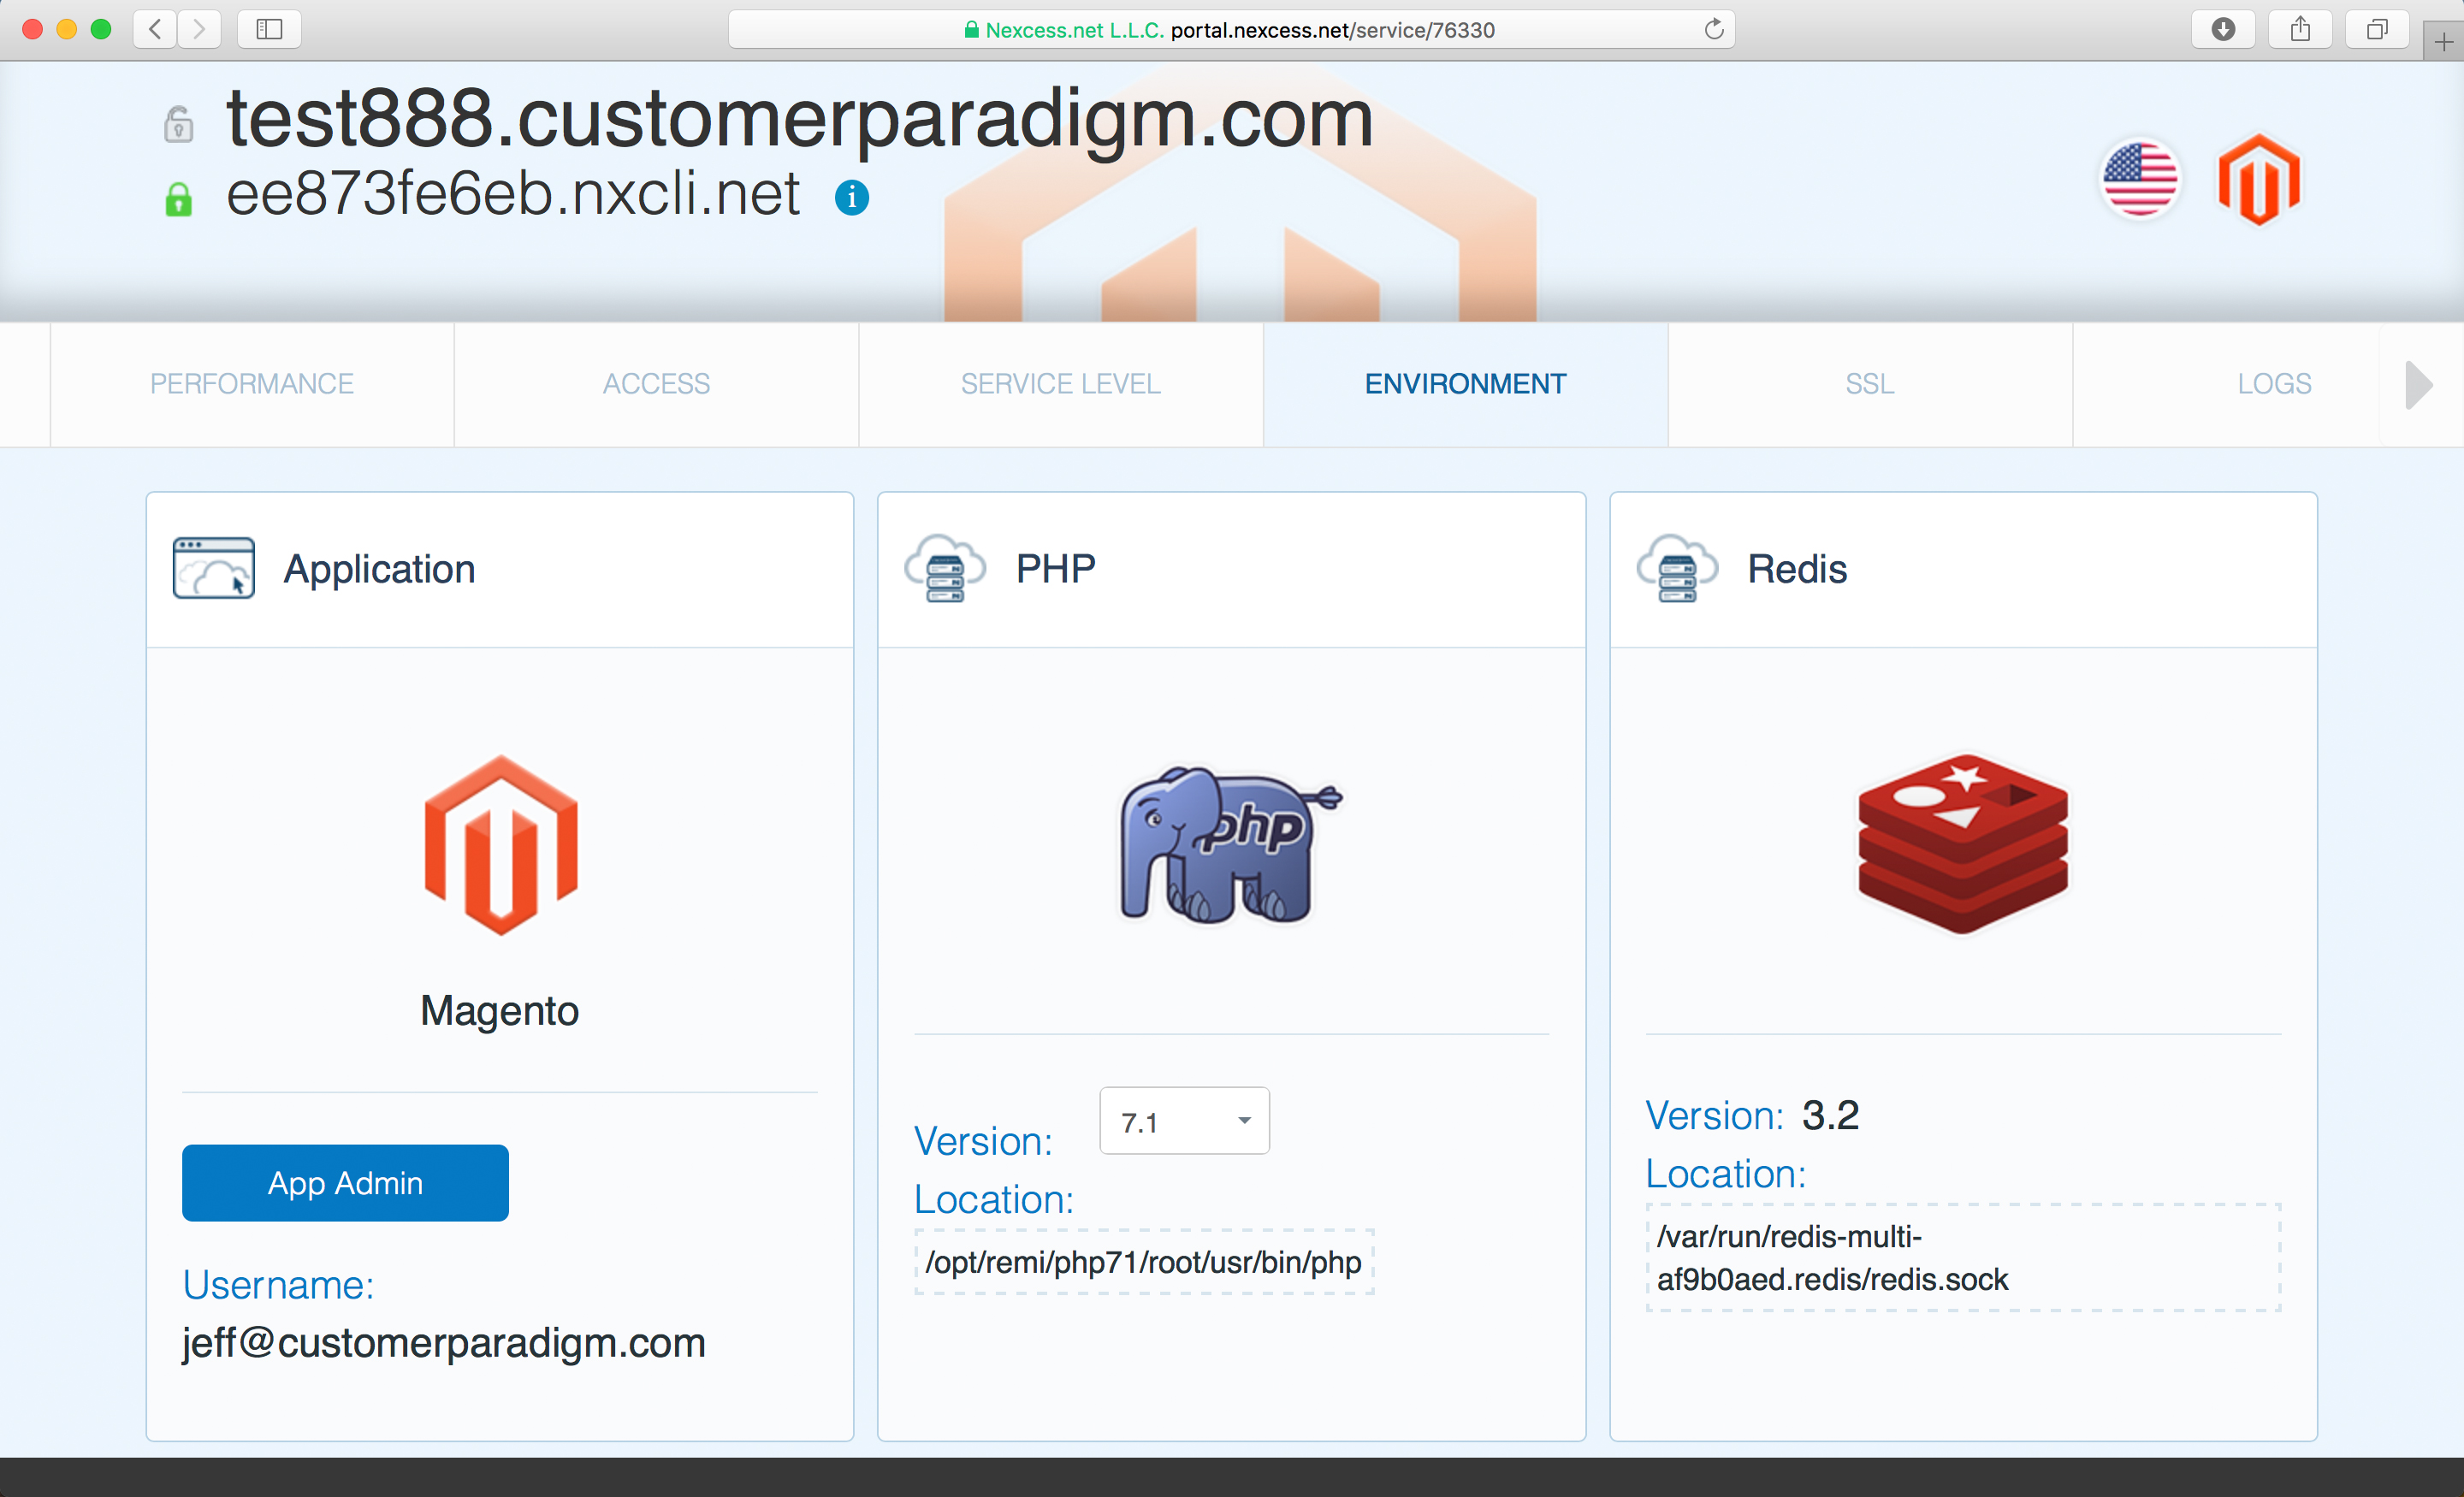
- The domain name (test888.customerparadigm.com)
- The temporary domain name (ee873fe6eb.nxcli.net); this has SSL configured on it.
- The cloud hosting zone is listed as well. In this case, it’s the US-midwest-1 cluster.
 View larger screenshot >> View larger screenshot >>
- The App environment is Magento
- The IP address of the system is listed; I went into my DNS control panel and created an A record that pointed to the IP address.
- The renewal date is when the credit card on file will be charged (one month from when I signed up).
- Service level – nc.xsmall, at $49.00 per month.
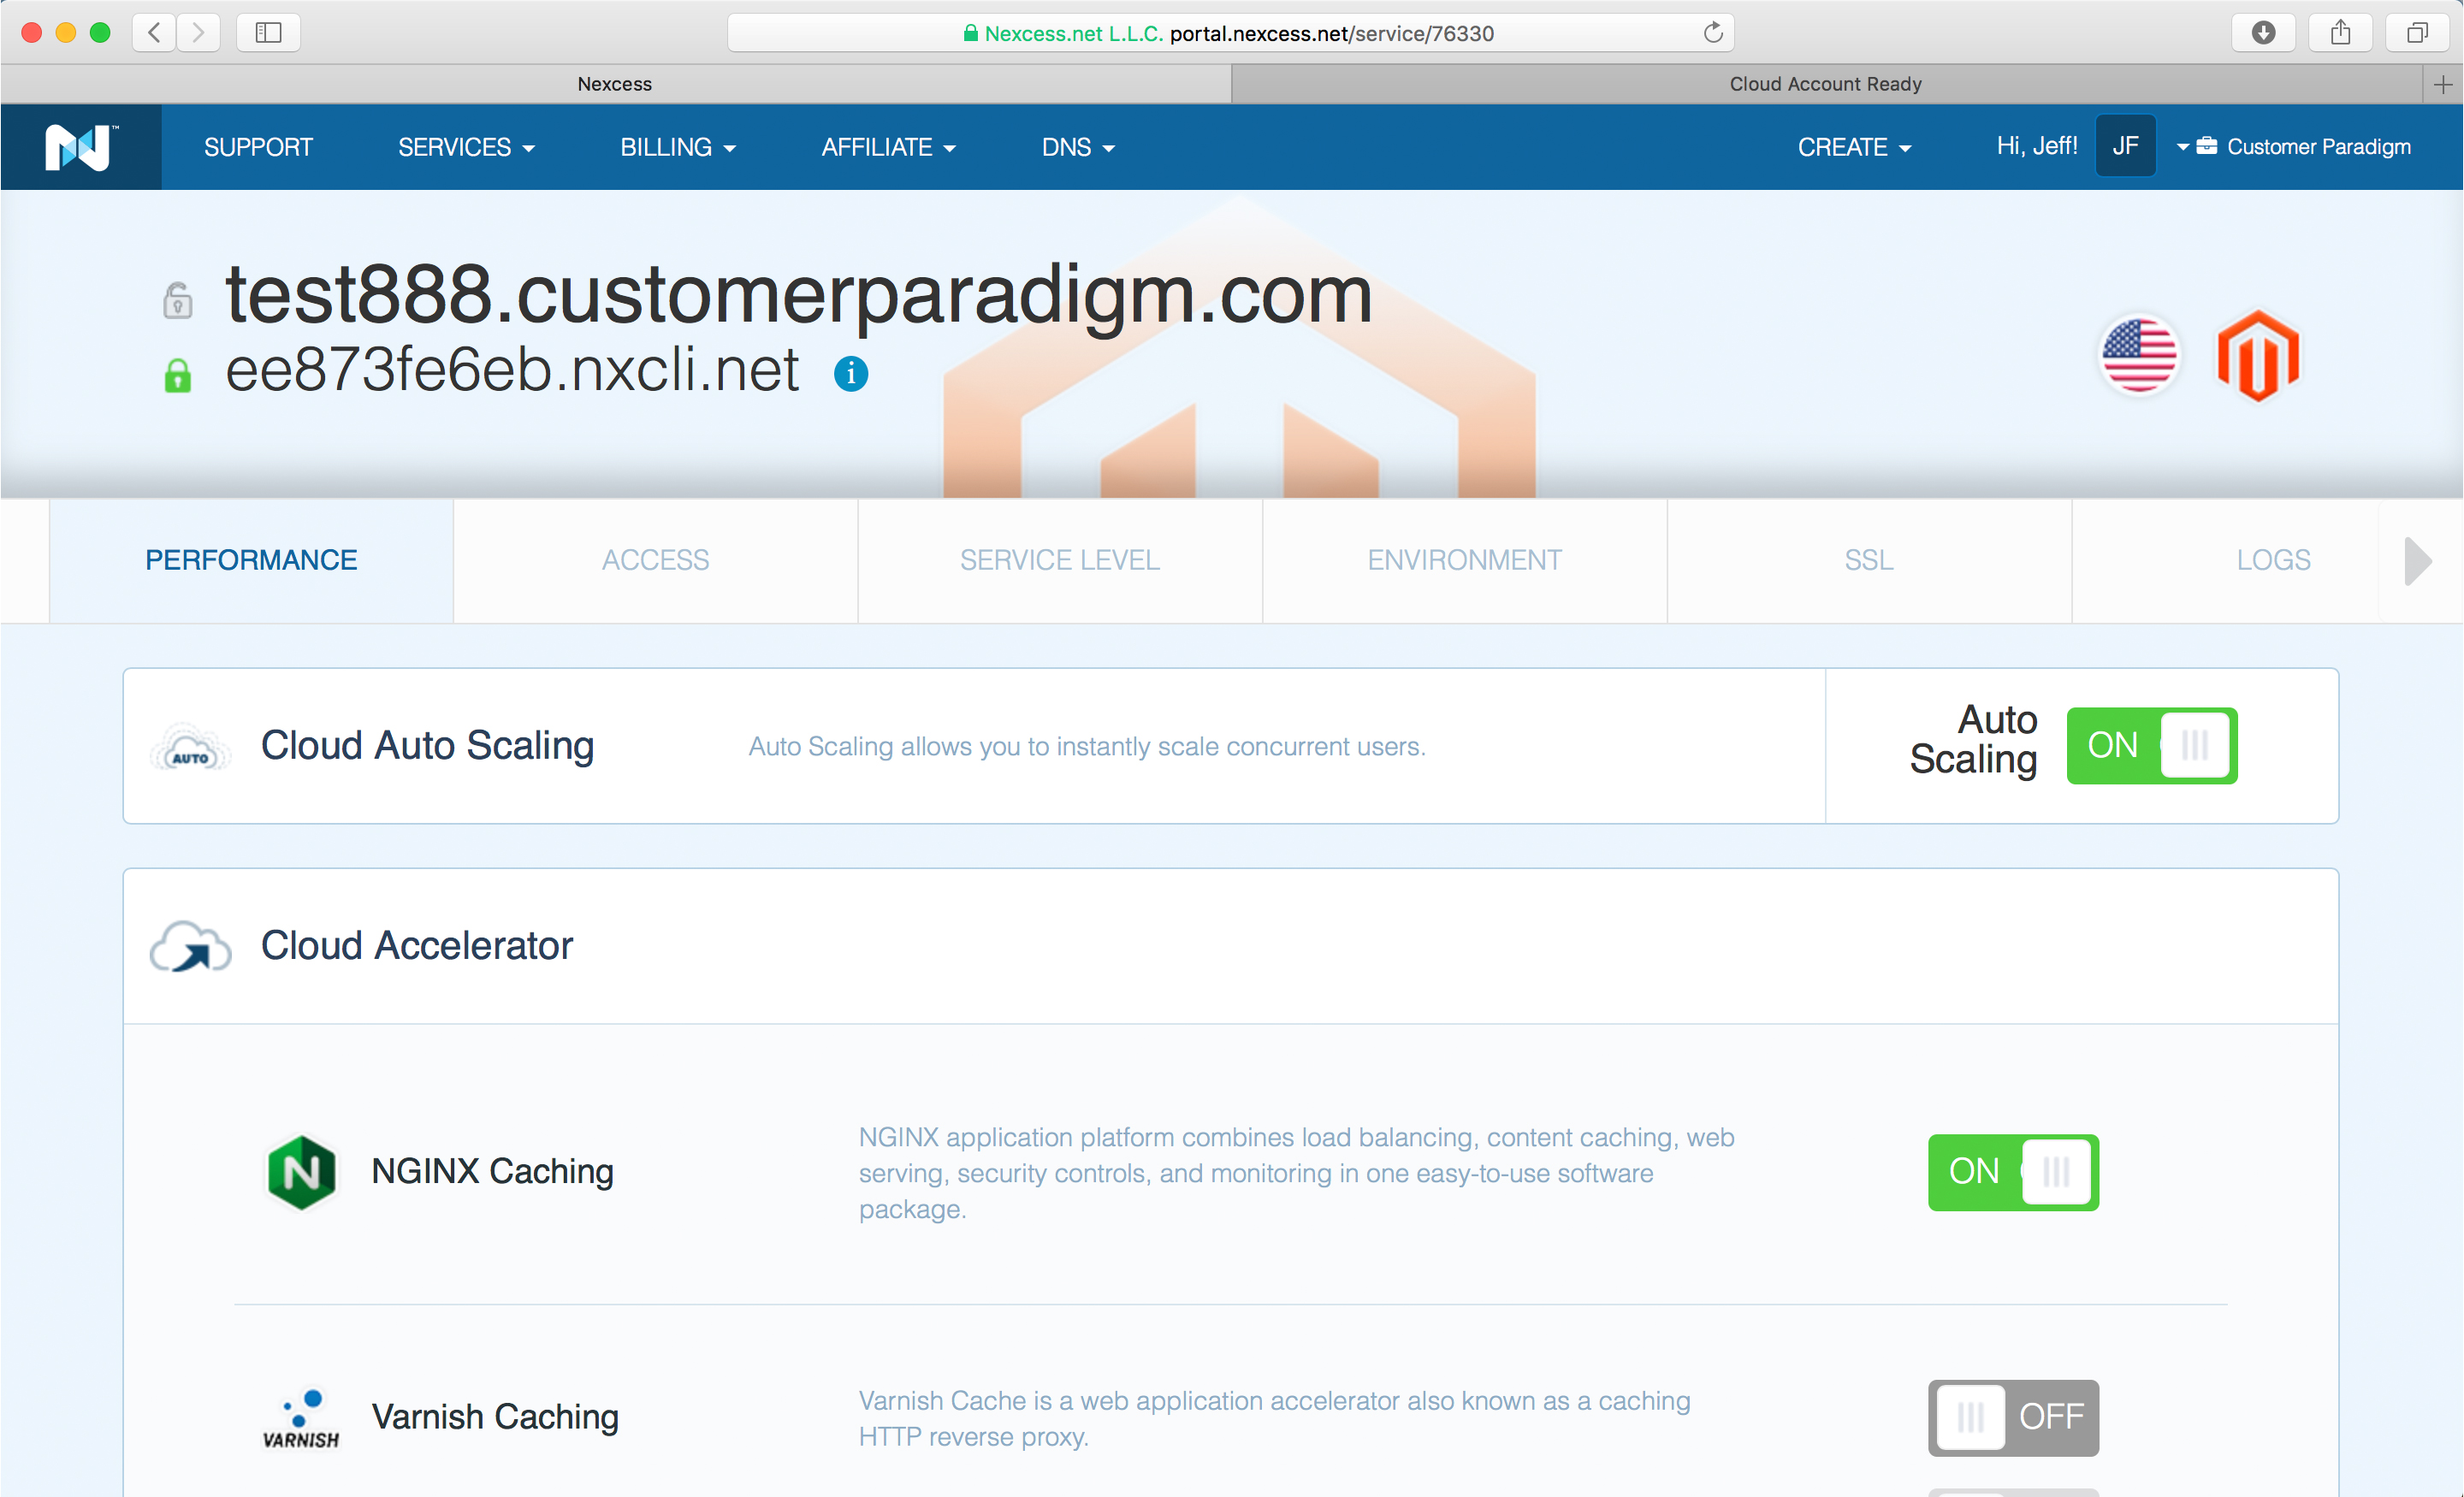
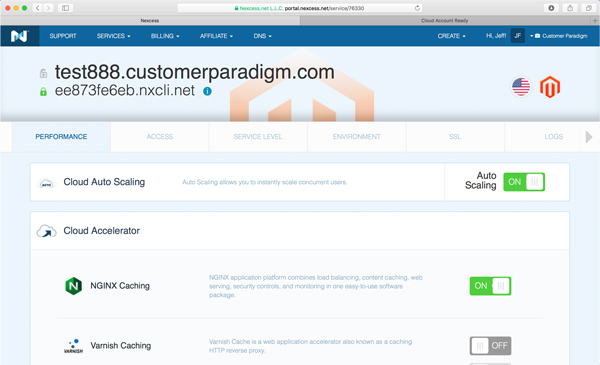
Step 7. Performance Tab:
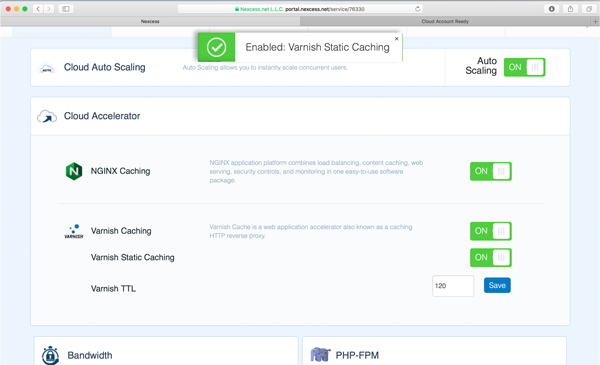
On the performance tab for the Cloud account allows you to set the auto scaling and caching systems:
 View larger screenshot >> View larger screenshot >>
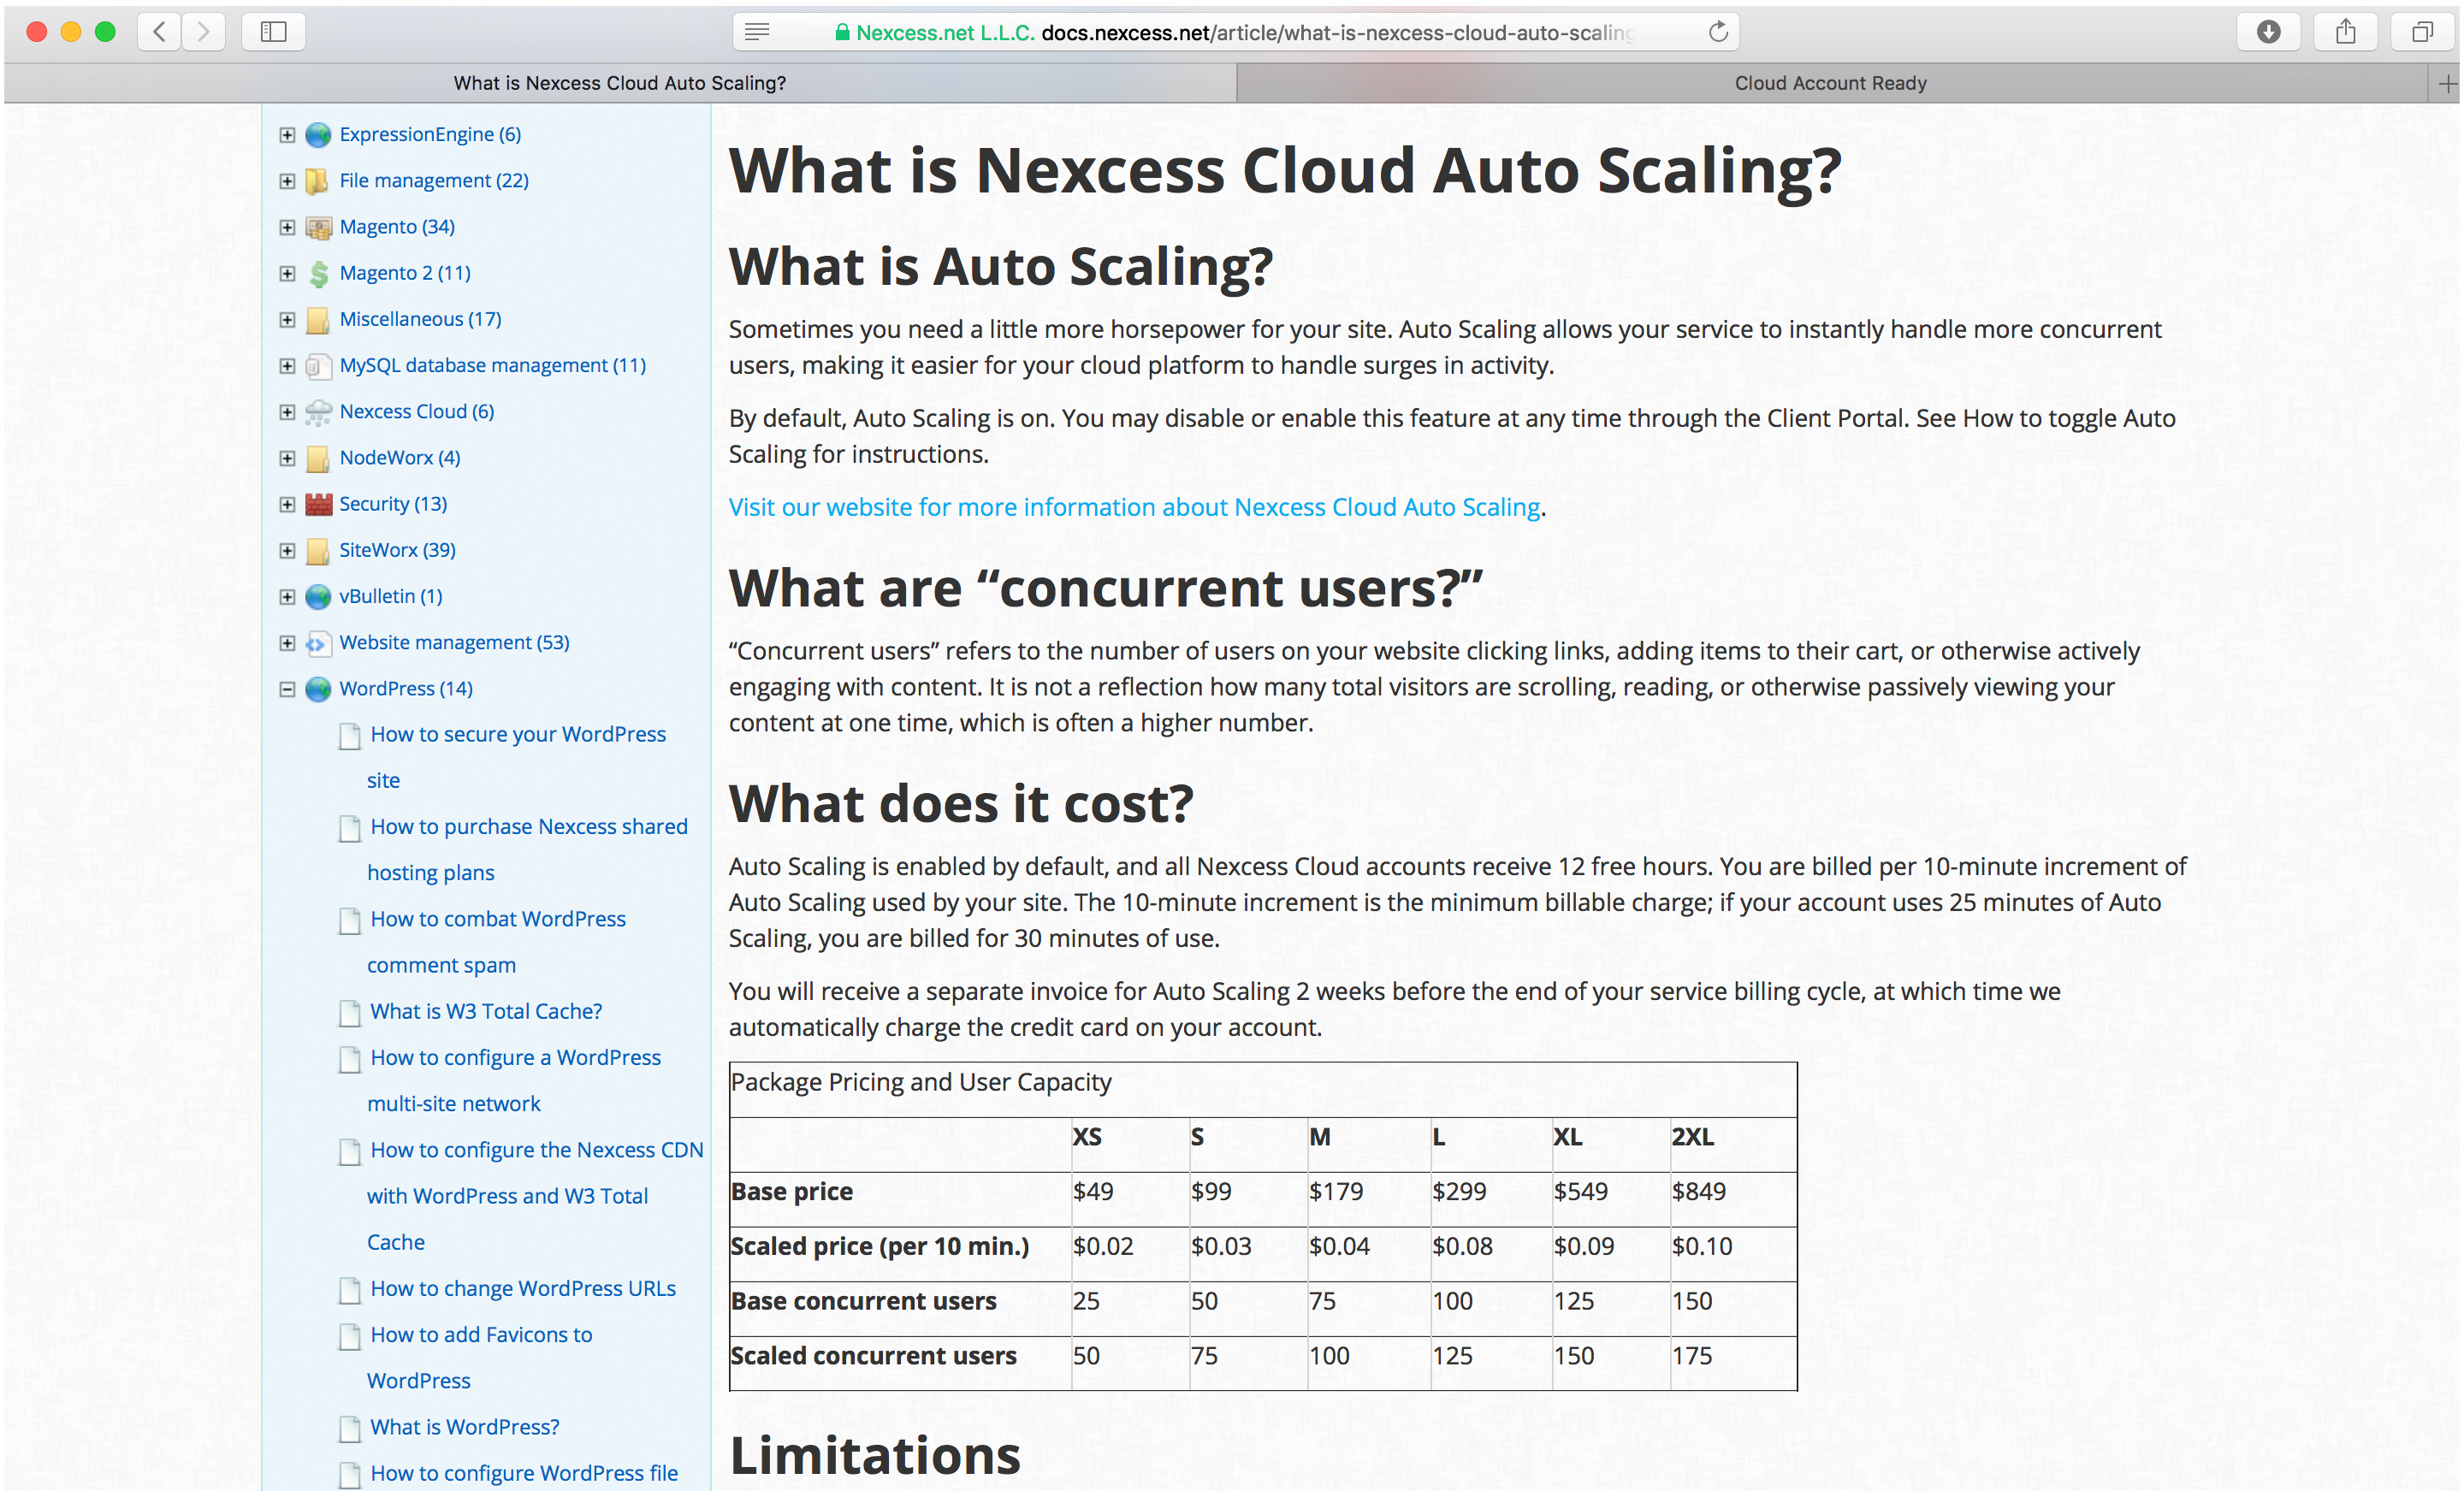
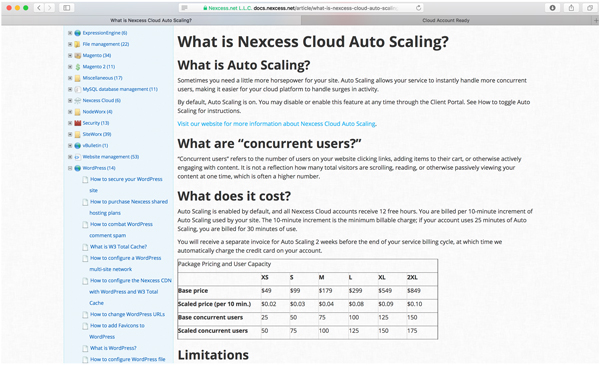
First, the Cloud Auto Scaling allows your site to instantly double the number of users your system can handle, based on traffic levels. This is a huge deal. In the past, a site would have to provision and build out a server for the highest number of users at a traffic spike.
Other systems like AWS that can auto scale can take a little while to warm up; we’ve seen some of these systems not perform well without a lot of testing and fine-tuning.
The Nexcess cloud auto scaling will allow you to have double the number of users on the system for up to twelve hours, without additional charges. At that point, you can pay by the hour, or upgrade the service to the next level – at which case your site can auto scale to the next level of users:
 View larger screenshot >> View larger screenshot >>
This is a huge deal – I’ve worked with many clients in the past to set up auto scaling, and seen epic failures. Like systems that were supposed to auto-scale and crashed instead. Or systems that spun up the wrong disk image. Or systems that failed, but there was nobody to call….
Second, while the Nexcess auto scaling allows you to safeguard against big traffic spikes, the cloud accelerator allows you to reduce the load on your site so it can handle more traffic.
When an end visitor goes to a normal site (without caching turned on), a website has to "build" the entire page. The home page may have 150+ different calls to different files or database lookups to fetch new products, pricing or special promotions. And that can take time. For a complex site with no caching, that could take 3-10 seconds of server time to render.
The issue is that the server has to do this same process for each and everyone going to the home page of the site.
With caching, the home page can be saved, so that the server doesn’t have to work so hard to create it again and again for each new user.
Magento has many different layers of caching within the application; for this test site I turned on full page caching, and put the site into production mode. This essentially pre-build all of the pages on the site, including the home page, product pages, category pages and more.
But even with this on, the pages for the site are served from the slower file system.
With NGINX Caching turned on, the site still will use Apache to handle normal Magento requests, 301 redirects and more. But NGINX will allow for load balancing, content caching off of the server, and additional security controls – because the end user is only hitting the server when they are adding a product to the cart to check out, or logging into their system.
With Varnish caching turned on (also known as an HTTP reverse proxy), all of the pages are stored in much faster memory… and offloaded from the server itself.
Both NGINX and Varnish are really tough and tricky to set up. One of the biggest problems with caching is that it wants to cache EVERYTHING. Meaning that if I add items to my cart, and then you visit the site, you could see the contents of my cart if caching isn’t set up properly.
Having auto scaling, and NGINX and Varnish caching available out of the box, is one of the most compelling reasons to use the Nexcess cloud hosting system.
Scrolling down on the same page, you can see there are options for Varnish static caching and being able to set the TTL – Time to Live, which allows you to set how long resources should be available before the cache requests them again from the server.
 View larger screenshot >> View larger screenshot >>
One of the problems with caching is the fact that when you go into the admin area and make a change, multiple layers of caching might prevent you from seeing the change on the live site for 15-20 minutes (or until the cache is cleared again).
Caching is biased to making things as fast as possible. But one of the amazing features Nexcess put into the cloud hosted system is the ability to append a custom URL string onto a page name in the address bar (such as https://test888.customerparadigm.com/test-page.php?Cache-Control=NO-CACHE)
(Don’t use this syntax – I just made it up for demonstration purposes. I don’t want to show the exact string here.)
This allows you to essentially bypass all of the caching on your live site, without having to disrupt all of the other visitors to your site when a change has been made to pricing, layout or content.
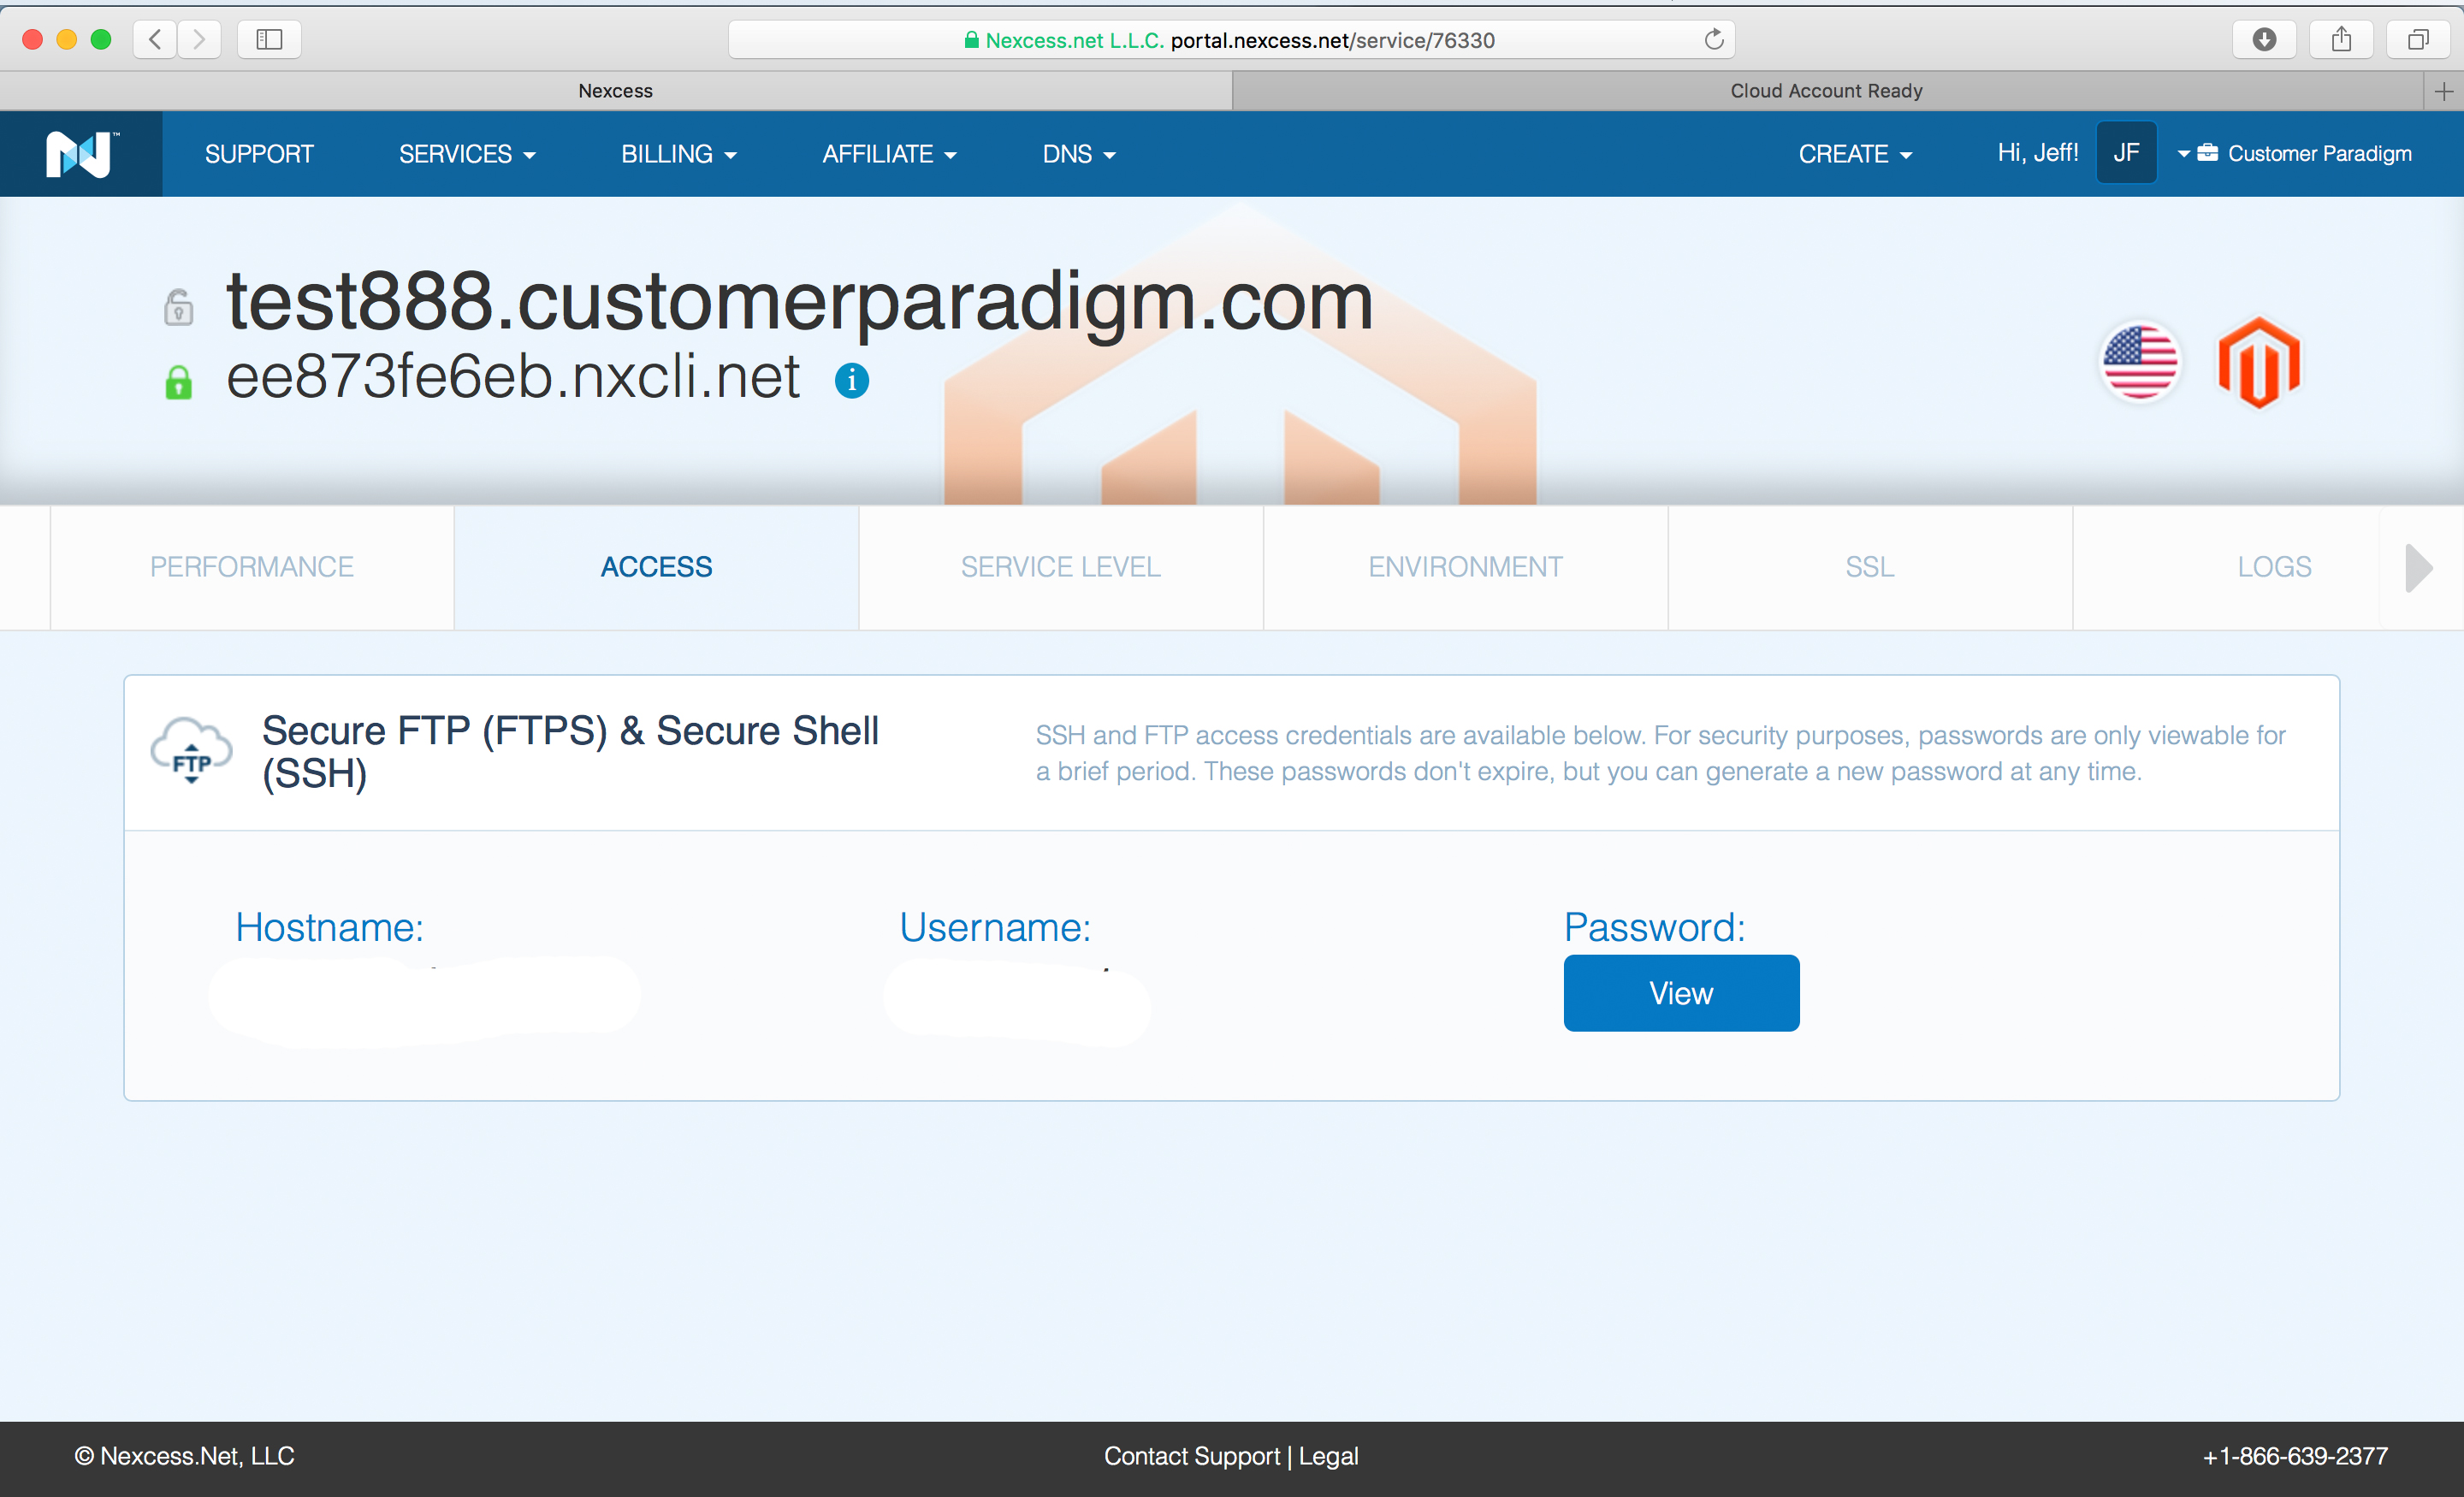
Step 8. Password Credentials for SSH and FTP:
On the next page, the system gives you the host name and username for accessing the site. (I’ve erased this information, even though this server is no longer live.)
 View larger screenshot >> View larger screenshot >>
For developers, this makes is really easy to access the site, as well as highly secure.
Some of the other systems force you to use SSH keys in order to access a site. I’m not a big fan of SSH keys, because in many cases, if your key is stolen or still available to other users, that key gives them full access to the site.
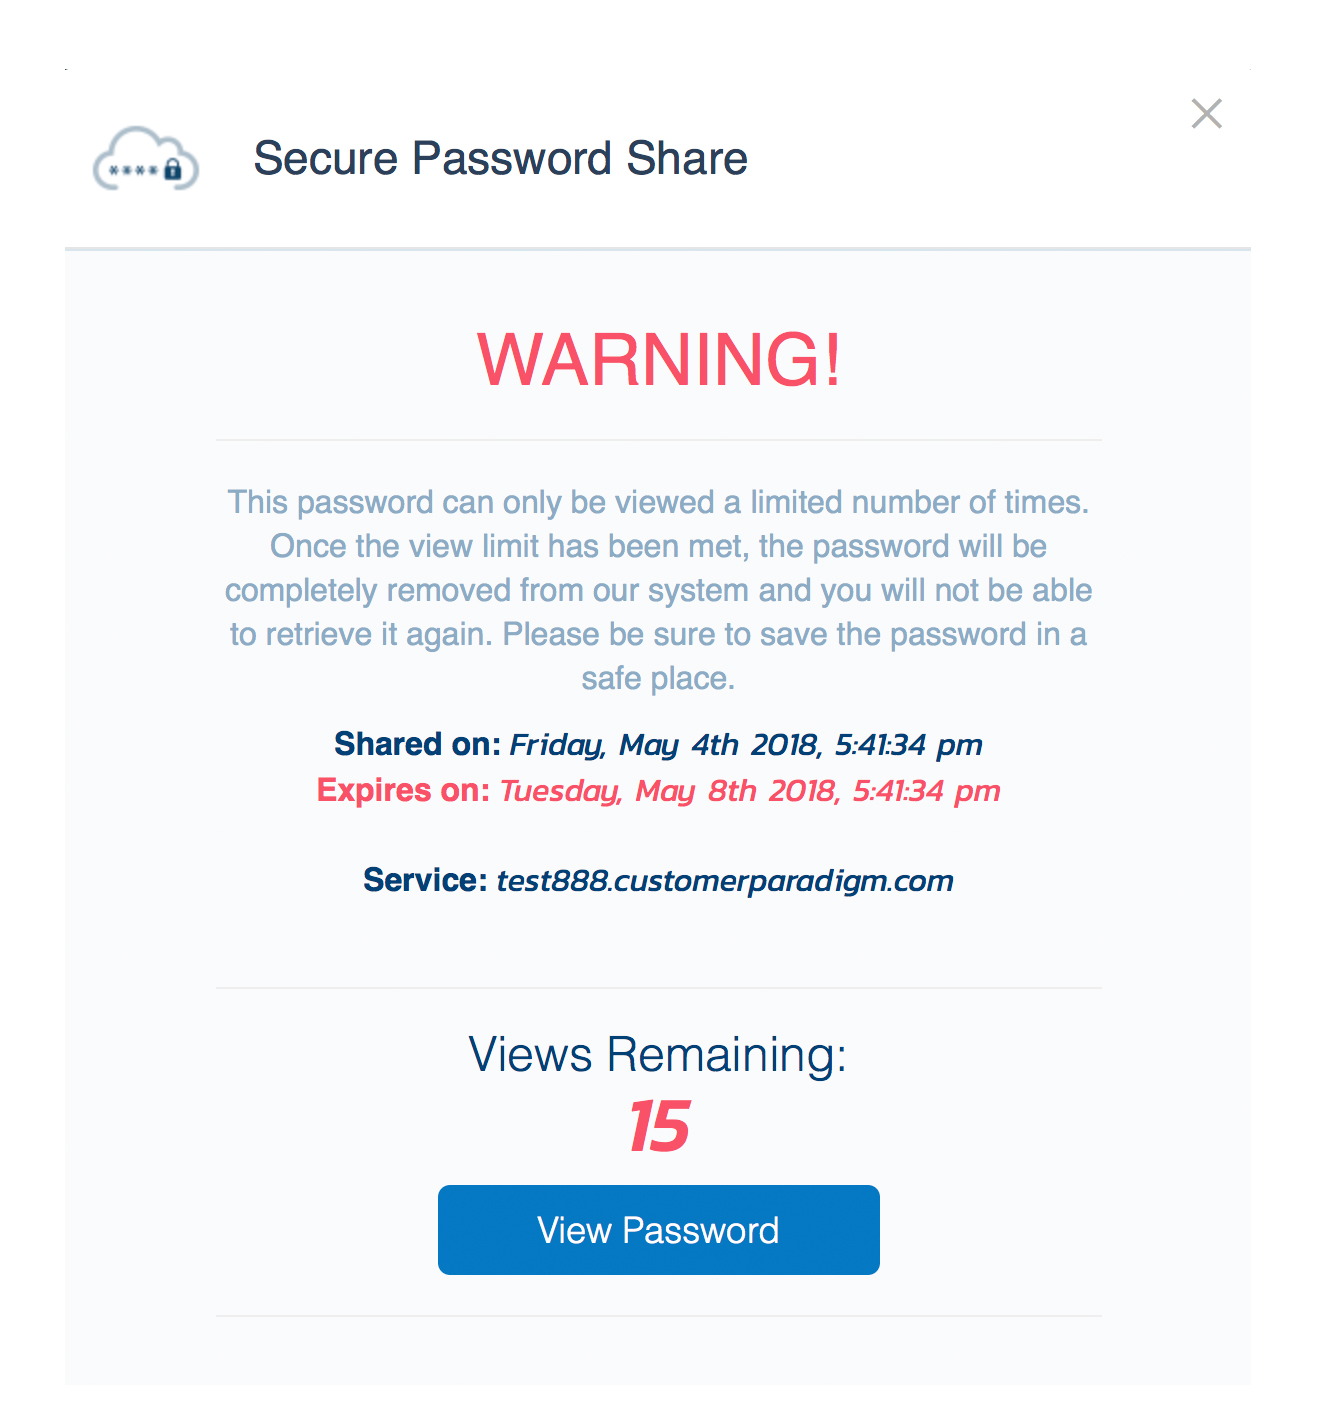
Step 9. View Password for SSH:
Nexcess has re-thought the password sharing system, and come up with a system that generates extremely strong passwords. Once you have viewed it in a secure, SSL-encrypted manner, Nexcess no longer will store the password. If you forget it, you can have the password regenerated.

View larger screenshot >>
This mitigates the possibility that an attack on the hosting company’s systems would allow someone to gain access to your system. Instead, by deleting and not storing your password (but allowing you to reset it), Nexcess essentially takes themselves out of the loop for long-term password storage.
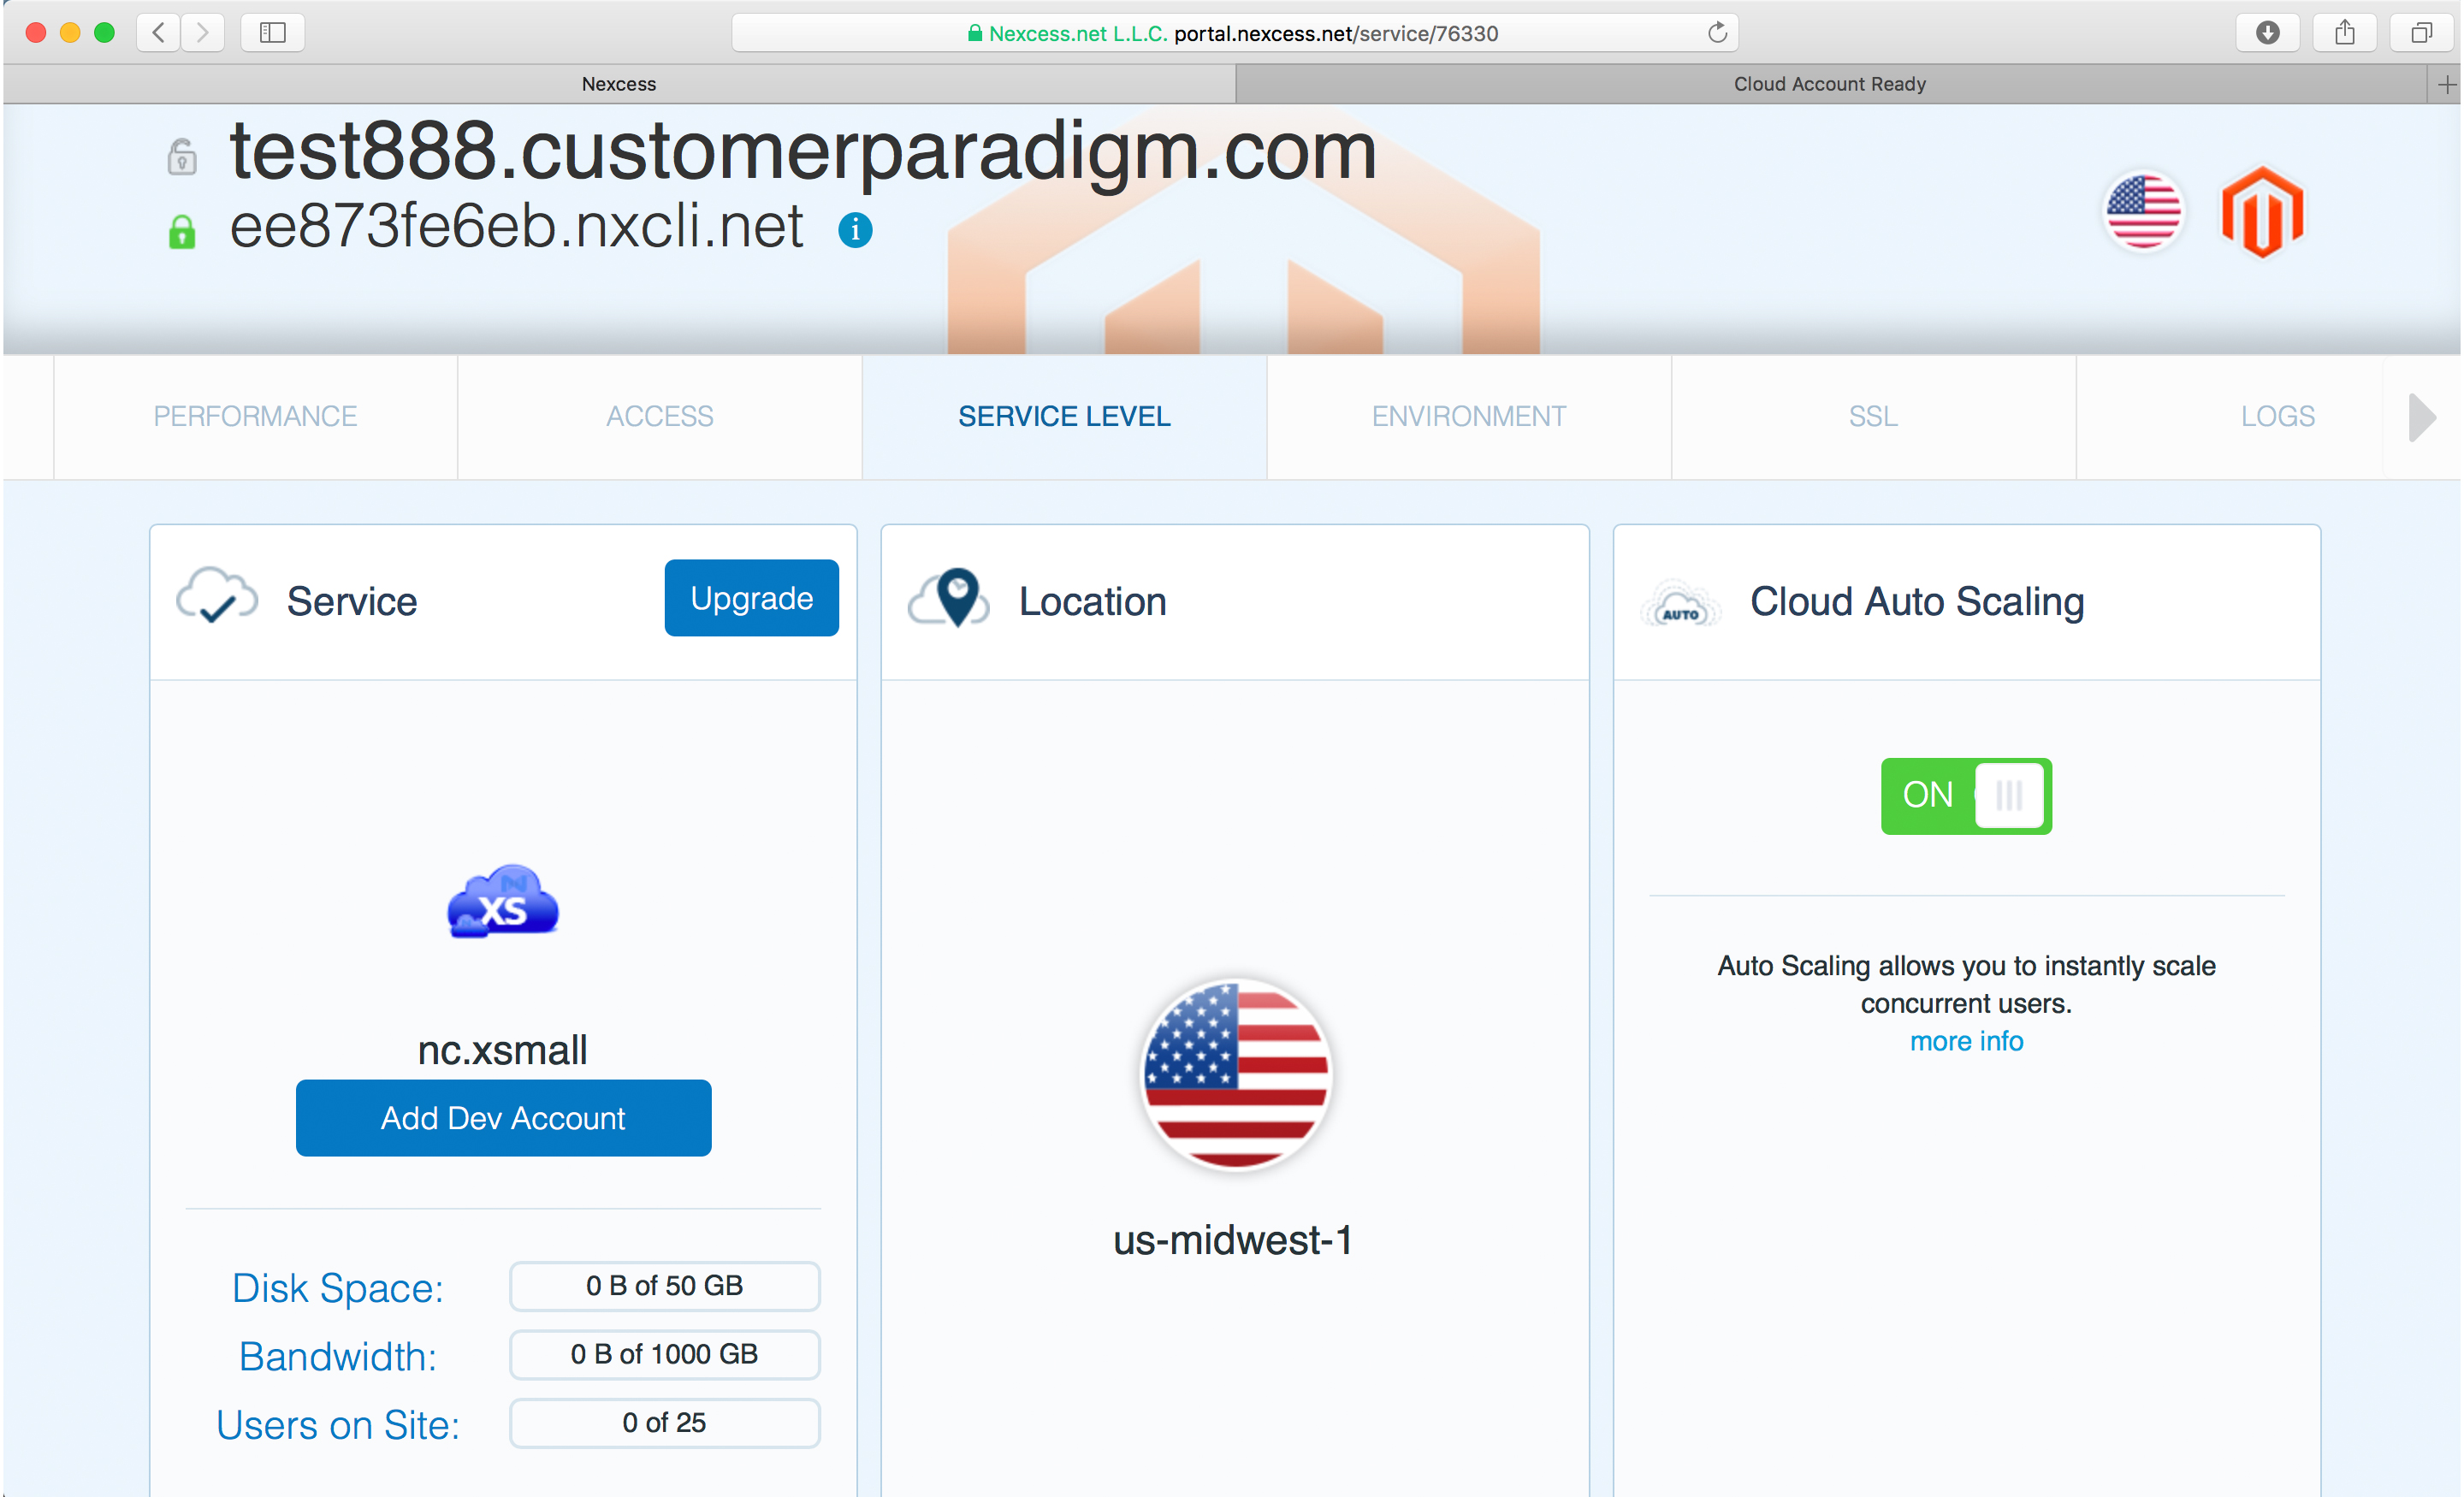
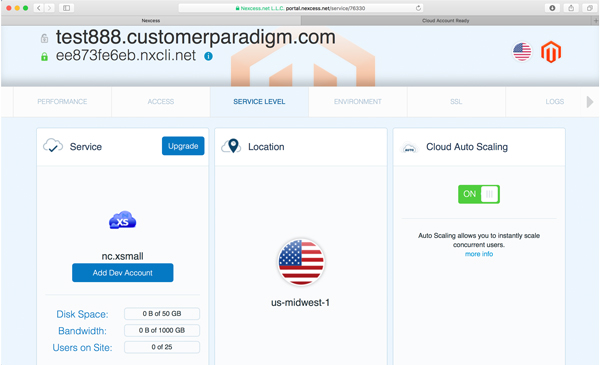
Step 10. Service Level for Cloud Hosted Account.
On this page, you’re able to see the service. In this case, the nc.xsmall size for the cloud hosted account is what I chose for this test evaluation:
 View larger screenshot >> View larger screenshot >>
It’s easy to upgrade to the next level of service, see the location of the data center (us-midwest1), and see if Cloud auto scaling is turned on.
In this case, the nc.xsmall gives me 50 GB of disk space – plenty for most Magento sites, 1 terabyte of data for bandwidth, and 25 concurrent users on the site. Again, this is usually fine for a small site.
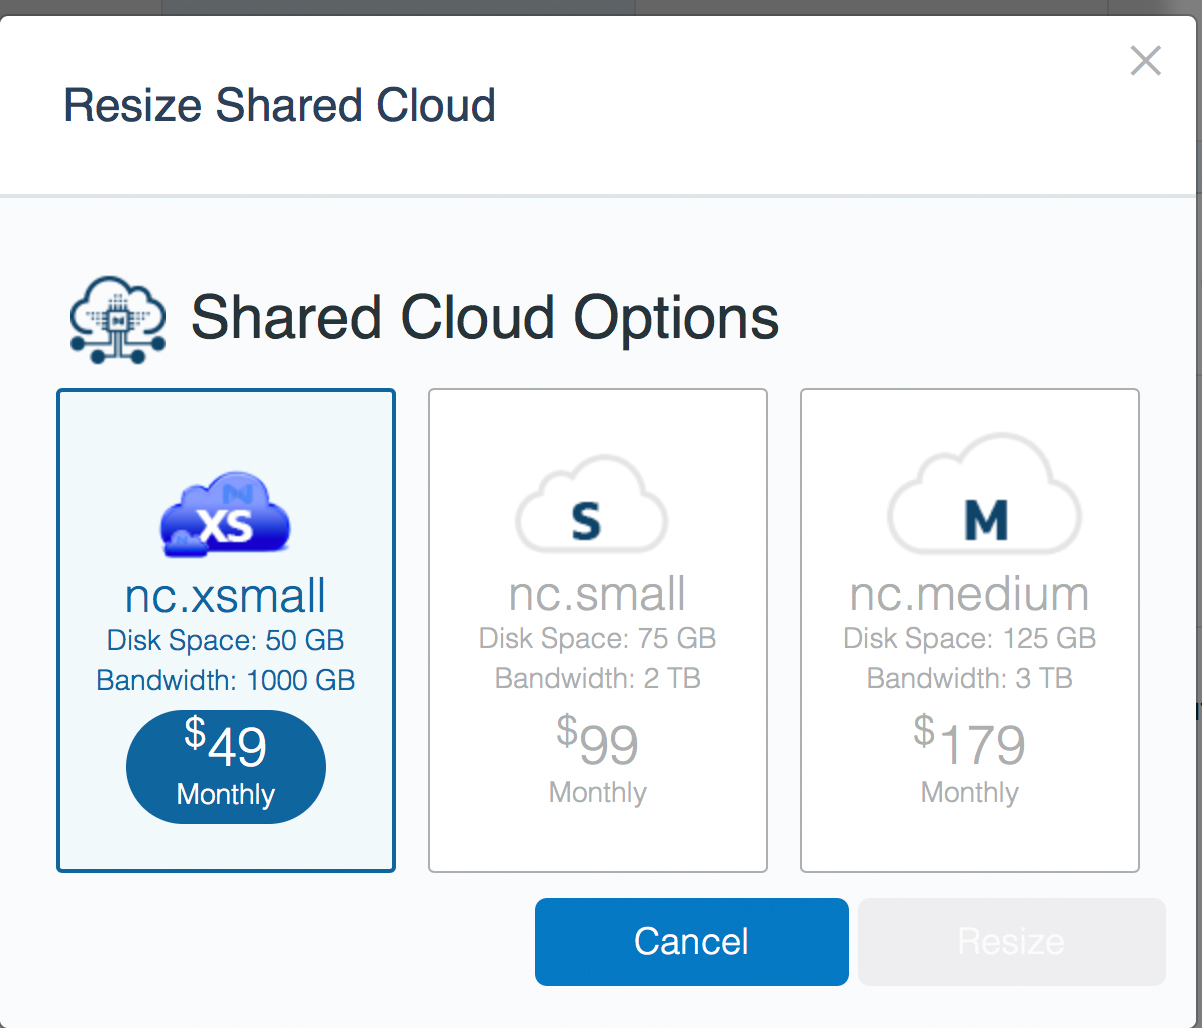
But if I want to resize, I can go up to the next level of service – nc.small, which would give me 75 GB of disk space and double the bandwidth for $99 per month. Or, going up to an nc.medium gives me even more bandwidth, disk space and users:

View larger screenshot >>
Upgrading to these next options as a shared account is instant, and gives you the added benefit of being able to auto-scale to the next level. If you want to upsize from there, a couple of minutes of downtime may be required.
If I know I’m going to have a big marketing campaign, I might want to resize to the next level, and then scale back down to save money if needed.
I think that the only reason not to turn on auto scaling would be if you know your server is going to often be at high load, and you don’t want to incur additional hourly charges beyond your normal monthly hosting price.
This page also lists disk space used, bandwidth, and number of users on the site at the time.
But the most compelling thing on this entire page is the ability to instantly add a Dev Account.
When our company, Customer Paradigm, works on sites, we always make a copy of the site, and bring it over to one of our systems. We work on the site, check in any file changes into a version control system called Git, and then once things are tested, we can push the changes up to the live site.
One of the problems, though, is that our development servers are really good for troubleshooting sites that are having issues. But it is really amazing to have a staging site or development site that is an exact match of the live site for testing. The development site creation allows you to instantly spin up a new test site, including caching.
Step 11. Create Dev Cloud Account:
Creating a dev cloud account will take your current live site, including all of the software versions (php, mySQL, caching) and configuration, and optionally copy the base site files and databases.
It starts with entering a domain name. In this case, I’m using dev.test888.customerparadigm.com:
 View larger screenshot >> View larger screenshot >>
There are two main options for this:
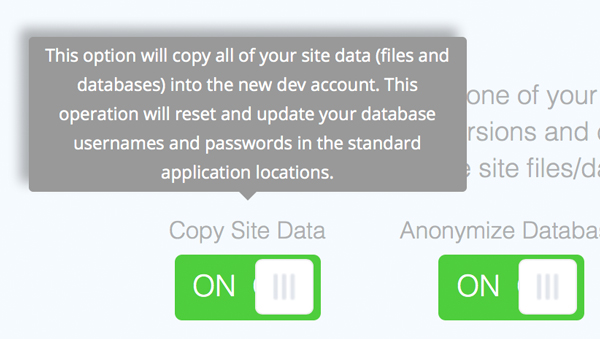
Copy Site Data:
This option copies all of the site data, including images, css, layout files, etc, into the new developer account. It’s really a nice feature.
 View larger screenshot >> View larger screenshot >>
It will also copy the database as well, so that you have a full working copy of the mySQL database to run your site against.
And then, auto-magically, it will update the configuration file on the development (dev) version of the site, so that you’re on the new test version of the database.
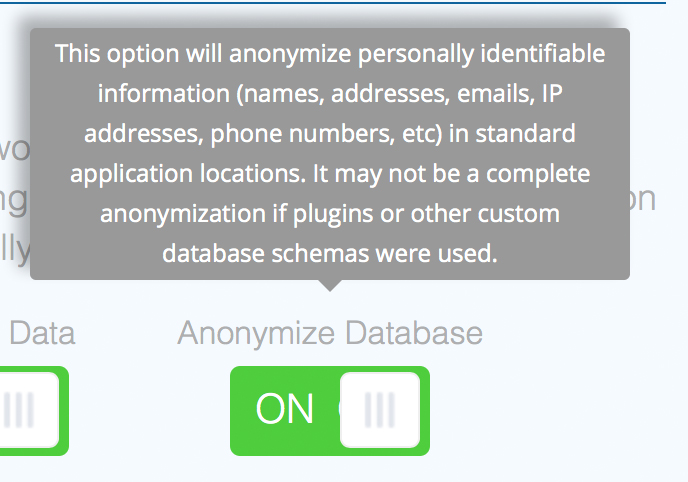
Anonymize Database:
This is a great feature that allows you to strip out all of the customer information when you’re copying over the database. It’s a great feature to have for many reasons. First, it allows you to test the site without live customer information. So if there is a process that sends out emails to past customers, this is a safeguard that prevents you from sending out 25,000 emails from a test server.
 View larger screenshot >> View larger screenshot >>
Second, it’s a prudent measure to limit access to sensitive PII (personally identifiable information). A developer most likely does not need the names, addresses, emails, IP addresses, phone numbers and other information in order to make sure that a particular module works.
However, it may not catch everything – especially if there are major customizations to the Magento database.
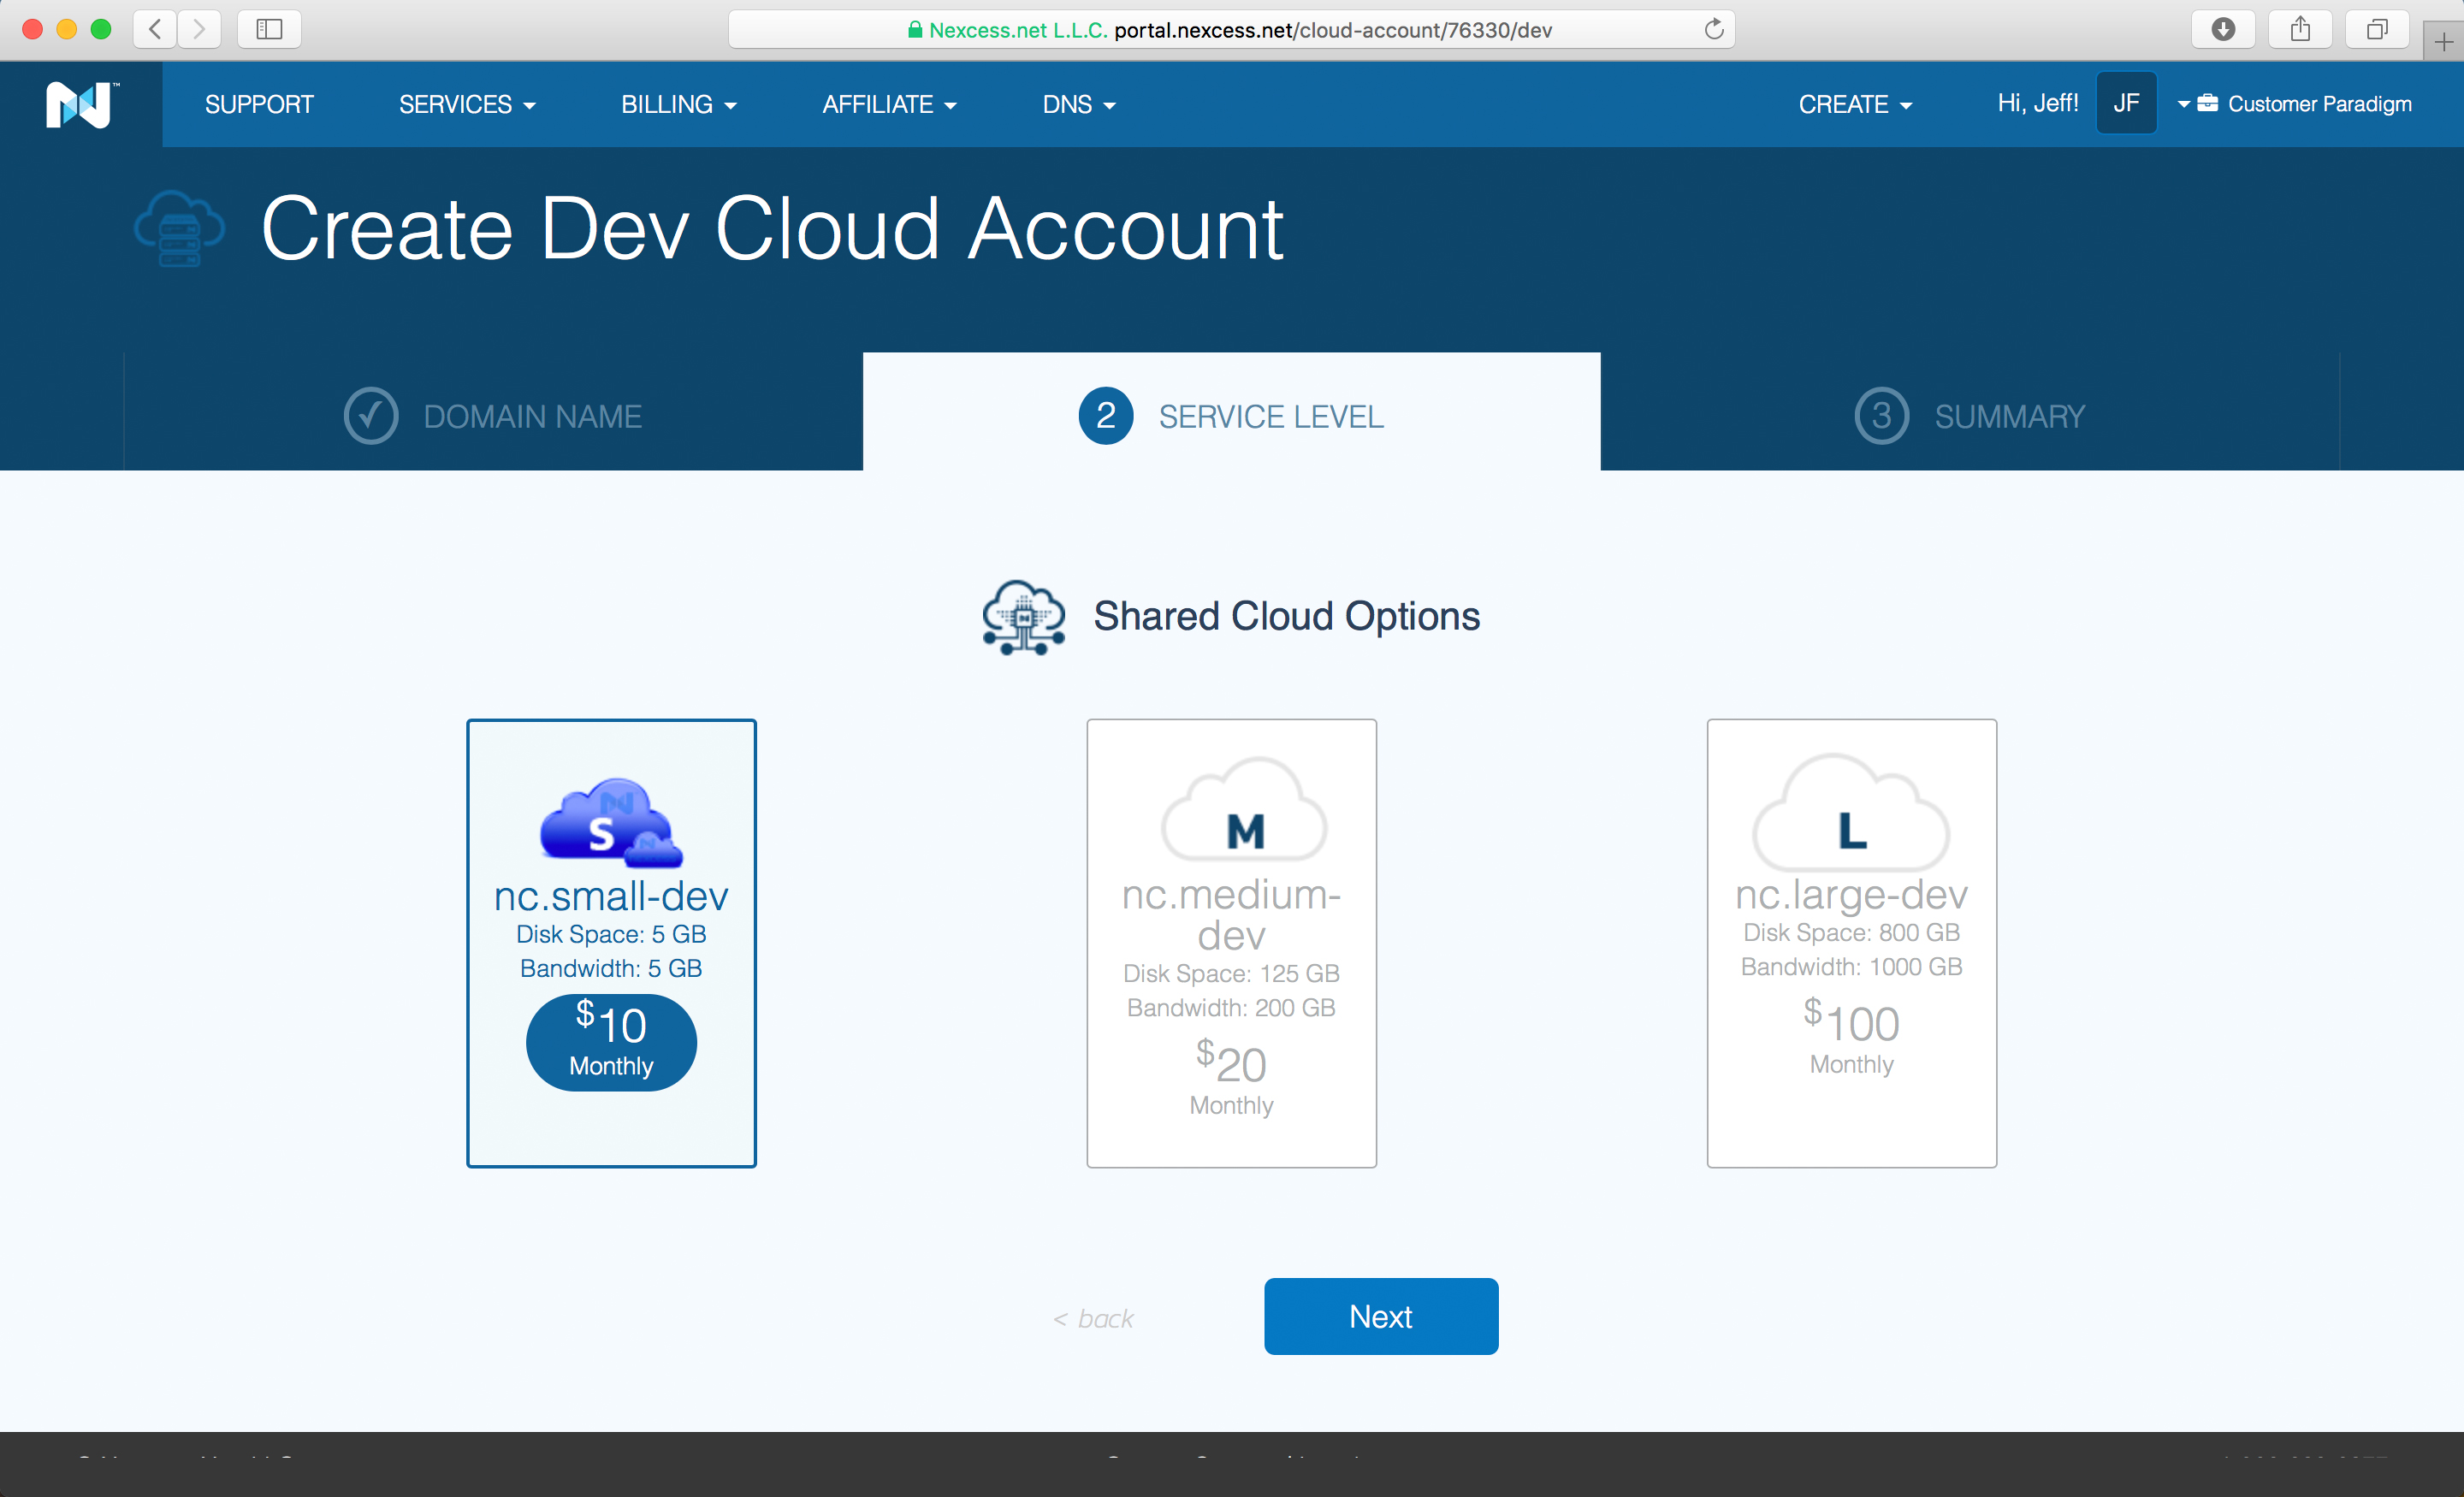
Step 12. Choose Size for Dev Cloud Account:
You can choose the size for the dev site on the next screen. If you aren’t copying over all of the files and just need a very small instance, the 5GB of file storage should be fine at $10 per month. (That’s the option I chose for this example.)
Or, you can opt for the medium dev version that gives you 125 GB of disk space for $20 per month, or a really large instance with 800 GB of space for $100 per month:
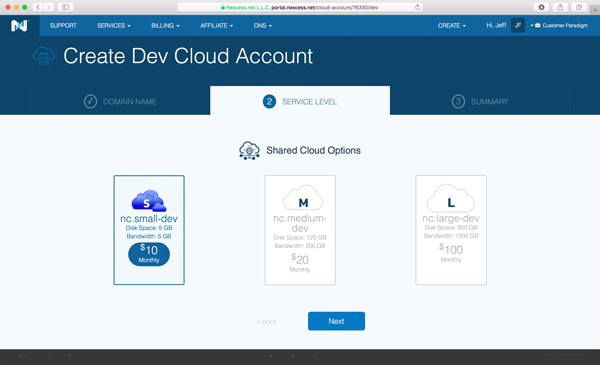 View larger screenshot >> View larger screenshot >>
Step 13. Dev site being set up.
It takes just a quick moment for the site to be set up on the server, and then all of the access information, etc, is then available under the primary account:
 View larger screenshot >> View larger screenshot >>
It’s also easy to cancel a dev environment pretty easily as well, when it’s not needed.
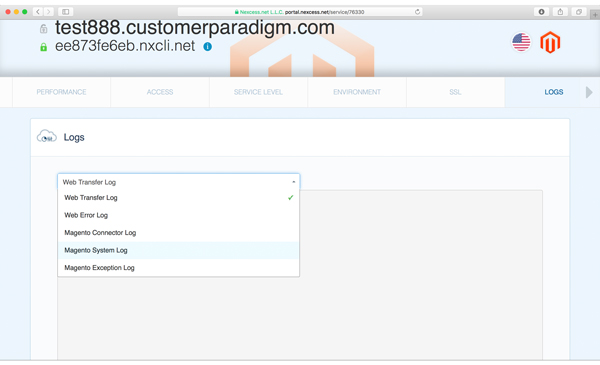
Step 14. Log Access
Rather than have to SSH into the system via the command line to review the logs on the site (which requires more of a technical ability to type in specific commands), an admin can log into the cloud account and review the following logs easily:
- Web transfer log
- Web error log
- Magento connector log
- Magento system log
- Magento exception log
 View larger screenshot >> View larger screenshot >>
Often if there is an ongoing issue with the site, these errors will be logged for troubleshooting.
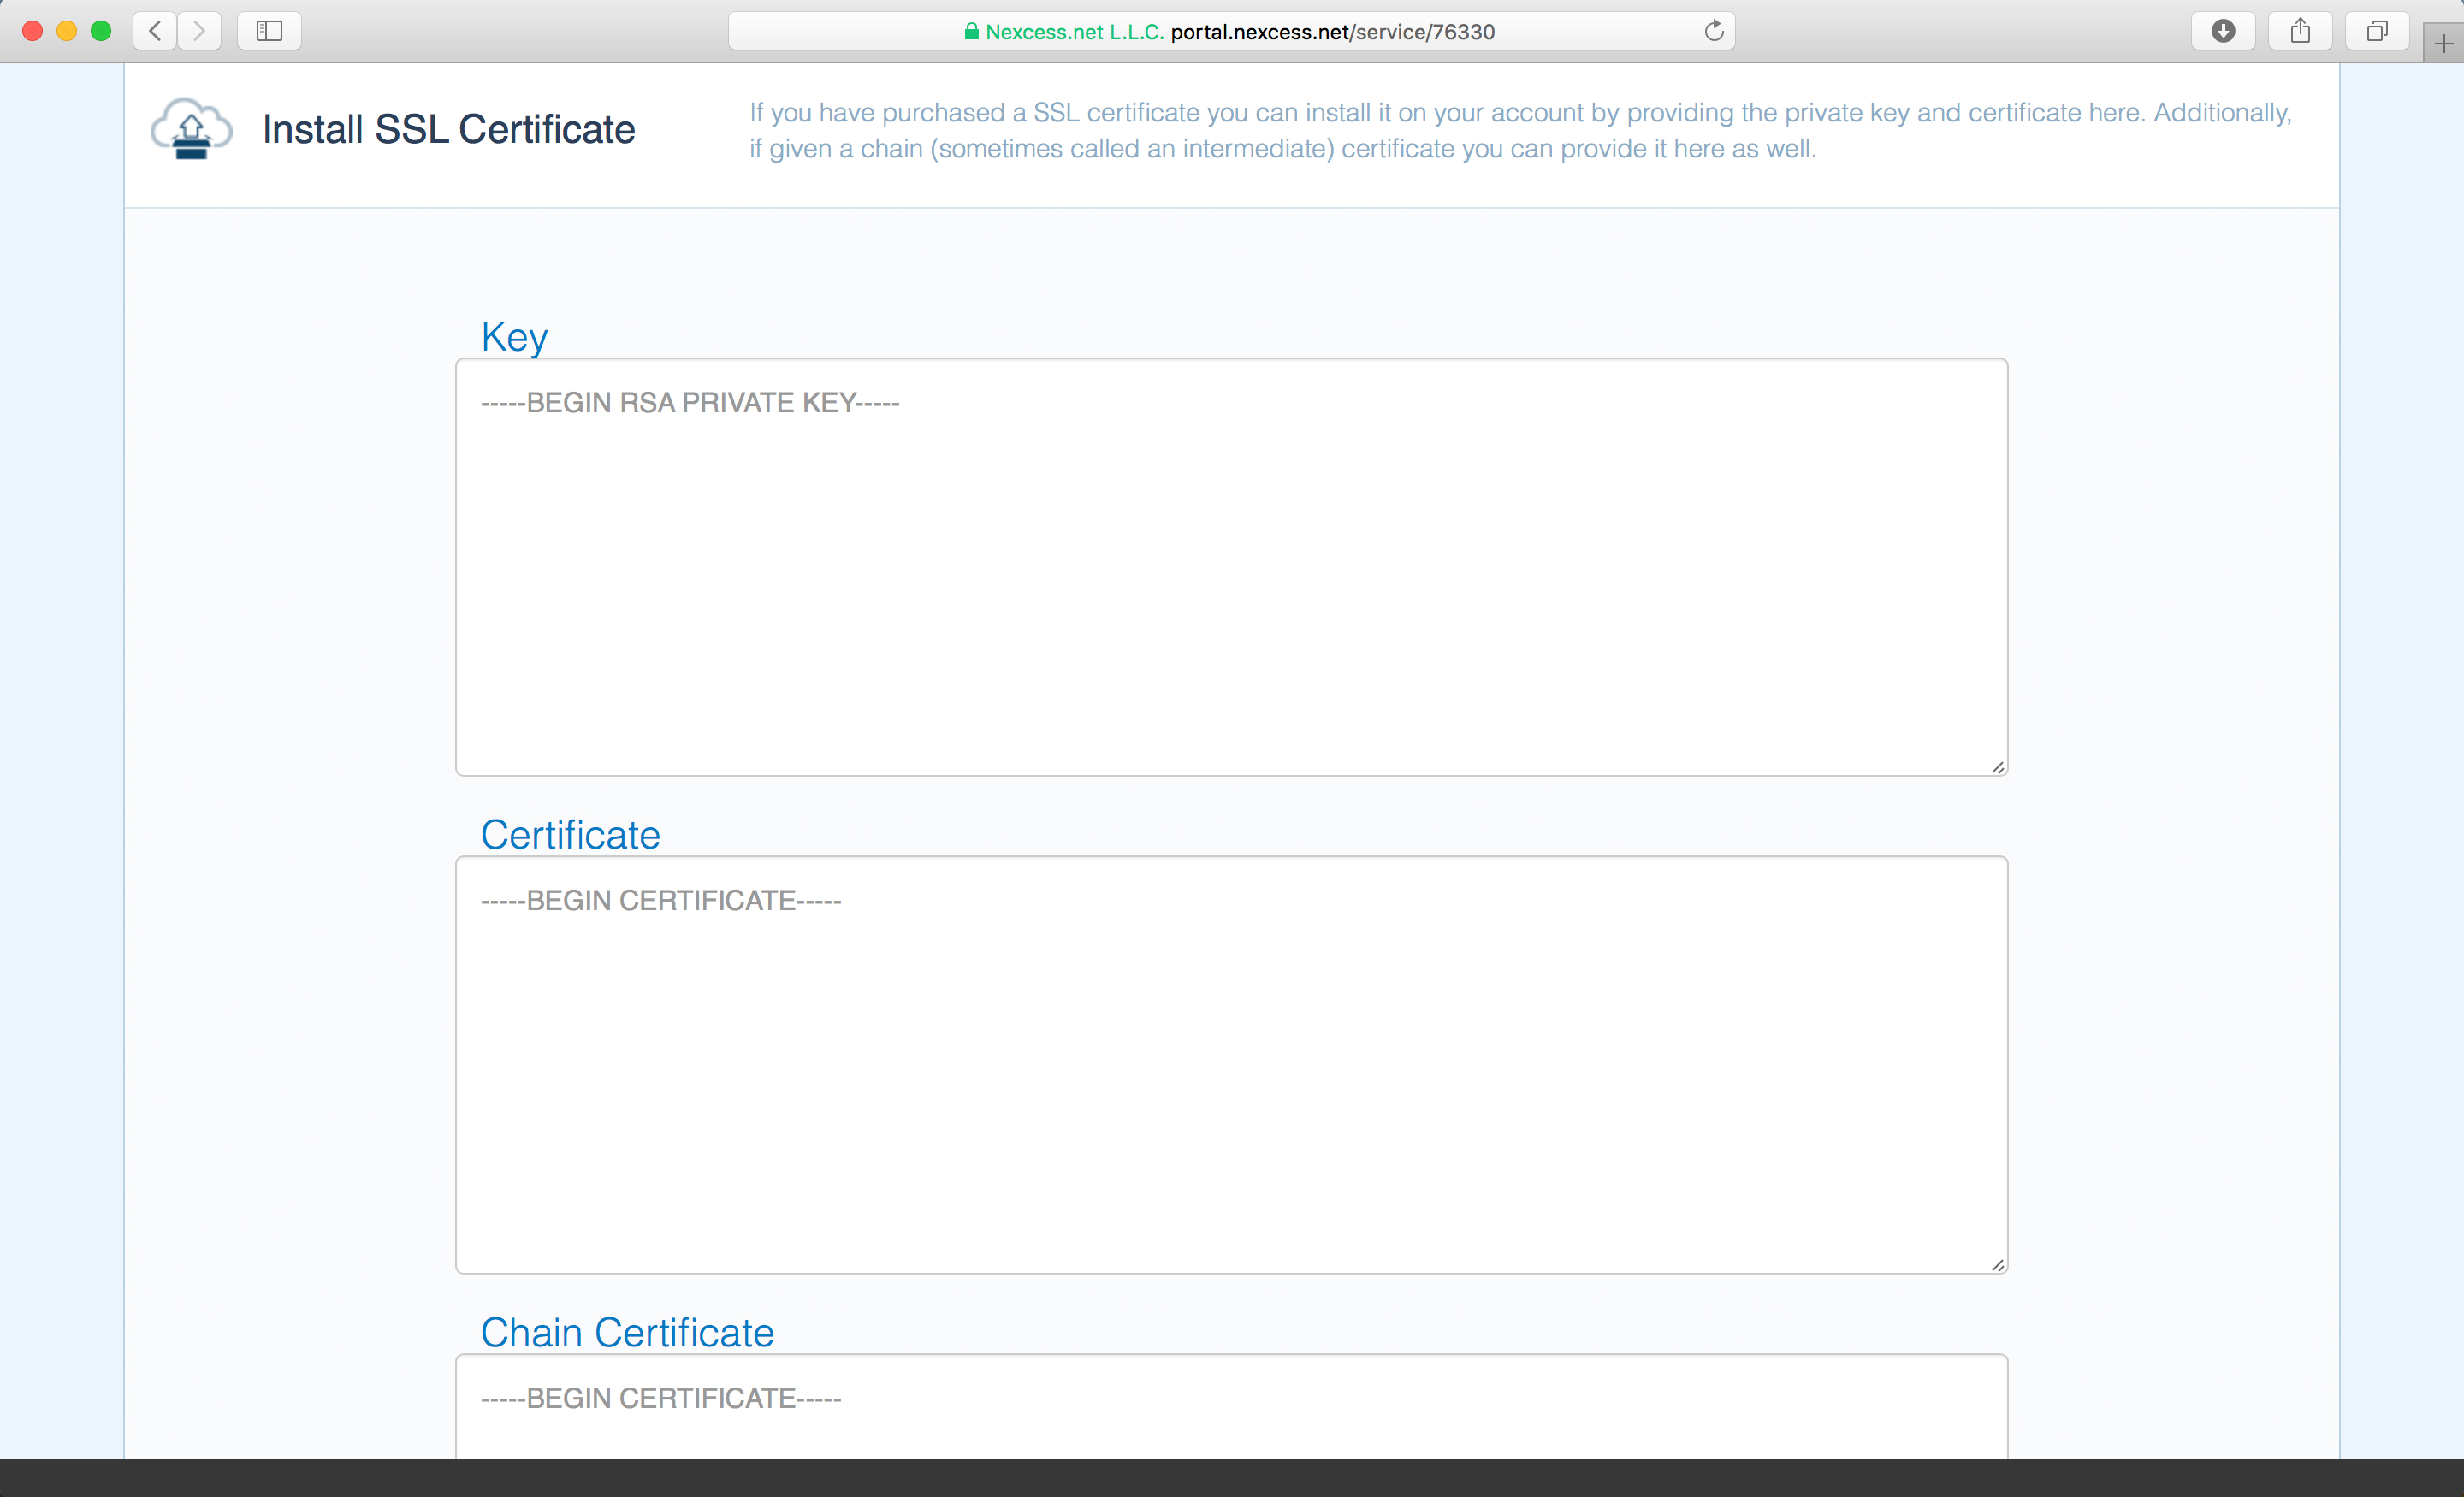
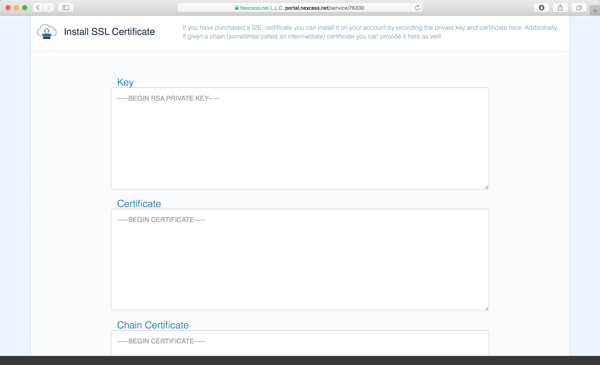
Step 15. SSL
By default, your temporary domain has SSL already included.
But if you’ve already purchased an SSL certificate (such as a fancy one that puts the company name in green at the top of the address bar), you can past in the RSA private key, certificate and chain certificate into this section so that the cloud server can use your SSL certificate:
 View larger screenshot >> View larger screenshot >>
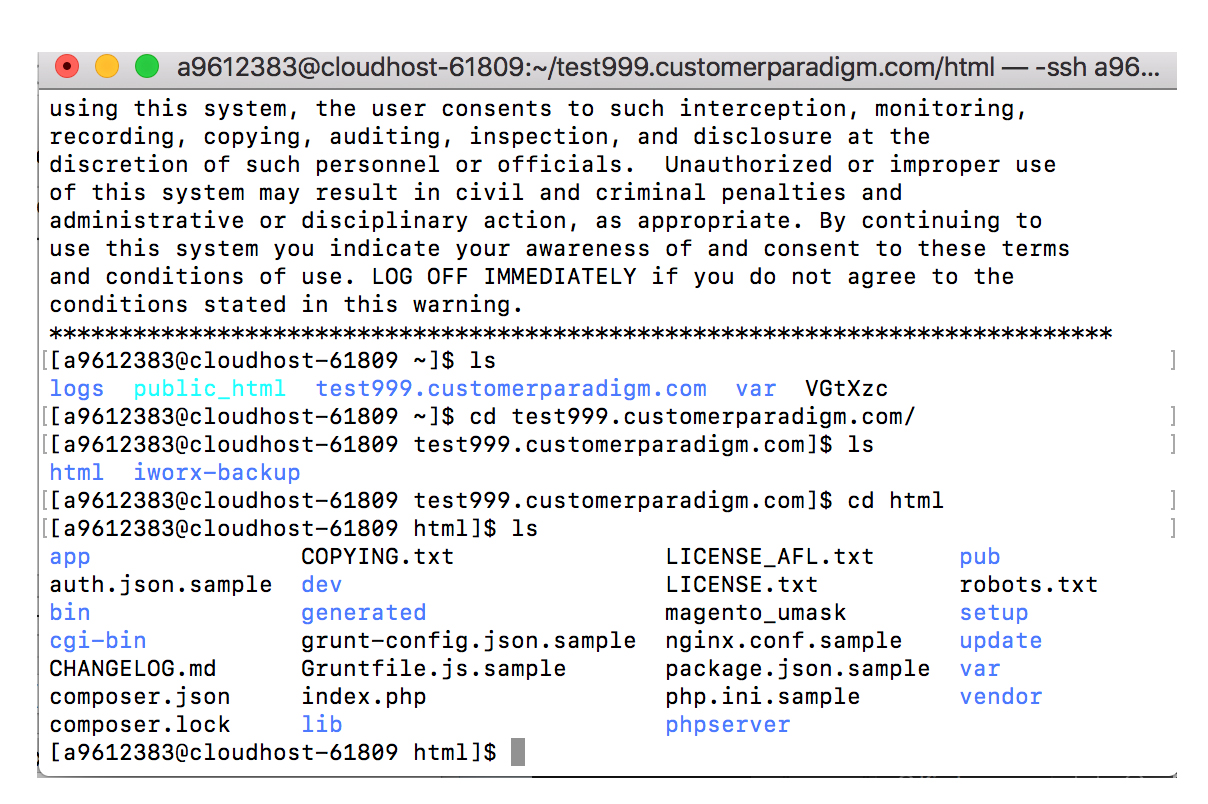
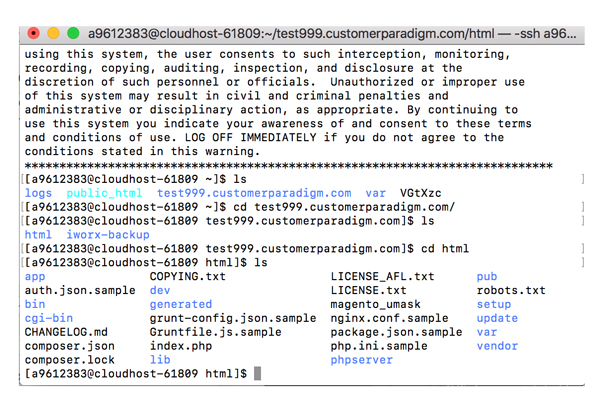
Step 16. Logging in via SSH:
After the site was set up, I logged in via SSH to a test account. (Note: this is the test999.customerparadigm.com version, which has also now been removed from their system).
Logging in, I can see that the Magento 2.2.4 file structure has been already installed, and is ready for use:
 View larger screenshot >> View larger screenshot >>
Step 17. Magento Admin Screen:
You can log into the Magento admin screen from a link in the cloud hosting portal:
The username and password are provided in the admin, similar to how the credentials are generated and stored for SSH and sFTP accounts:
 View larger screenshot >> View larger screenshot >>
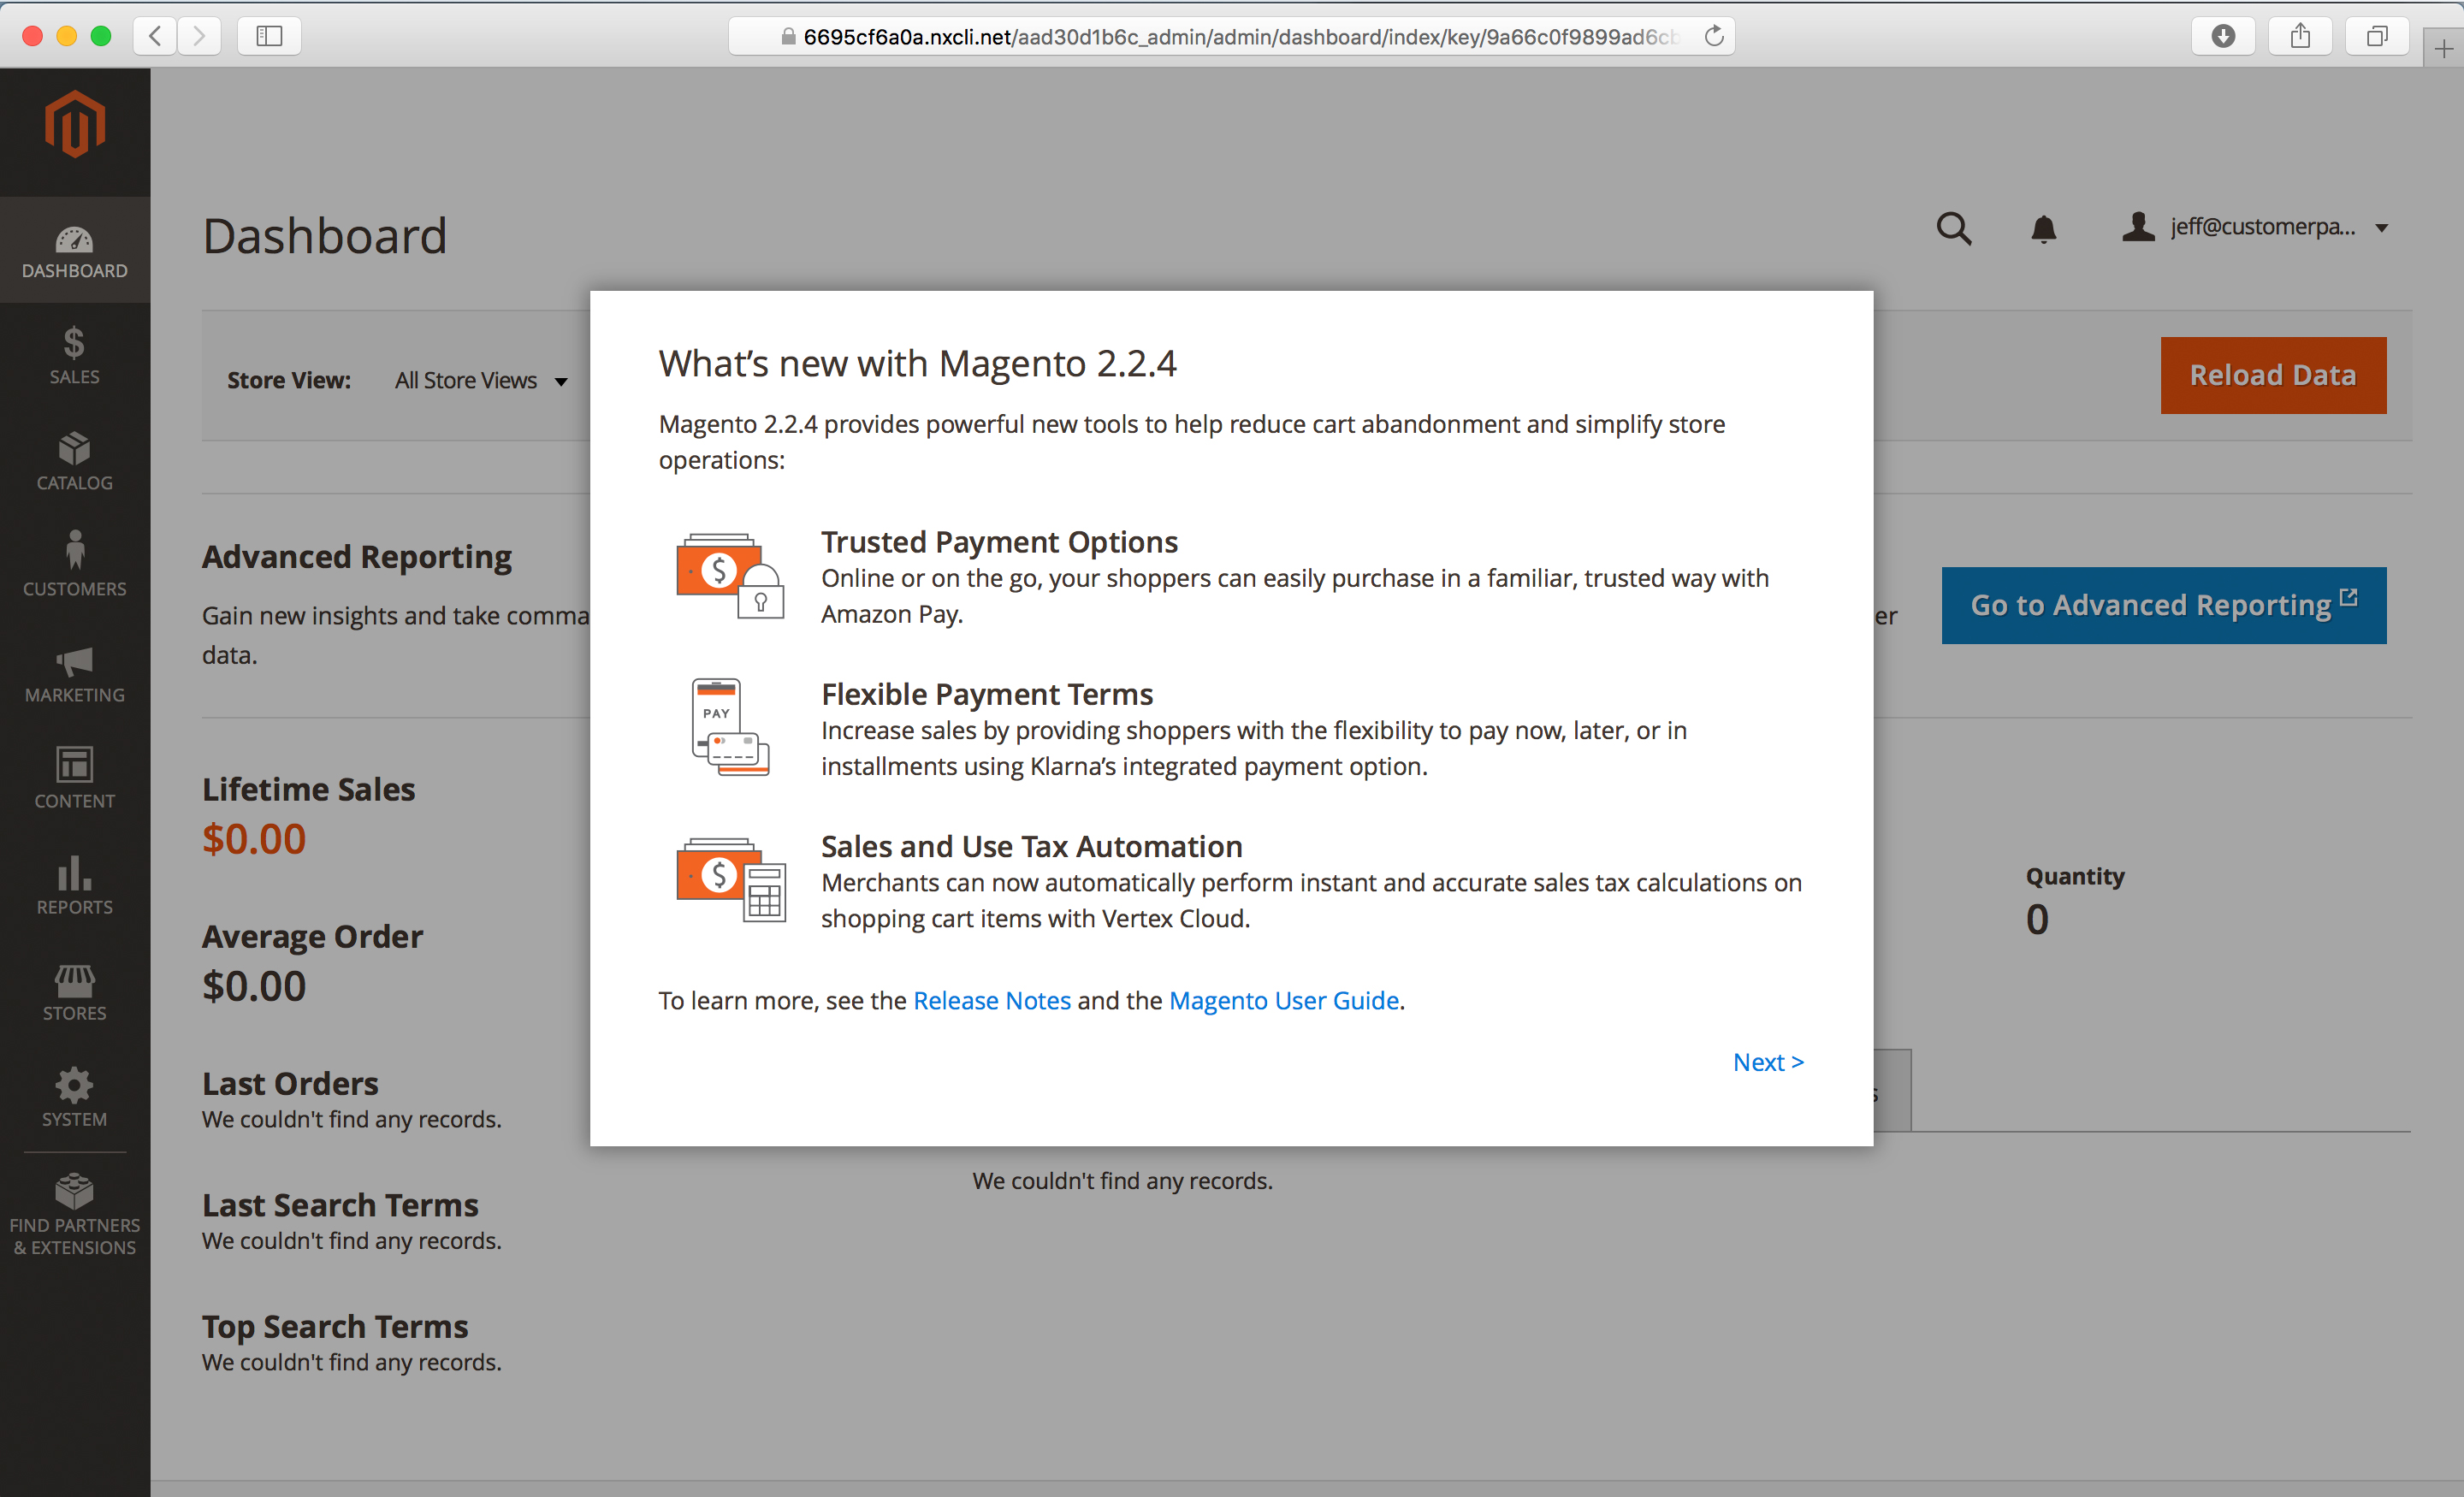
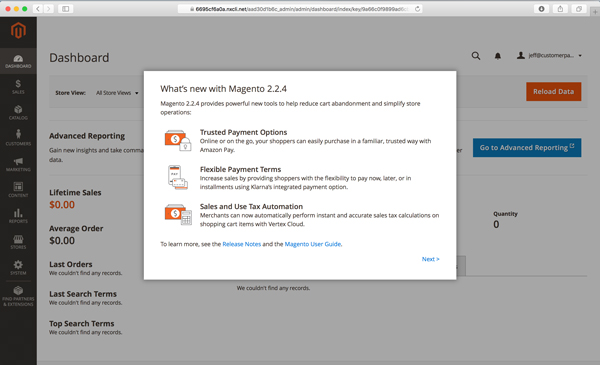
Step 18. Logging in to Magento 2.2.4:
Although the Magento 2.2.4 software was only released a couple of days before I tested out the system, the auto-install used the most recent version of the software:
 View larger screenshot >> View larger screenshot >>
The first few screens are what’s new with Magento 2.2.4, including Amazon Pay, Klarna Pay Later, and Sales and Use Tax automation from Vertex.
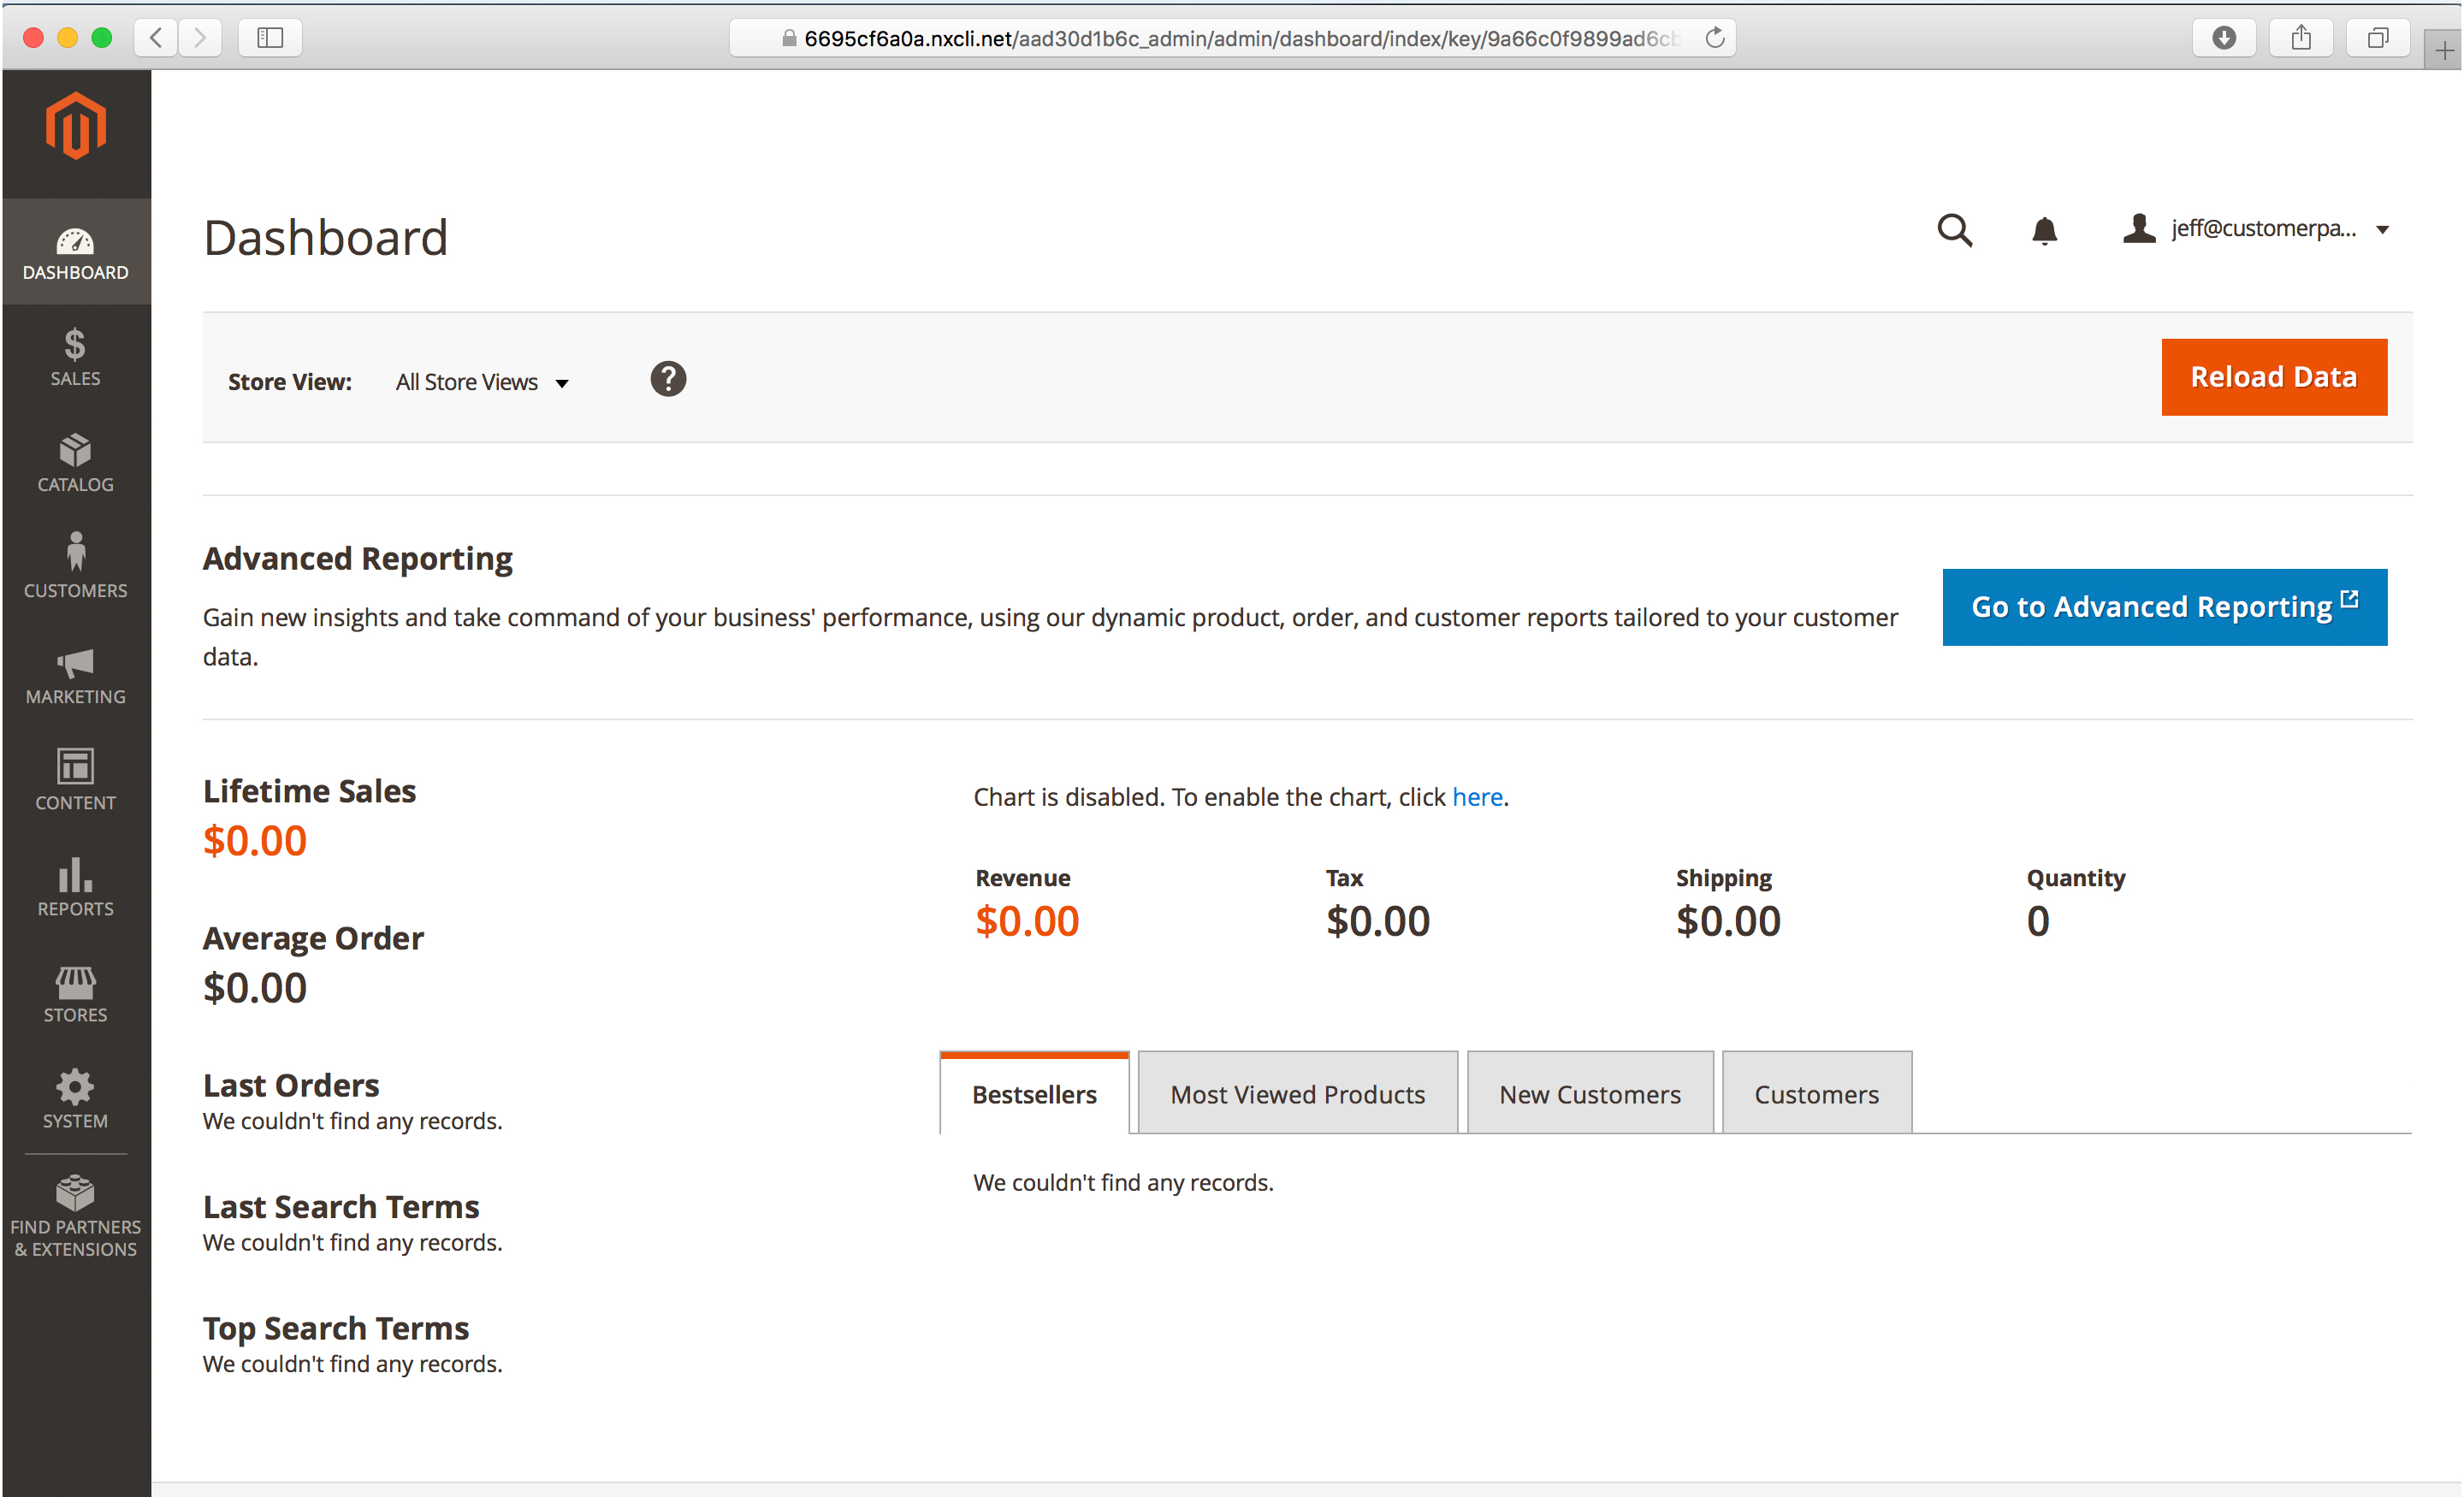
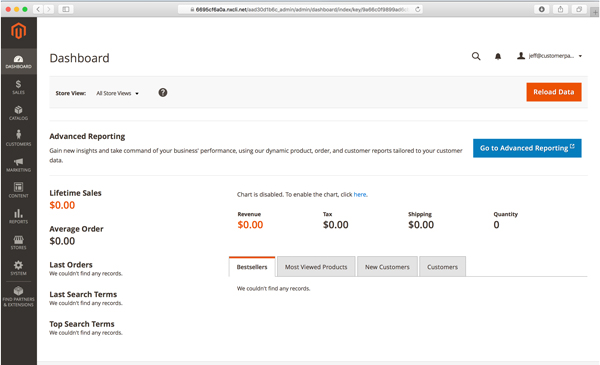
The dashboard is blank – as there have been no sales on this fresh installation:
 View larger screenshot >> View larger screenshot >>
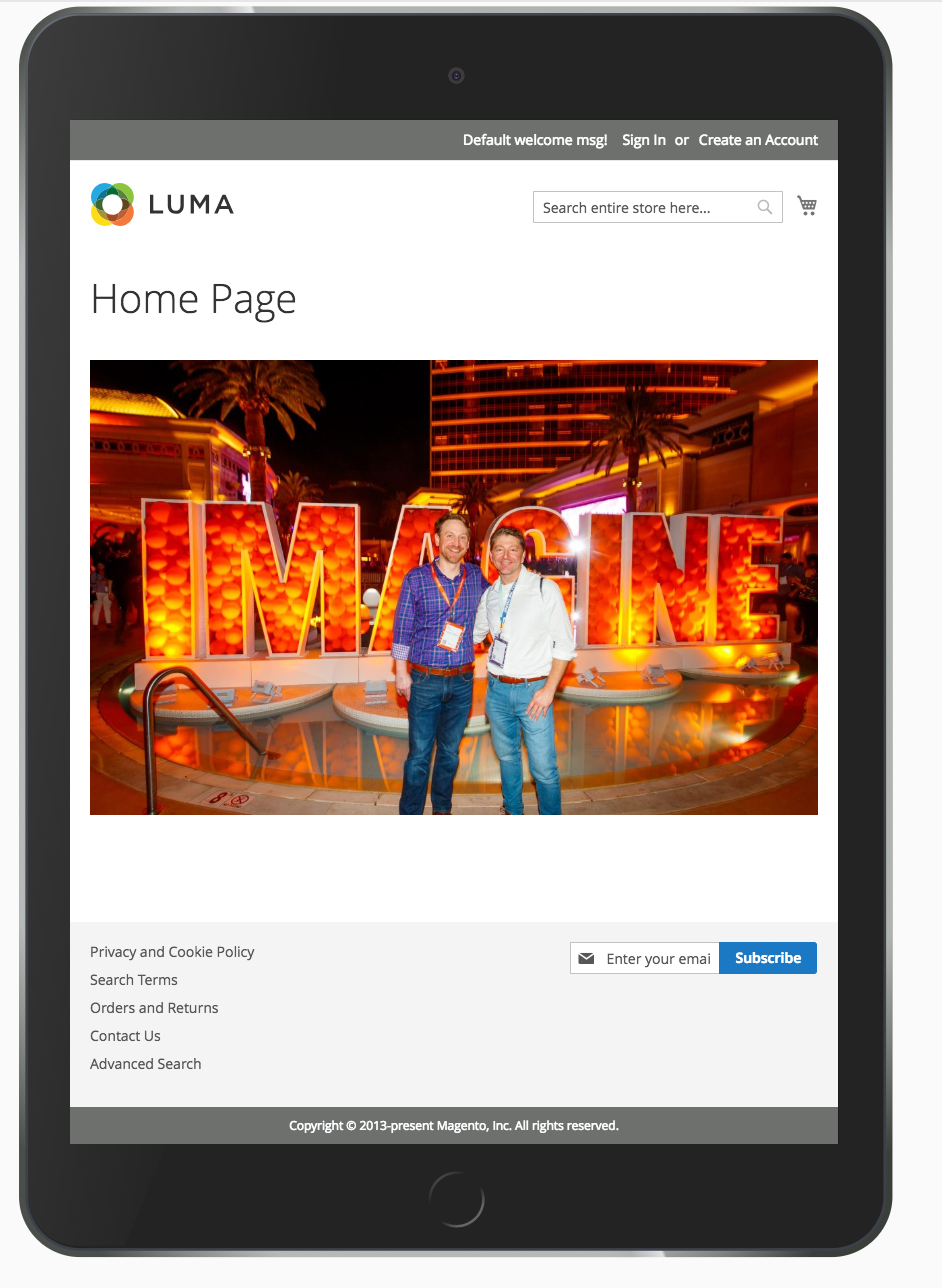
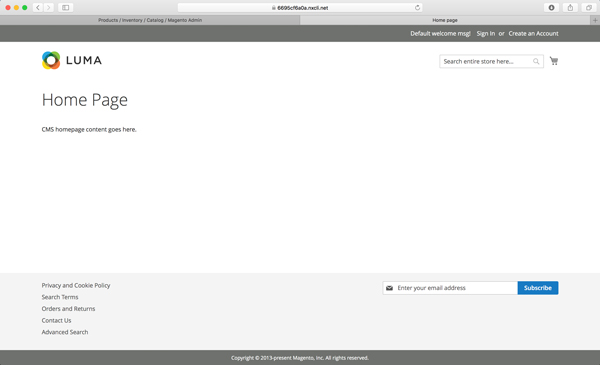
Step 19. Luma default home page for the Magento 2.2.4 site:
Here’s a quick view of the default view of the home page for the site. This is the Luma demonstration theme:
 View larger screenshot >> View larger screenshot >>
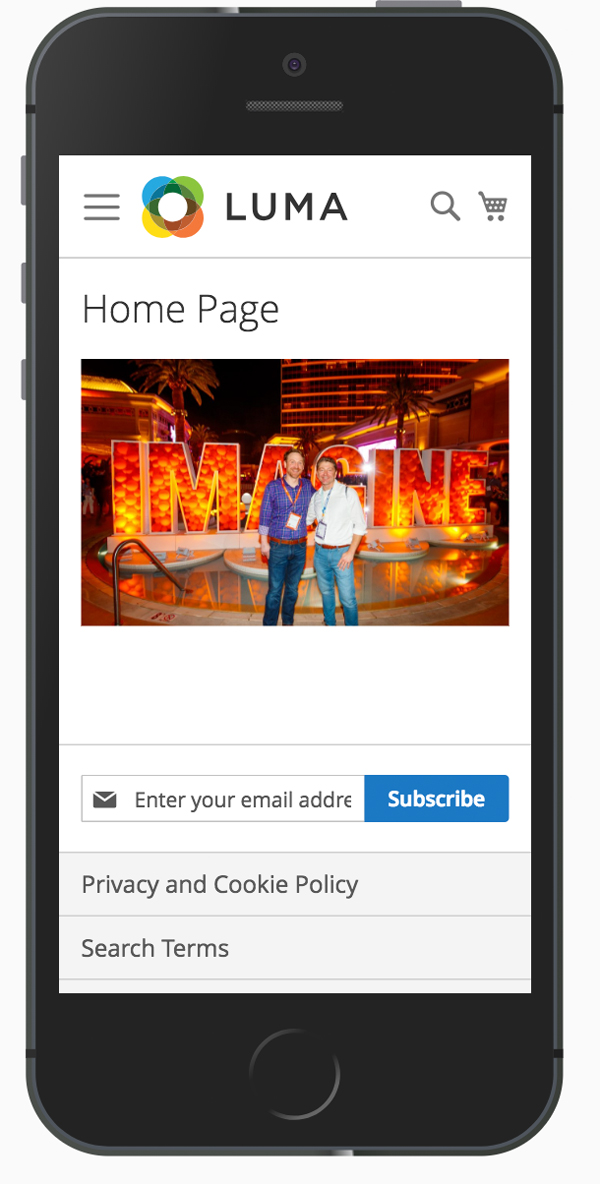
Step 20. Luma Responsive Theme – iPhone:
I went into the admin of the site and added a photo of me and Tim England at the Magento Imagine 2018 conference. Here’s how the image looks on an iPhone 6S, with the image being scaled down properly:
View larger screenshot >>
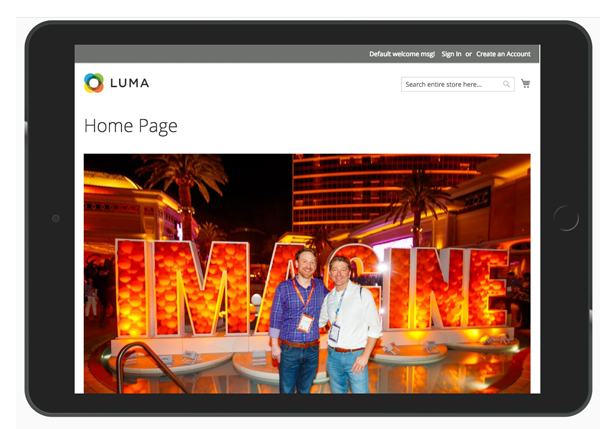
Step 21. Luma Responsive Theme – iPad:
Here’s how the Luma default home page (with my photo from Imagine) looks on an iPad in landscape mode. Again, the image sizes properly to fit the screen:
 View larger screenshot >> View larger screenshot >>
Here’s a look at the iPad in portrait mode:
View larger screenshot >>
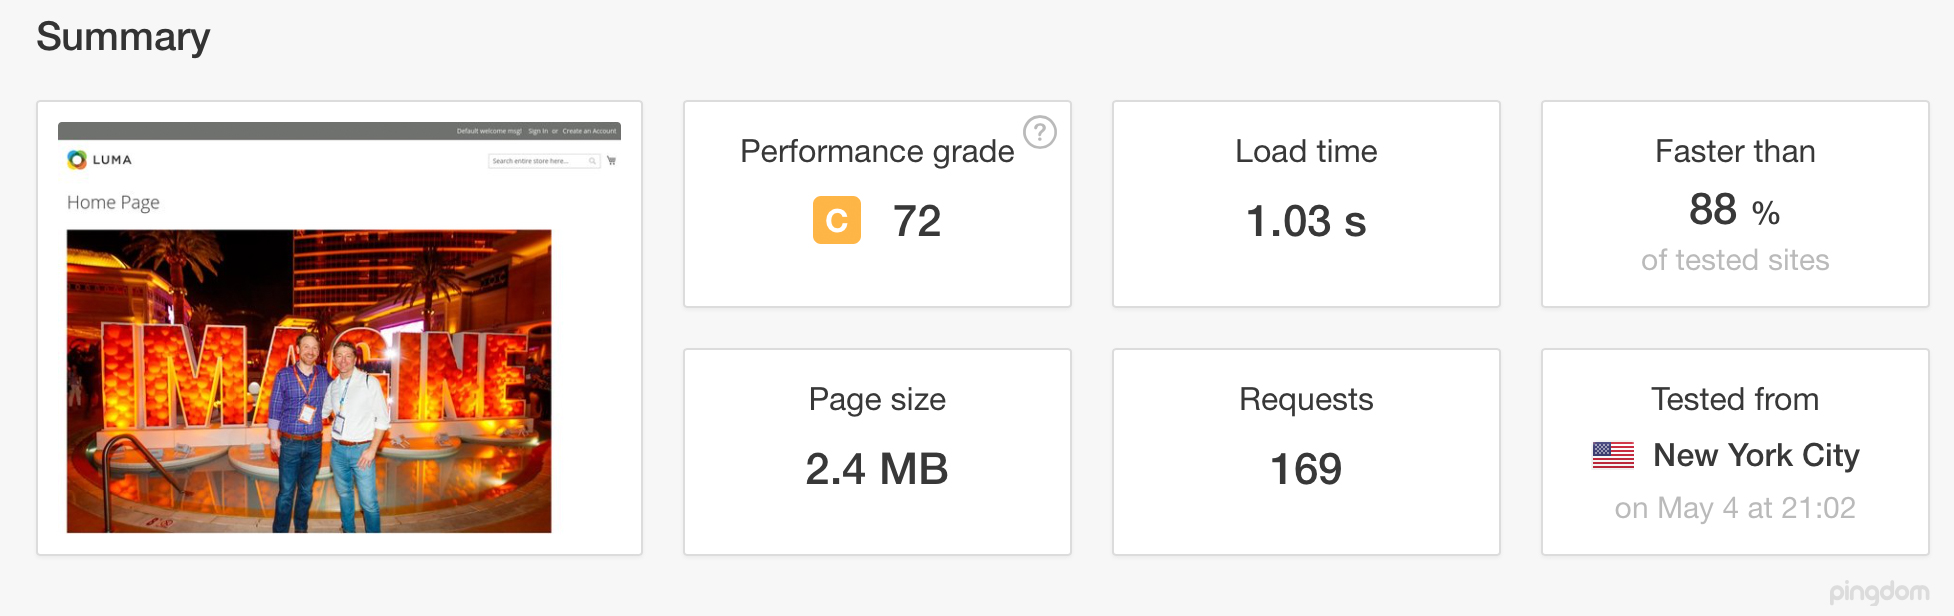
Step 22. Speed test on home page:
I next ran a speed test on the home page, using the Pingdom speed test system:
 View larger screenshot >> View larger screenshot >>
The site loads in 1.03 seconds. Pretty darn fast for an eCommerce site. Now there’s only one image on the home page, but this to me was a very fast baseline.
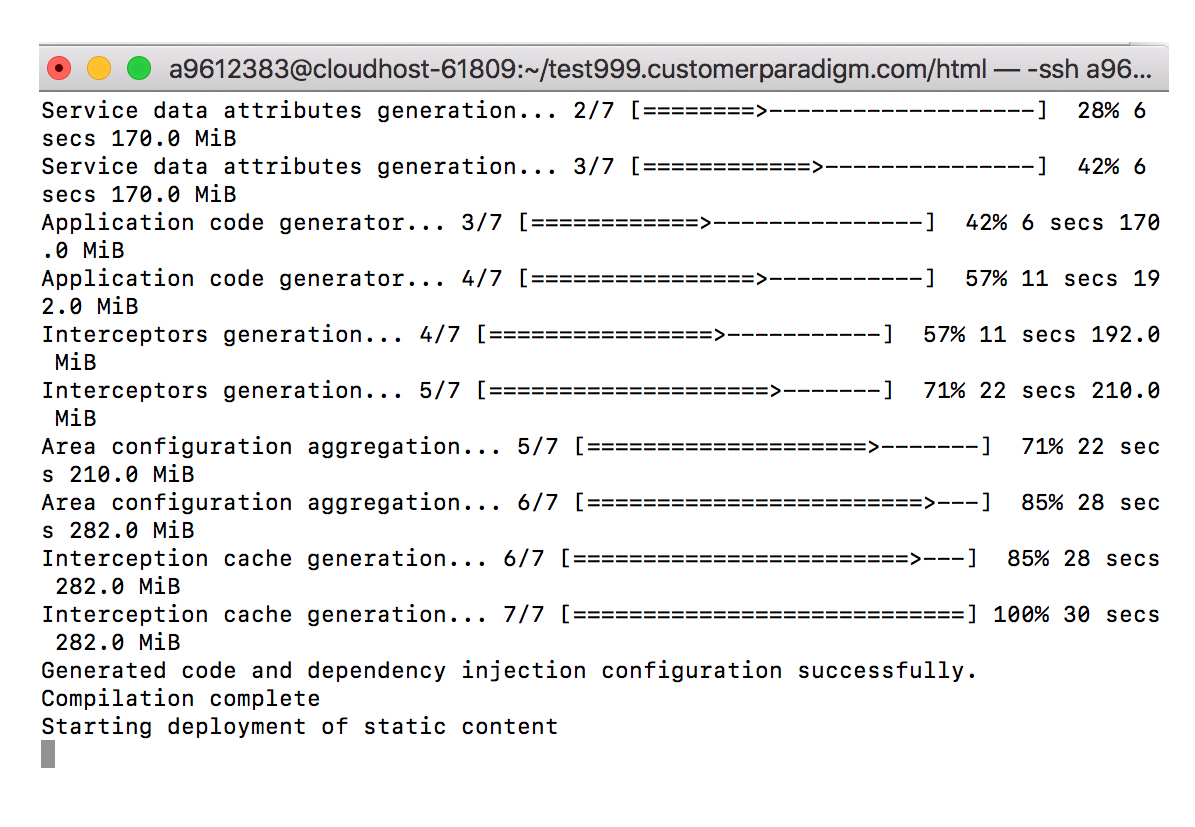
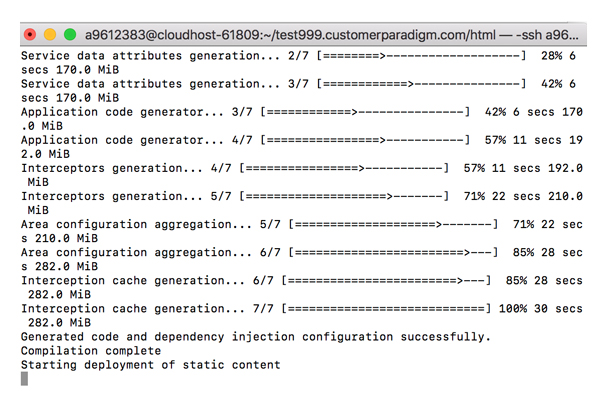
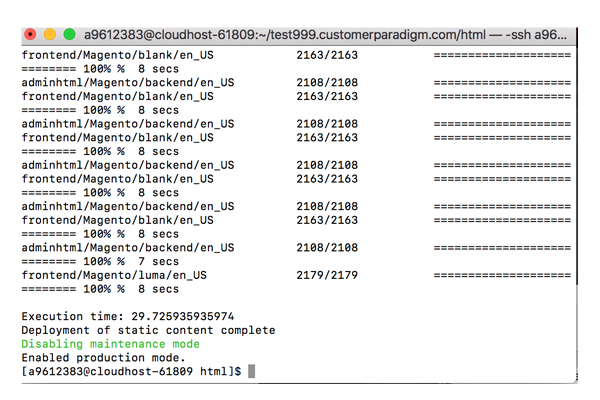
Step 23. Enabled Production Mode via SSH:
1.03 seconds is fast. But could I get the site to load even faster?
I SSH’d into the server, and enabled production mode on the site, by running these commands from the command line:
php bin/magento setup:upgrade
php bin/magento indexer:reindex
php bin/magento deploy:mode:set production -s
php bin/magento setup:di:compile
php bin/magento setup:static-content:deploy
View larger screenshot >>
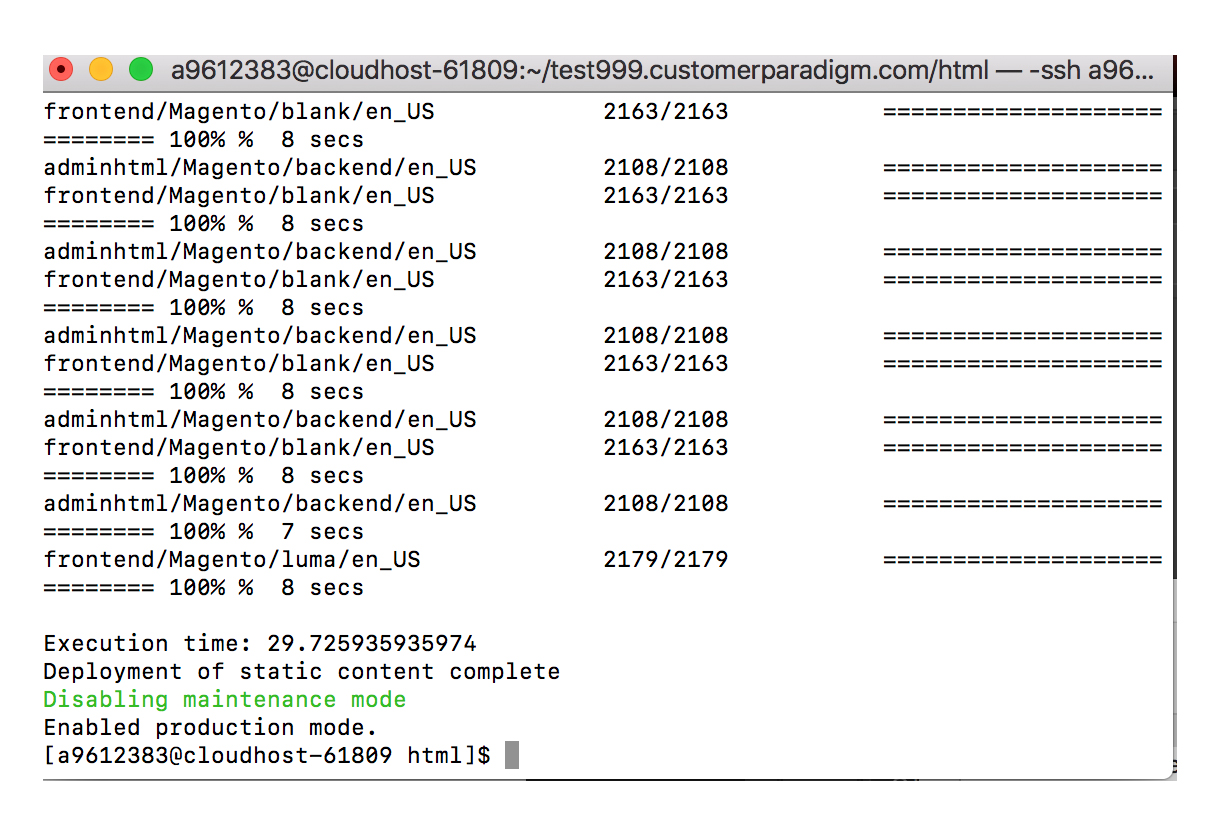
In Magento’s production mode, all of the static content is moved into the /pub/ folder, and all of the pages (such as the home page, category pages, product pages, CMS pages) are pre-built and rendered. This gives you extremely fast response times:
View larger screenshot >>
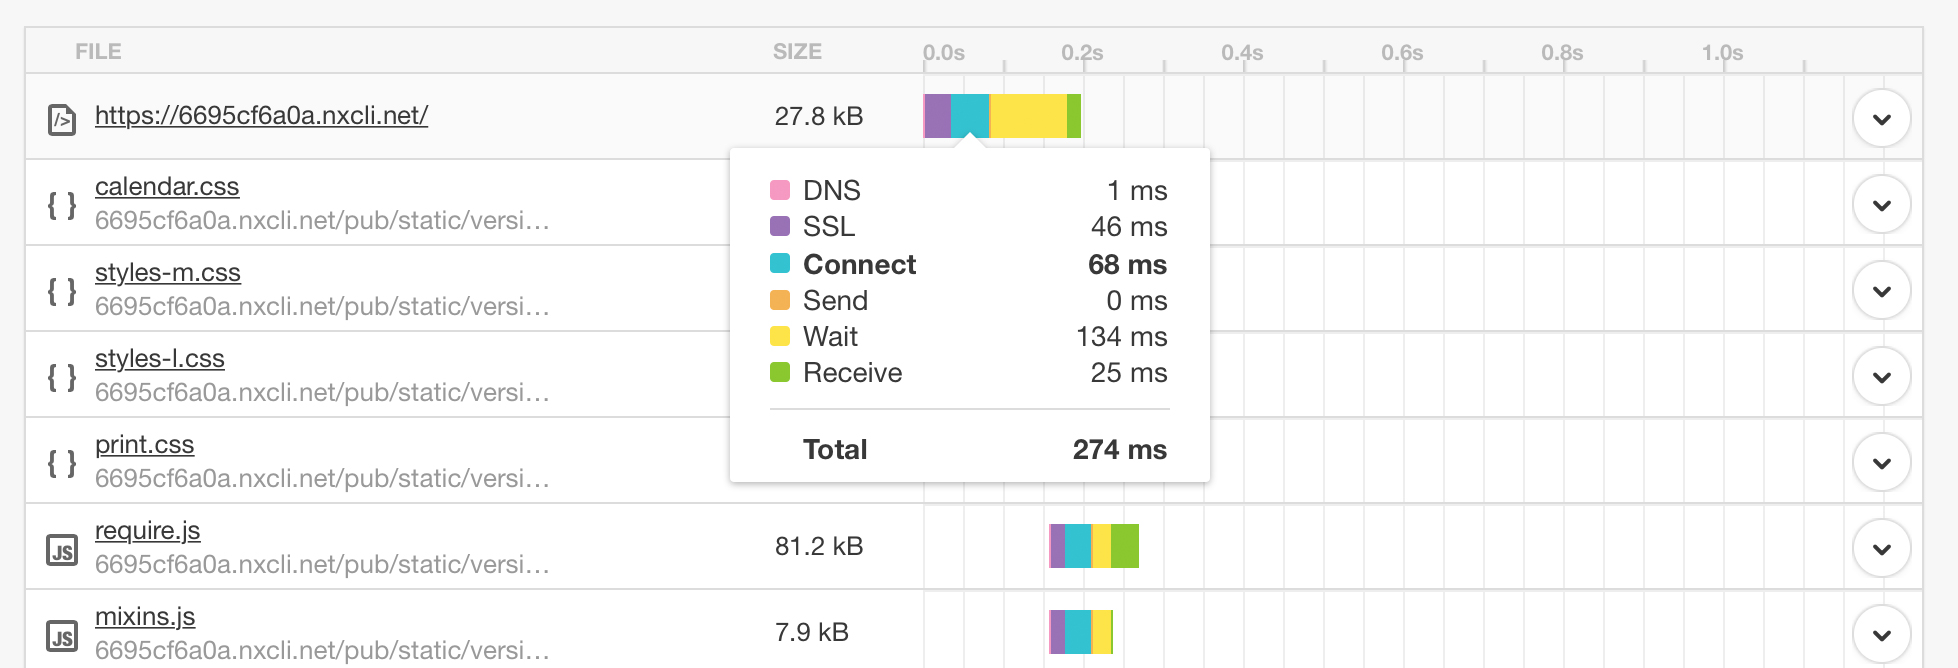
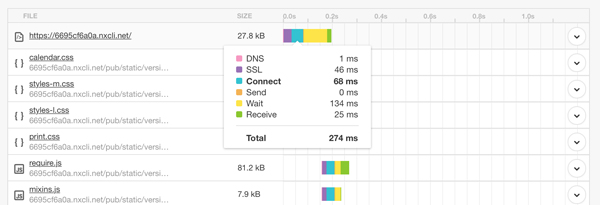
Step 24. Time to First Byte Caching in Magento:
With production mode turned on, and all of the caching on the site turned on, I ran the speed test again.
Time to first byte was 274 MS:
View larger screenshot >>
What this means is that when a person types in the URK of the site (i.e. http://test888.customerparadigm.com), their browser receives the HTML content for the page in 0.274 seconds. This is really, really fast.
The longest time was 134 MS (0.134 seconds) for the server to fetch the HTML for the home page.
Without caching, the server would have had to do a tremendous amount of file and database lookups. I’ve seen this wait time jump into the 5.0 – 12.0 second wait times for a site without caching.
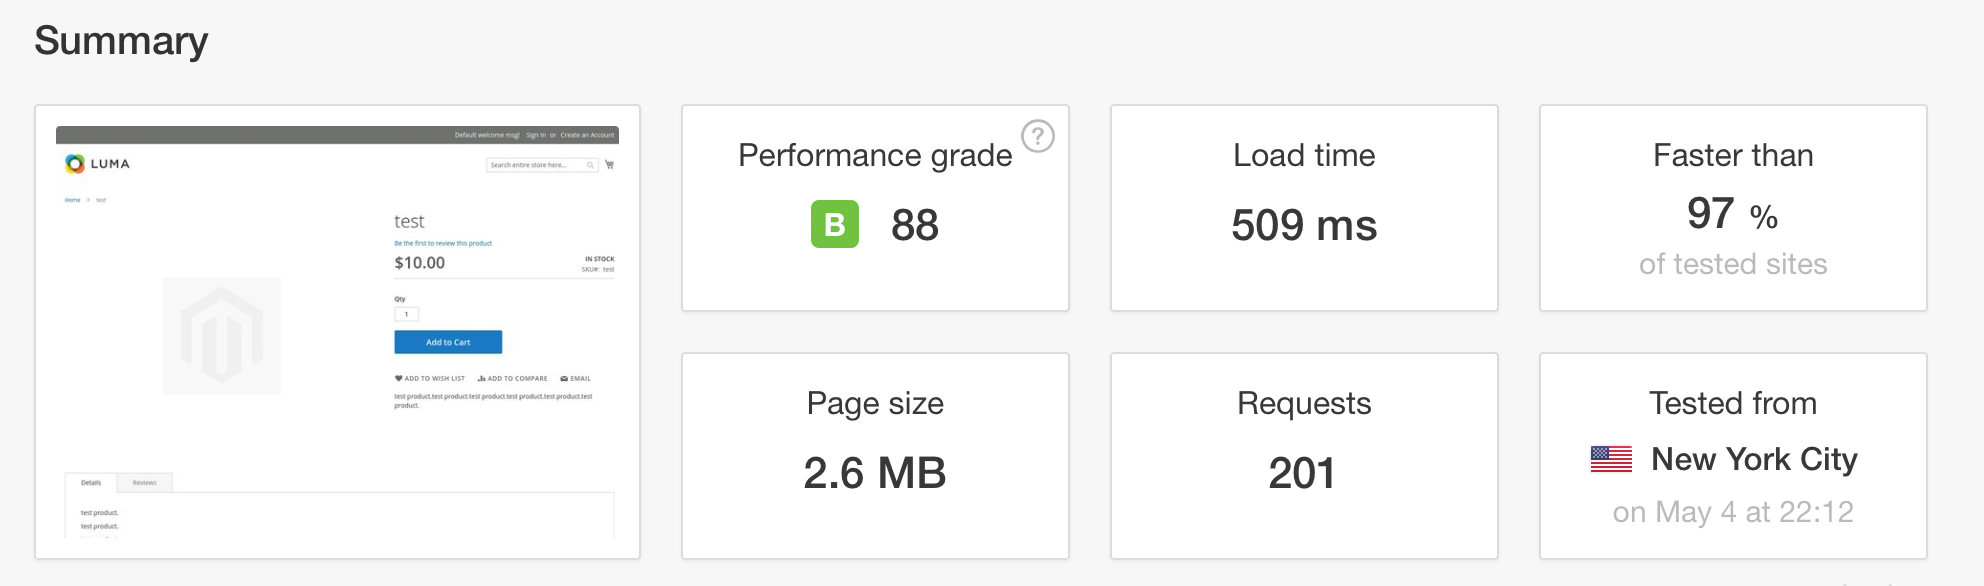
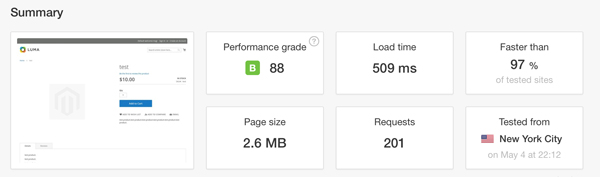
Step 25. Speed test on a product page in production mode:
I next did another speed test, with the site in full production mode. The test product page loaded in 0.509 seconds (509 MS):
View larger screenshot >>
That is blazing fast, especially for 2.6 MB of files in 201 requests. Of the 2.6 MB of content, 91.6% are scripts – it does take a lot of scripting to run an eCommerce site.
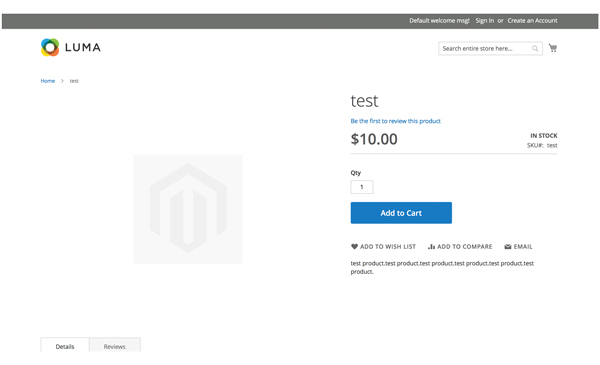
Now to be fair, the test product page doesn’t have a big image, or a lot of content:
View larger screenshot >>
But a page like this has a tremendous amount of functionality, including pricing, adding to a cart, reviews, product details and more.
Again, this is baseline. Adding more product images will increase the page load time.
From speaking with the Nexcess team, they have a number of additional UX items on their roadmap, and are releasing updates to the system every two weeks.
For more information about Nexcess Cloud hosting, visit here >>
Until next time,

Jeff Finkelstein
Founder, Customer Paradigm
303.473.4400
We love referrals! Our Referral Promise >>
|