Have you heard the news? There is a new version of Google Analytics that is already available and ready to be utilized! Starting in 2023, Google will begin to dial back Universal Analytics in favor of their most recent iteration, Google Analytics 4. But wait! You probably have some questions like how do I upgrade, how long do I have to make the switch, what are the benefits, etc.? Don’t worry, this article will walk through the benefits, upgrade process and hidden tricks.
Busy running your business? We’ve got you covered!
Fill out the form below and we’ll upgrade your Google Analytics to GA4!
About Google Analytics 4
Google Analytics has gone through many upgrades and iterations over the years. In 2005, GA1 Urchin was first released. Then GA2 Classic in 2008 and in 2013, GA3 Universal. After providing Universal Analytics for nearly a decade, we are on to the most recent iteration, Google Analytics 4 Property (GA4). Each new variation has brought a game changing user interface and unparalleled online tracking and GA4 is no different. This most recent iteration of Google Analytics builds on previous builds while also offering some new and very exciting features.
Why Upgrade?
The online landscape is constantly changing and so are the rules and regulations that guide data collection and use. Regulation updates like GDPR and CCPA are affecting how data is collected and utilized while updates to browsers are making traditional data collection more difficult. In addition, users have more control and transparency when it comes to how their data is collected. On top of all that, there is more data being collected than ever before, from countless sites and individuals and this amount will only increase. This is where Analytics comes into play, to help navigate all of this data.
Google recognizes that they need to evolve with the curve which leads us to Google Analytics 4 Property. To adapt with and overcome the widespread industry changes mentioned above, GA4 is built with some amazing features.
- At its core, GA4 is constructed with Google’s robust machine learning to automatically unearth trends from data that can be used to boost overall marketing performance.
- GA4 also presents a more accurate and consistent perspective of the customer’s journey, from acquisition to retention, spanning multiple devices, platforms and applications.
- GA4 is built to be scalable and stand the test of time. This most recent iteration works without cookies, allowing users to gain more knowledge of their customer base even with some voids in the data.
Benefits
Google Analytics 4 has a lot of the same features as previous builds like being able to track page views, interactions and users. Some new key features include:
- Tracking across the web and applications. Before GA4, users would have to use Universal Analytics to track web interactions and platforms like Firebase to track app interactions. Now, the best of both is available on the same interface.
- Improved event measurement tracking. In Universal analytics, basic events would be generated automatically and anything more specific needed to be created in Analytics. Now, there are more features available right out the gate. These include the ability to track scrolling, clicks on documents, outbound clicks and searches on the site. Plus, now, marketers do not need developers to set up custom events.
- A new view called pathways. Essentially, this view provides a more in-depth understanding of the customer journey and a deeper understanding of the flow a visitor takes on your website. This allows marketers to see each step leading up to a conversion and provides opportunity to optimize the steps leading up to a conversion.
- Ease of use on custom reports. In GA4, users can now choose starting segments to work with and then add dimensions and metrics. This provides a more concise and flexible data analysis. This feature is not a big change from what is currently available in Universal Analytics but it is more user friendly.
- Free BigQuery export is now available. In the current Universal Analytics, this feature was only available if you upgraded to GA 360 and was a bit expensive. This new feature is particularly exciting for marketers that utilize a data warehouse.
Google’s most recent Analytics platform showcases a lot of new and exciting features that improve the user experience and overall data collection. Upgrading to GA4 also provides an opportunity for users to review their current conversion tracking and further optimize the process to better align with company KPI’s. Overall, GA4 is a more user friendly and powerful version of the current Universal Analytics and presents more convenience for marketers to collect and understand their data.
Want to streamline the upgrade process?
Contact us and we will have your website on Google Analytics 4 in no time!
Please note: the following platforms do not yet support GA4.
- Blogger
- Cart.com
- PrestaShop
- Salesforce (Demandware)
- Shopify
- VTEX
- Weebly
How to upgrade
Now that we have covered why you should upgrade to GA4 and the incredible new features that you will be able to utilize, let’s dive in and get started on how to upgrade.

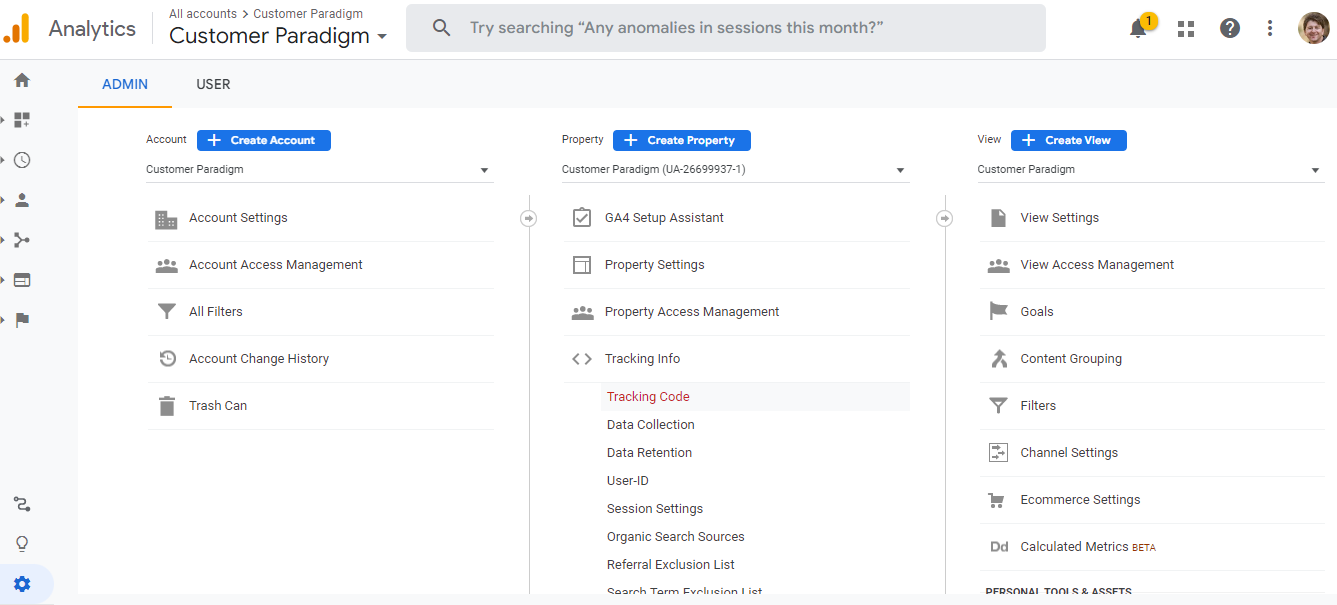
When you log into your Google Analytics account, navigate to the dropdown menu next to the “Analytics” logo. From here click on the account you wish to upgrade.

Analytics is structured as Account->Property-> Views
Please Note “Views” is a Universal Analytics feature, if you do not see the “Views” column on the far right, your account is already GA4!

Once you have selected the account you wish to upgrade, navigate to the corresponding property. In the screenshot below, you can see two properties, one with a UA ID and the other with no UA. In this view, the UA ID is the original Universal Analytics property and the one without is a GA4 property. This is another way to see if you have already upgraded to GA4.
Step 4
Once you have selected the desired property, navigate to the view you wish to upgrade and click. Views are disappearing from Analytics, and since GA4 uses an existing UA view to upgrade, this is where you start.
PLEASE NOTE: Any newly generated analytics property will be a GA4 Property by default

Step 5
Upon clicking the view, the main dashboard opens up. You should see something very similar to the screenshot below. From here, navigate to the Admin section at the bottom left corner and click.

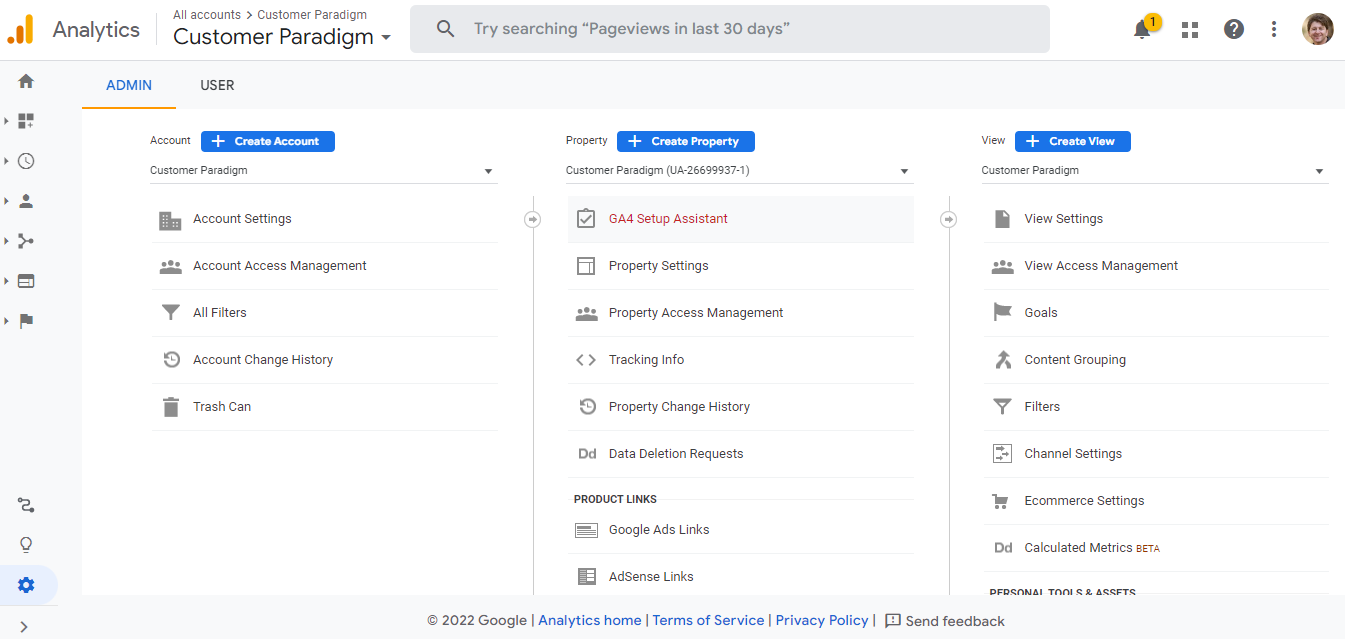
Step 6
Once you click on “Admin” you should see a dashboard similar to the screenshot above. This shows the admin view on a Universal Analytics property. You should see three columns and an ID that contains UA-#####.

Step 7 – GA4 VIEW
When clicking on the Admin section, if you are only seeing two columns and an ID without the UA prefix, this means that your property has already been upgraded to GA4. Hooray! Your work is done.
NOTE: Any new property that you create will automatically be generated as a GA4 property

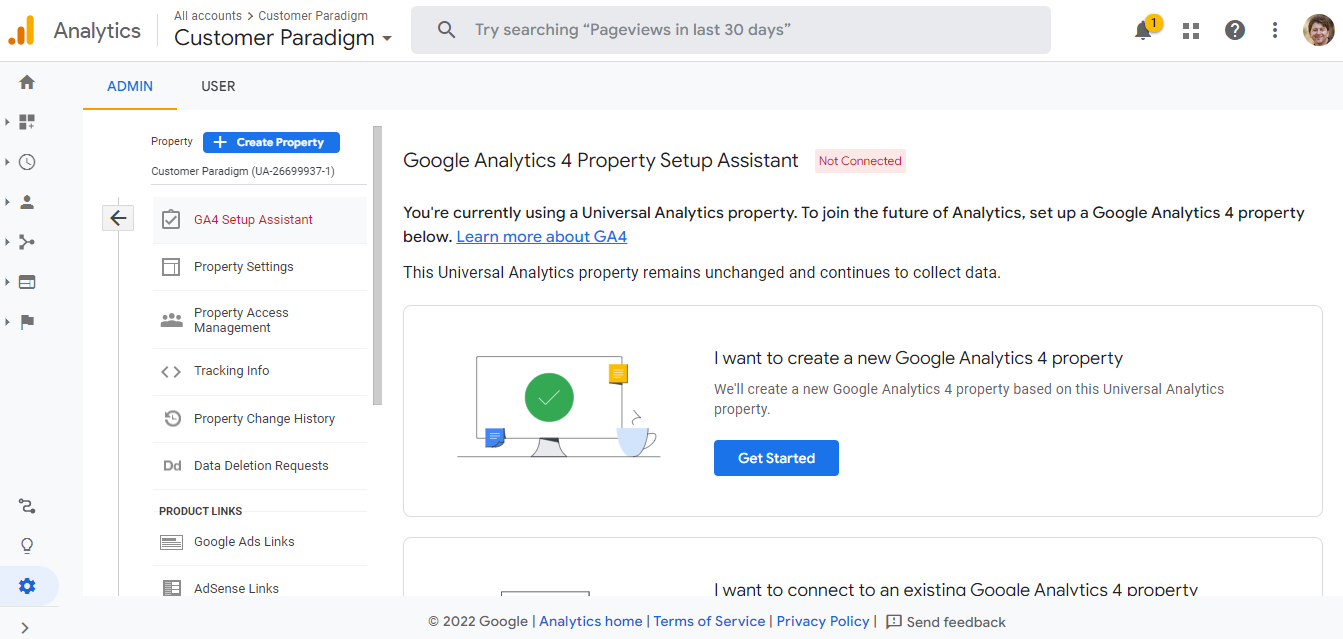
Step 8
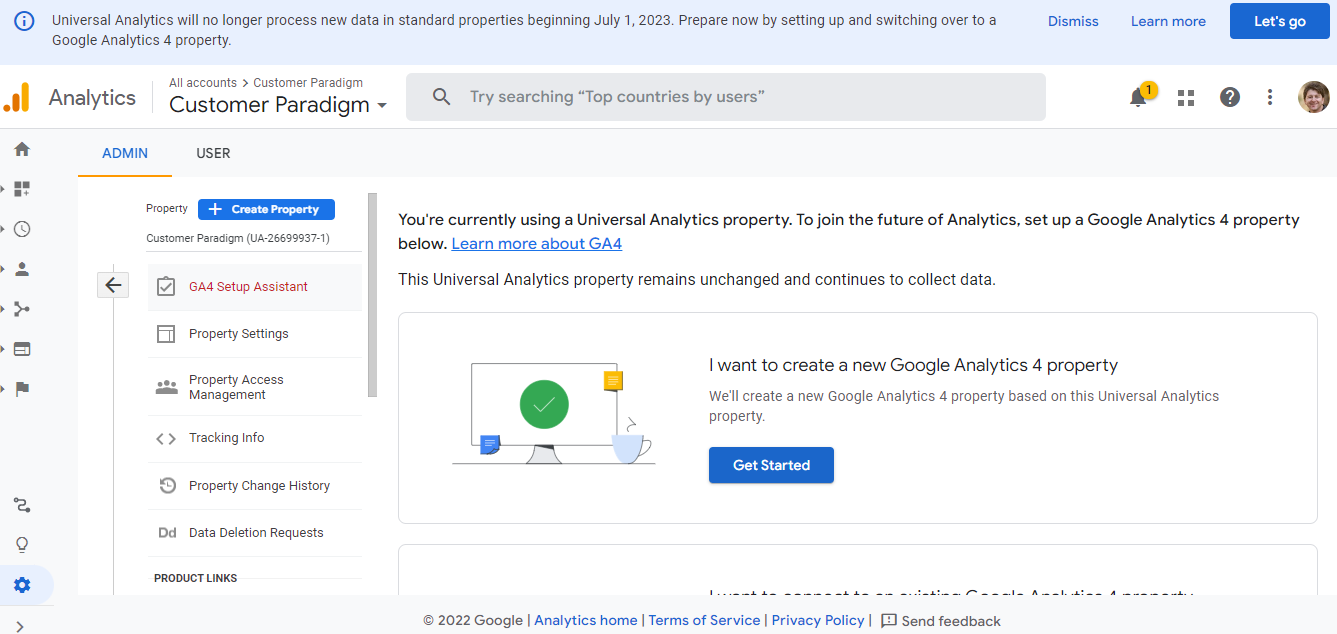
Once in the Admin section of Universal Analytics, navigate to the “GA4 Setup Assistant” and click.
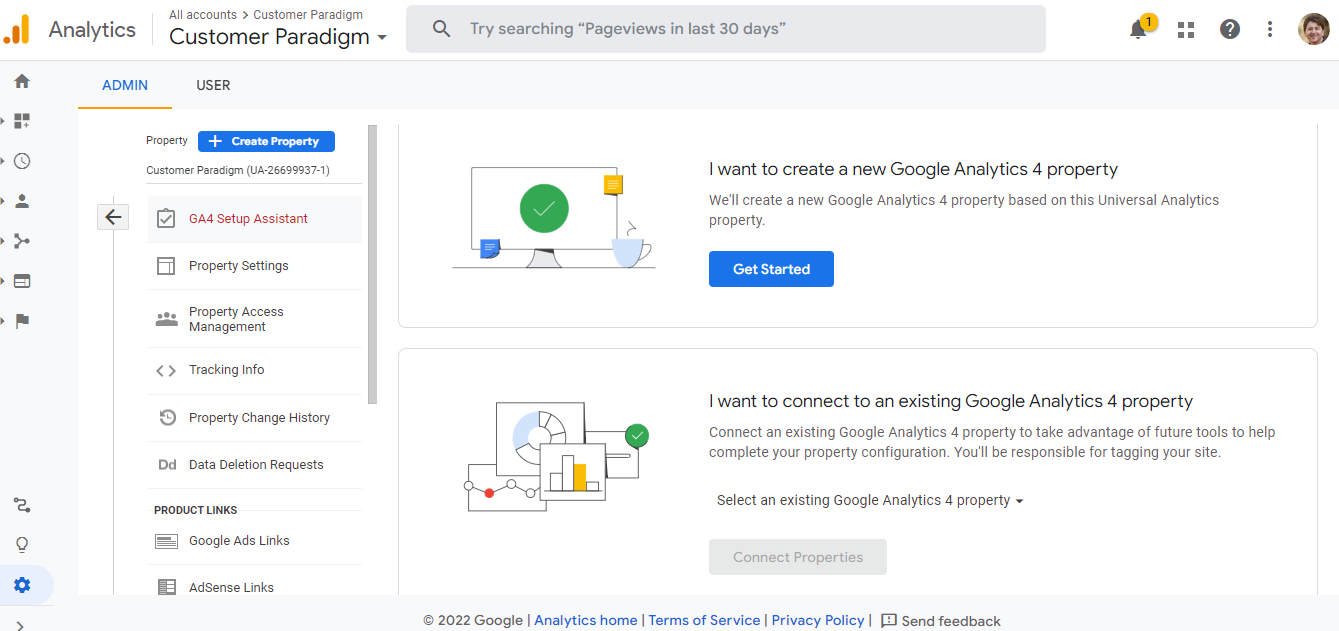
Step 9
Upon clicking the “GA4 Setup Assistant,” the window below should open with two options on how to proceed.
Step 10
The first open (I want to create a new Google Analytics 4 property) is where you want to click if you do not already have a GA4 property set up.
The second option allows you to connect to an existing GA4 property. For example, another member of your marketing team could have created a new Google Analytics property to replace what is currently being used. From here, the new GA4 property can be linked to the old, existing Universal Analytics.
Remember: Starting in 2022, any new property created in Google Analytics will be a GA4 property by default.
Step 11
Since we are going over upgrading to GA4, you want to select the first option. “Get Started”
Step 12
Once you click on the “Get Started” button, this window pops up. This window essentially lays out what the upgrade process does and how it will be completed.
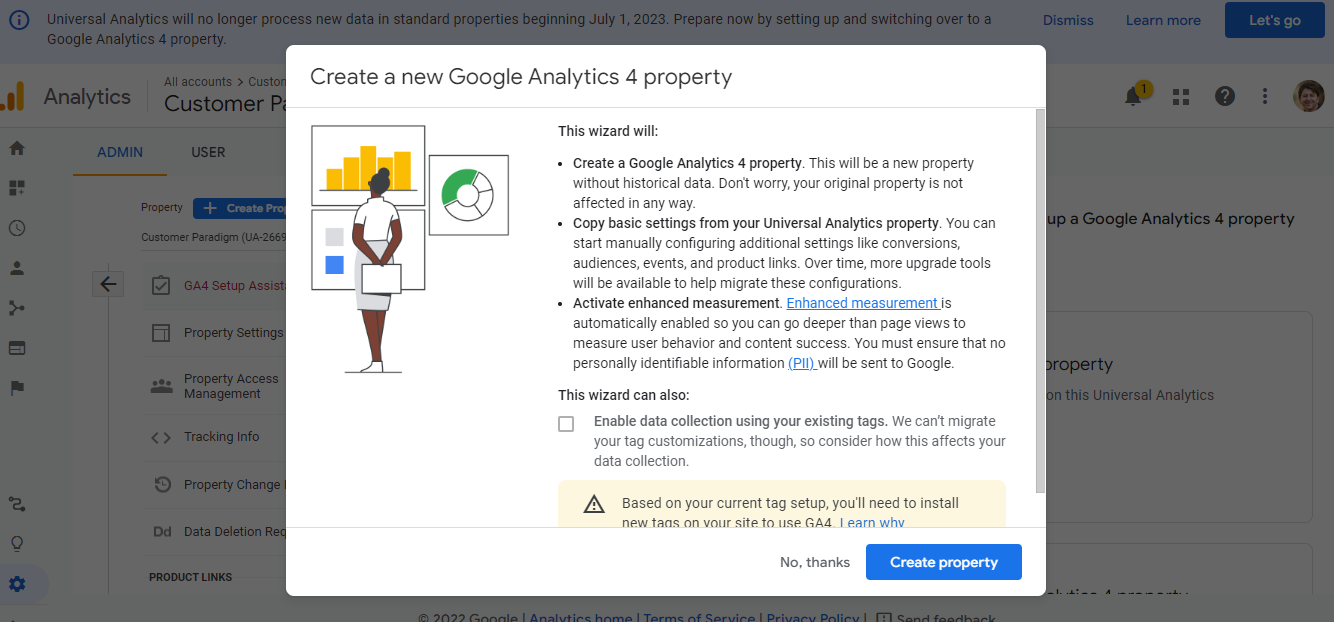
Step 13
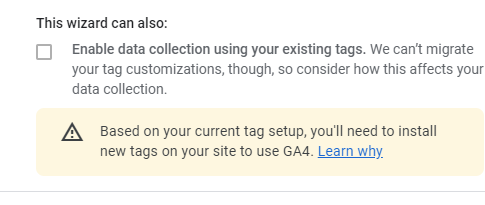
You may have noticed this disclaimer at the bottom of the page. This basically says that we will need to install the latest Gtag version (gtag.js) on our site to use GA4. For some of you, your current gtag set-up may be enough to pass data and utilize GA4. This section will be the determining factor.
Step 14
Now that we know what the upgrade will entail, including utilizing old or new tags, from here, we can click “Create Property”
Step 15
After clicking “Create Property” you will see this window. We are not done yet! Now, select “See your GA4 Property”
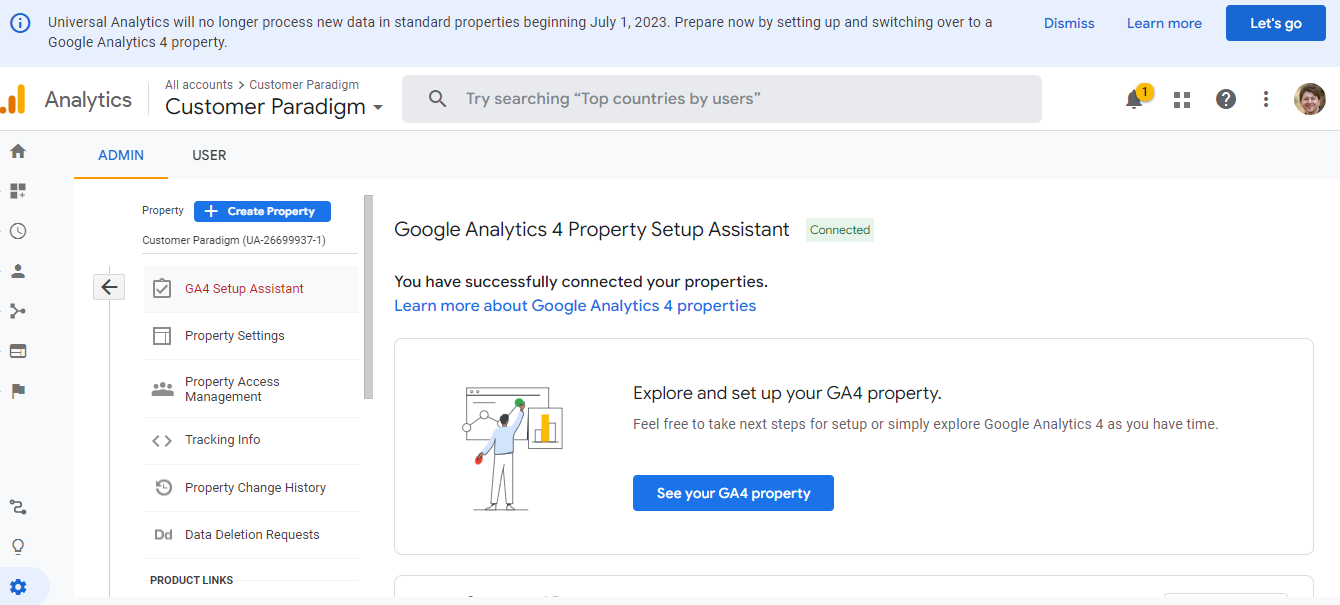
Step 16
Upon clicking “See Your GA4 Property,” a new tab will open with your new GA4 property. The reason why a whole new tab opens is that GA4 is a separate entity from Universal Analytics. The way the GA4 upgrade is setup, it uses the original property you chose when starting the upgrade process to generate basic tracking parameters.
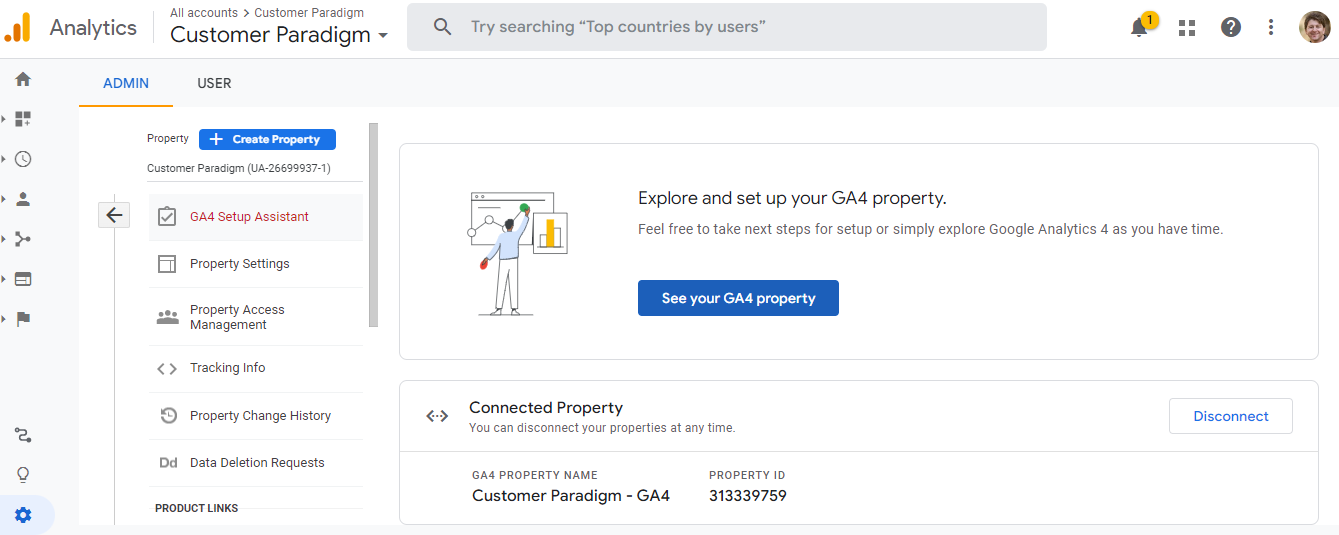
If you click “Open Connected Property” the view below shows that our new GA4 is linked to the original Universal Analytics. This is a great way to double check that you have selected and upgraded the correct property. To get back to the upgrade, select “See your GA4 upgrade”
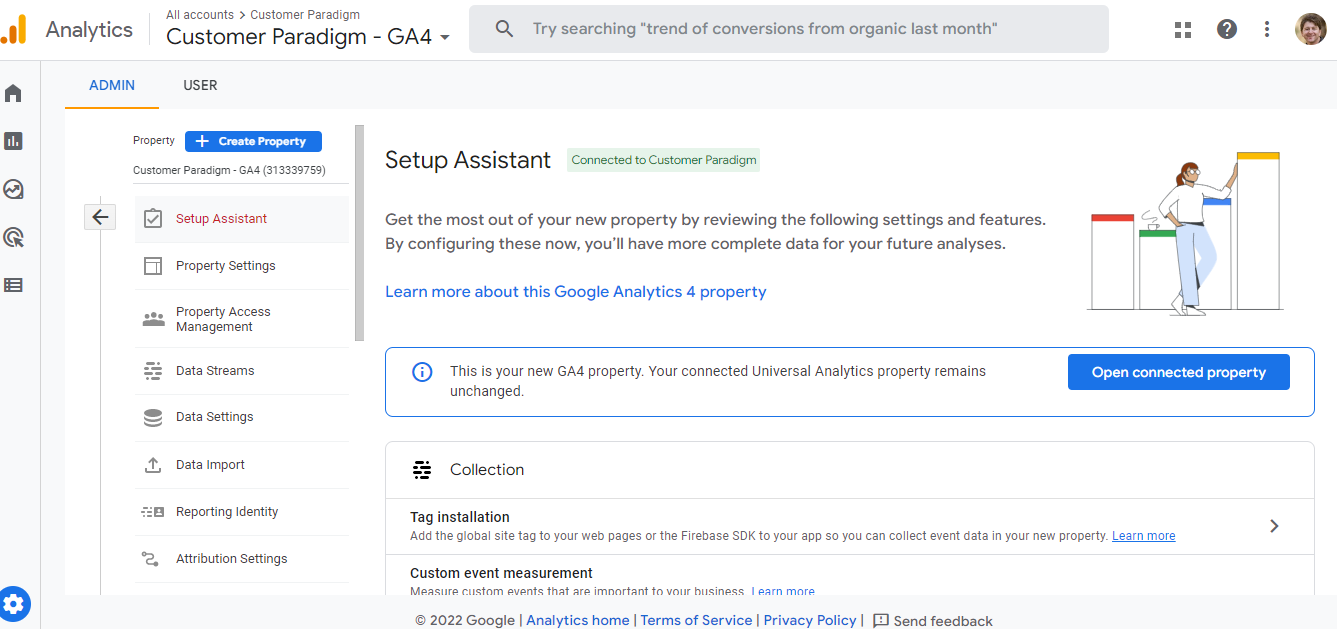
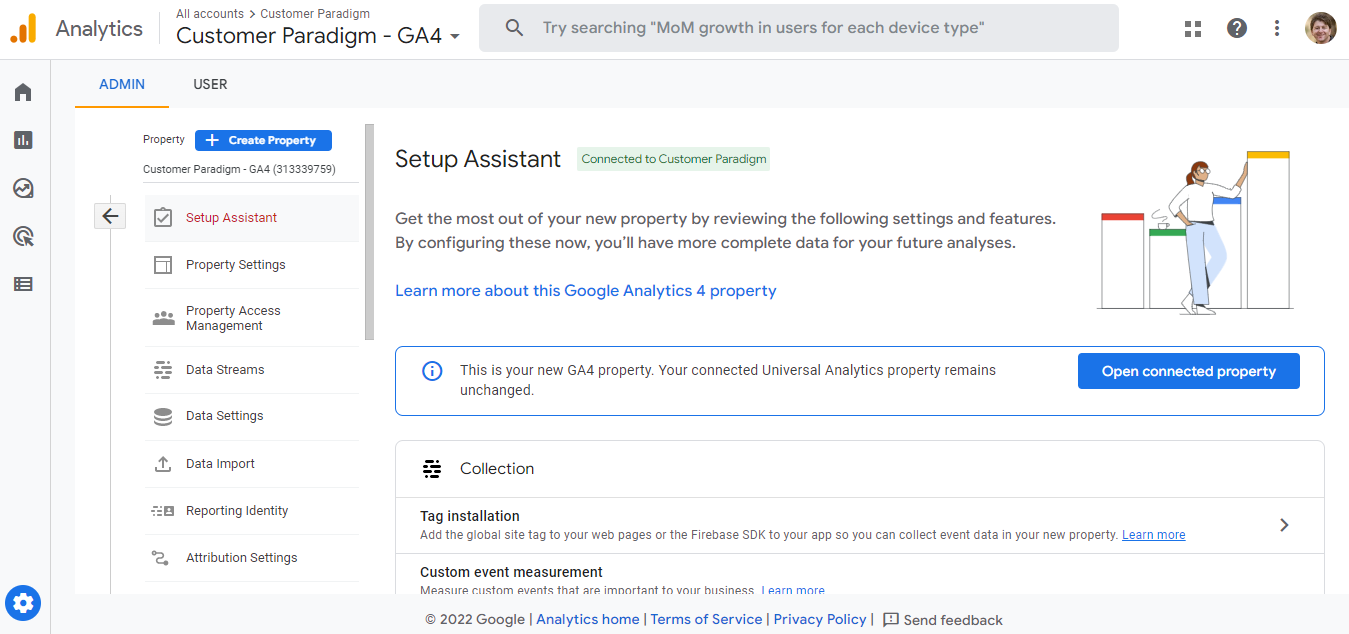
Step 17
After clicking on “See your GA4 property,” you should see this window. This is essentially the Admin panel where you have access to users, tagging instructions, conversions, linked accounts and audience definitions. The view below is from the “Setup Assistant” tab under the Admin panel.
Before we dive into the details of this panel, let’s start with the Tag Installation.
Need help upgrading to GA4? Our certified experts can take it from here!
Step 18
Navigate to the “Collection” group and find “Tag Installation.” From here, click on the little arrow to the right of the screen
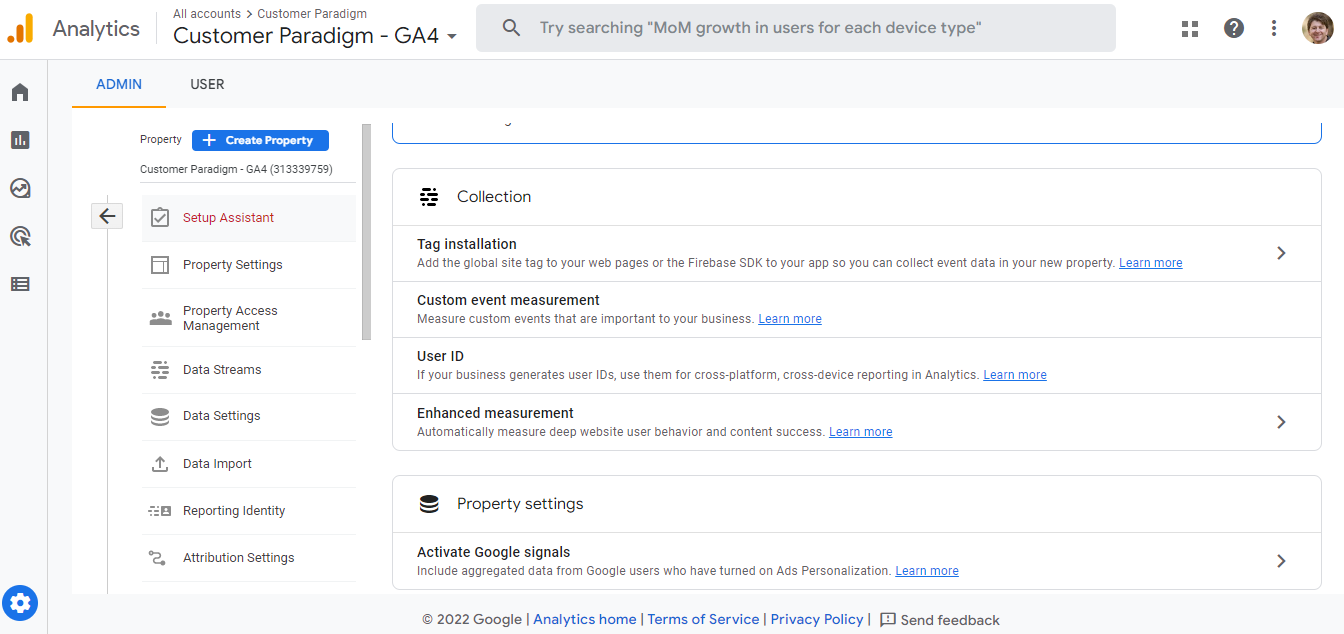
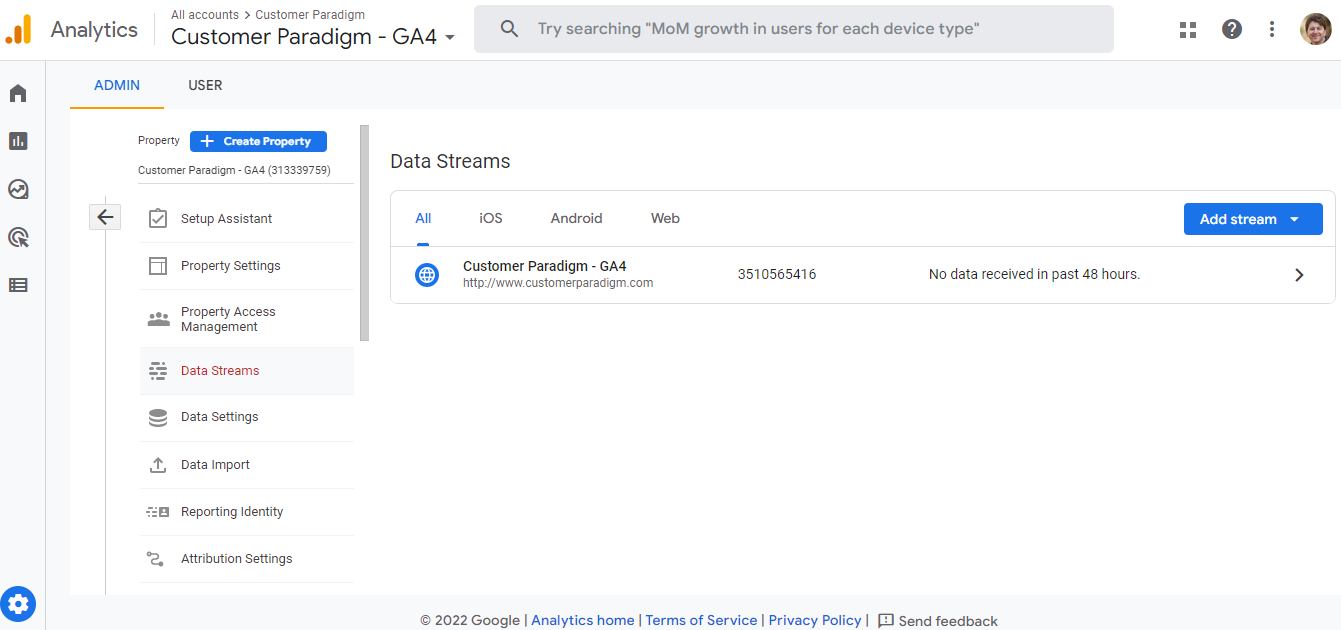
Step 19
After clicking on “Tag Installation,” you should see this window. This shows that the website is connected! Yay! If you have other apps or websites you utilize, they can be added here by clicking on “add stream.”
Please Note
- If you do use an app, you will need to create a data stream for each platform variation. For example: if your app is offered on IOS and Android, you will need a separate data steam for each option.
- Also, if you have a multiple website for your brand or a website for each country/region, it is best practice to create a data stream for each website. For example: Say you are a game developer and have a website that promotes your brand, a website for the game itself and an app for the game.
In this instance, you would need three data streams
- One for the main website
- One for the game website
- And one for the app
For now, let’s focus on the website. Click on the data stream to open up the “Web Stream Details” this has the tagging instructions and other key details
Step 20
After clicking on “Web Stream” you should see this window.
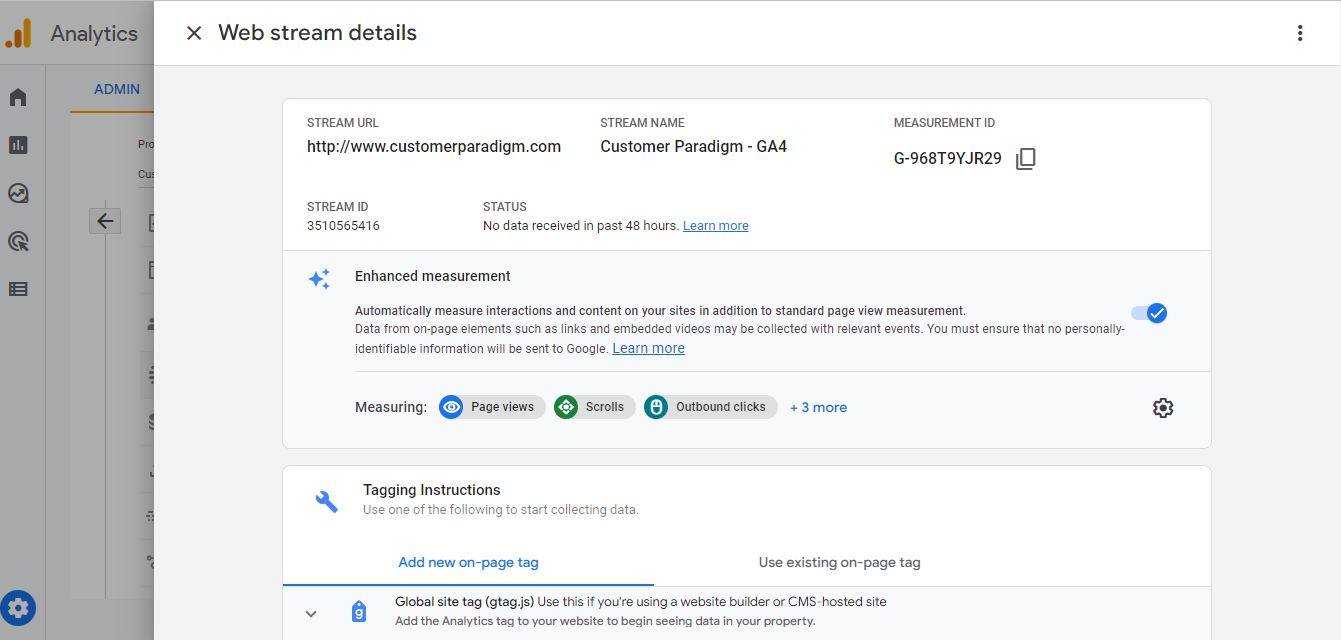
At the top, you can see:
- The stream URL
- The stream name ‘
- The measurement ID
- You would use this for other apps or your website to integrate GA4
You will also see the “Enhanced Measurement” section. If you choose to have this turned on, Google Analytics will automatically track:
- Page views
- Scrolls
- Outbound clicks
- Downloads
- Site searches
- Video engagements
I HIGHLY recommend having “Enhanced Measurement” enabled. This will save you and your team lots of time when creating events.
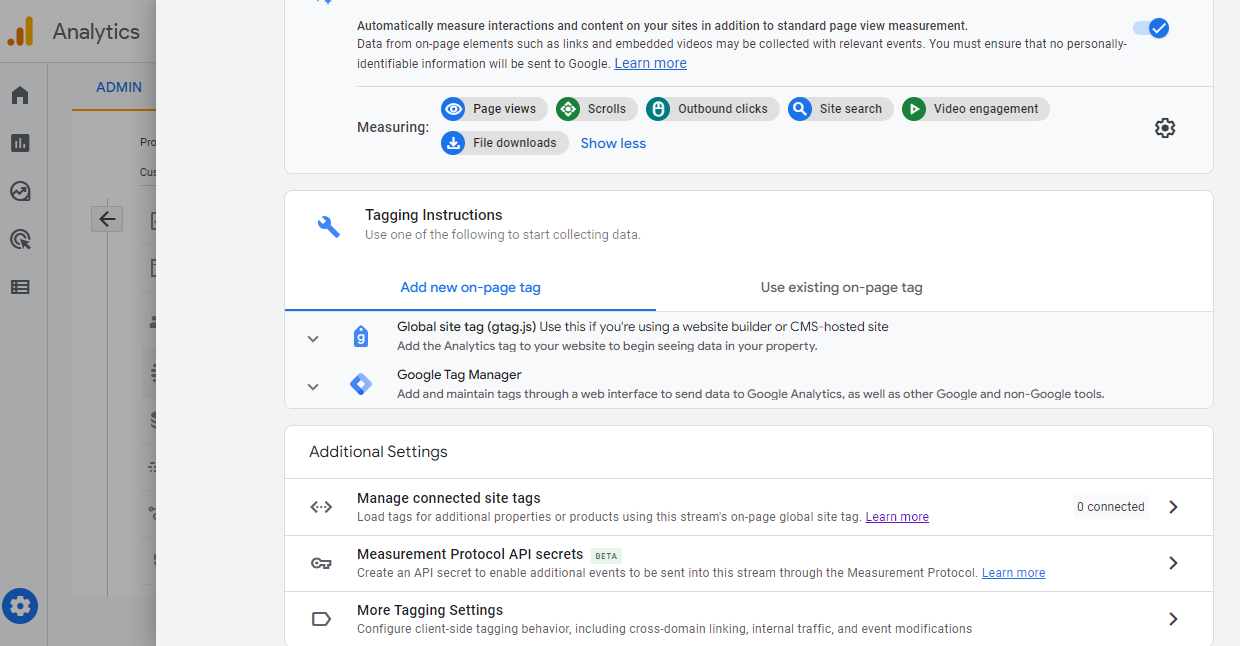
Now that we have covered the basics of the Data Stream, let’s move on to Tag Installation. Scroll down to this section, it is right beneath“Enhanced Measurement”
Step 21
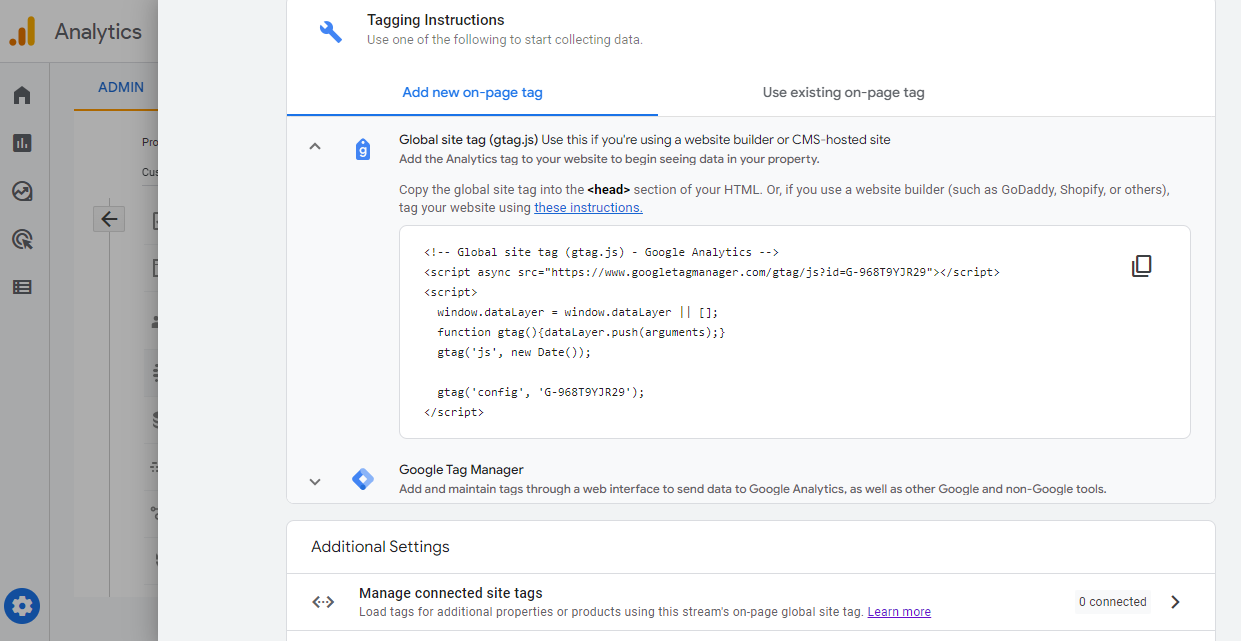
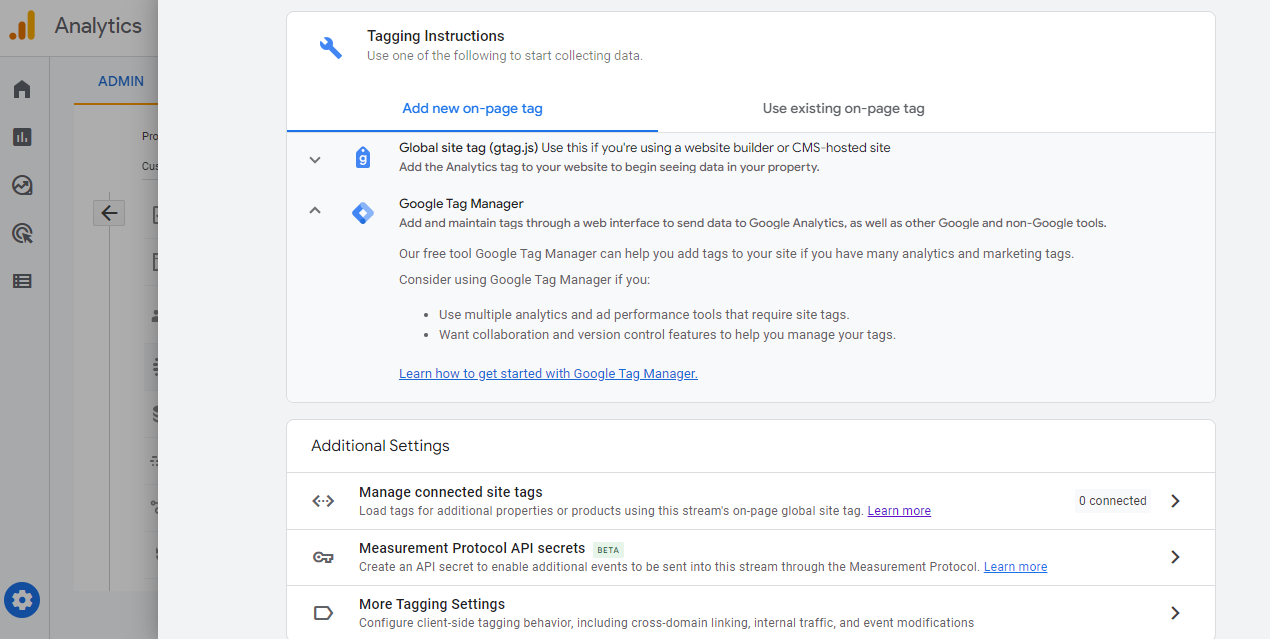
There are many different options available to install GA4 on your site.
We will first cover, “Add new on-page tag”
Step 22
The first option under this umbrella is to add the gtag.js directly to your page’s code. Depending on your comfort level, you or a developer can follow the instructions and get this installed
Step 23
The next option involves using GTM. This is a great choice if you are not a developer and want an easy way to install and track your tags. The following screenshots walk through the GTM process:
Step 24
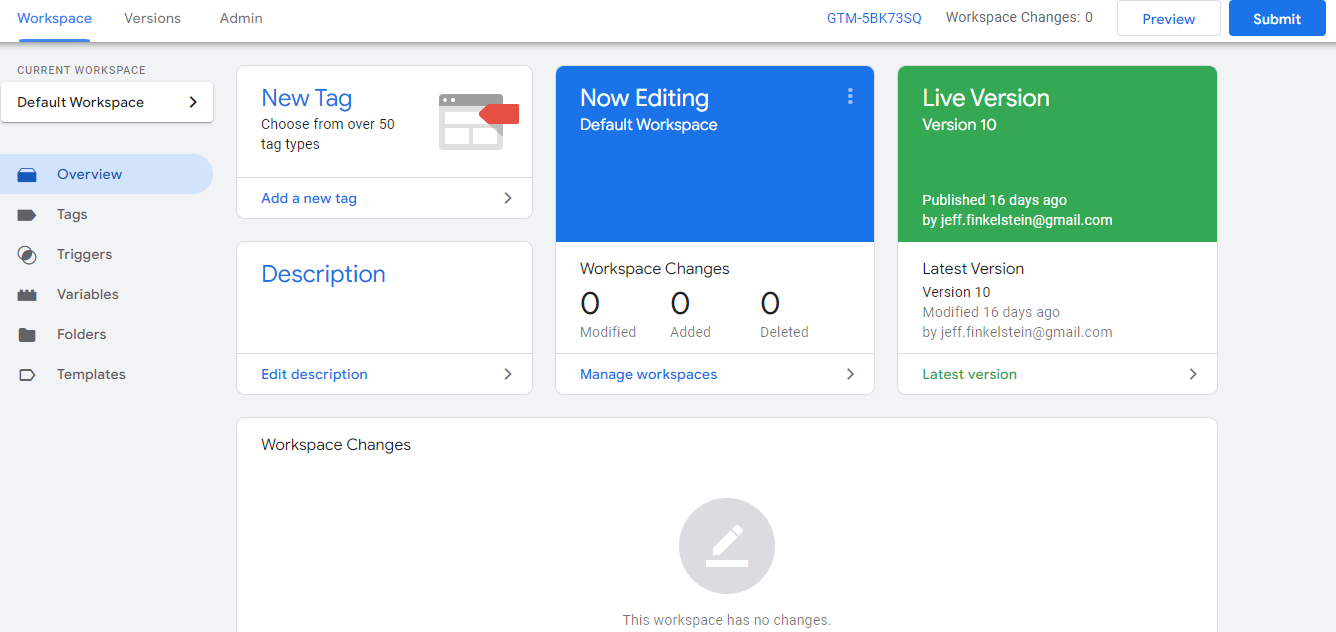
Log into your GTM account and select “New Tag”
Step 25
After clicking “New Tag” you should see this window. I have already named mine “GA4 Link”
From here, select “Tag Configuration”
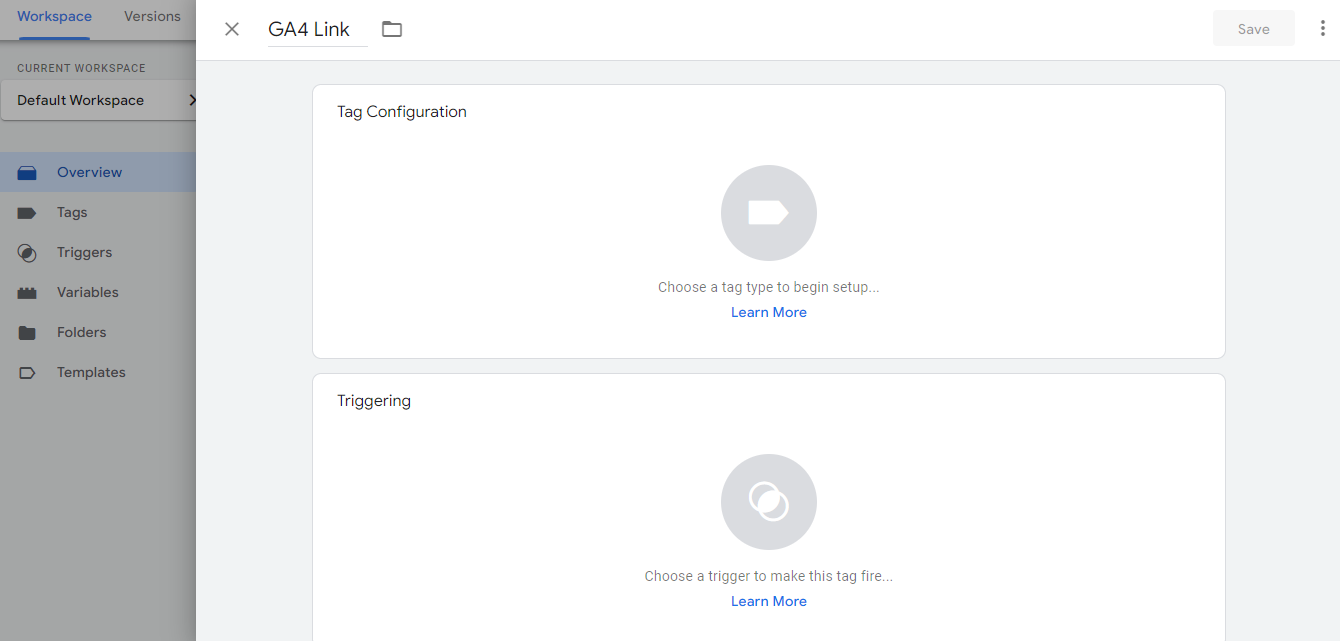
Step 26
Upon clicking, you will see a window with several options. We want the “GA4 Configuration”

Step 27
Click on GA4 configuration and you will see the below window.
You can access the measurement ID from the “Data Stream” section on the GA4 interface.
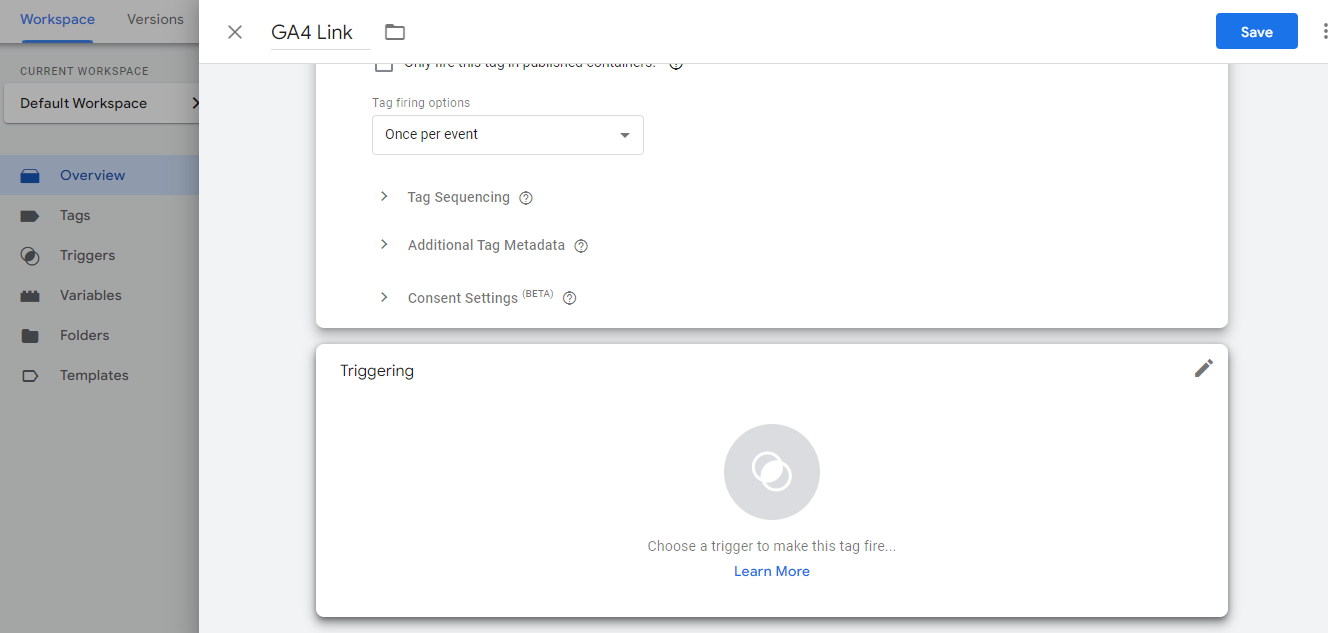
Unless you have some customizations to add, the next step is the Trigger.
Scroll down and you will see the “Trigger” below the Tag

Step 28
Select the “Edit” icon in the corner
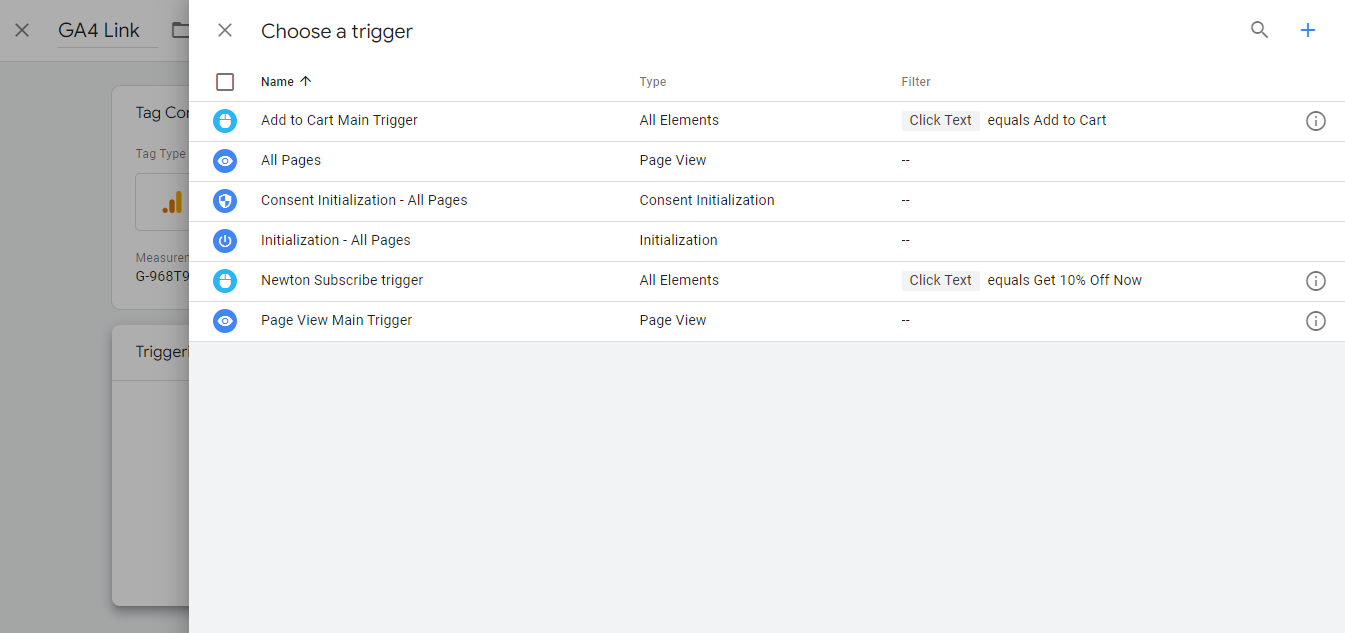
Step 29
After clicking on the edit icon, you will see a list of triggers. If you do not have any pre-made triggers, click the “+” icon on the top right. You want the trigger to be a page view trigger that fires on all pages.
Step 30
After setting up the trigger, your final GA4 configuration should look similar to the screenshot above. Now all you have to do is click save!

Step 31
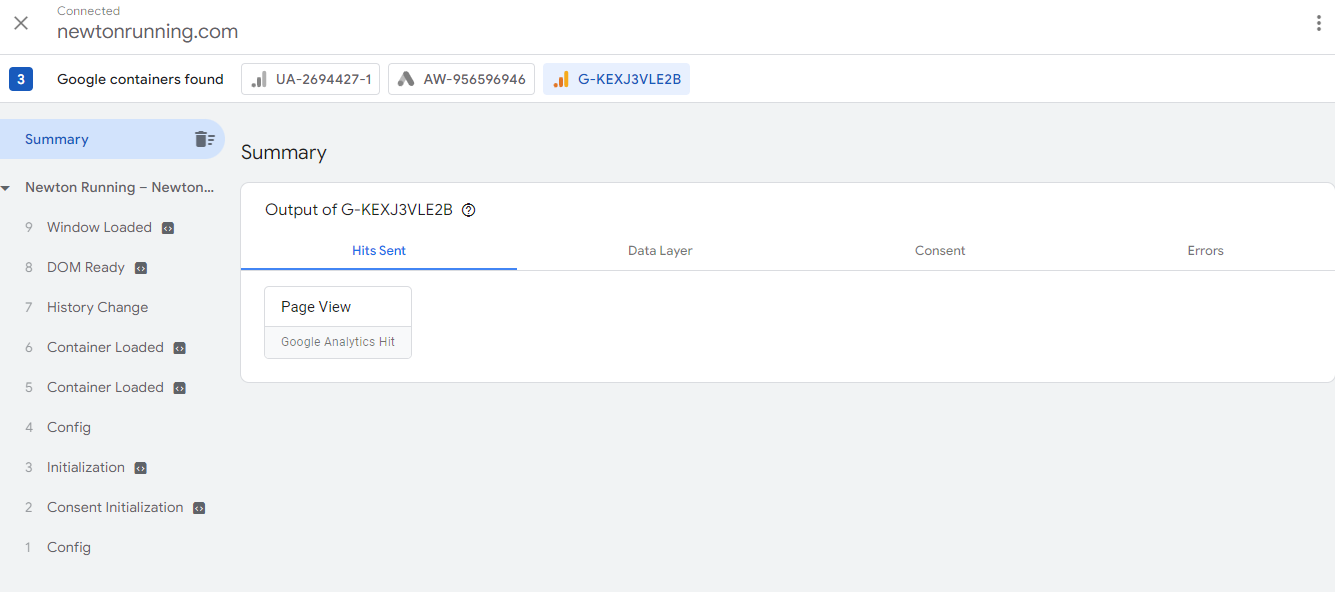
If you want to make sure that your GTM tag and trigger are working properly, open up Google Tag Assistant, plug in your website’s URL and you should see a G-XXXXXX code at the top. Select this and you will see the Page View
That is how you install using GTM! You can also create and install GA4 Events right in Google Tag Manager.
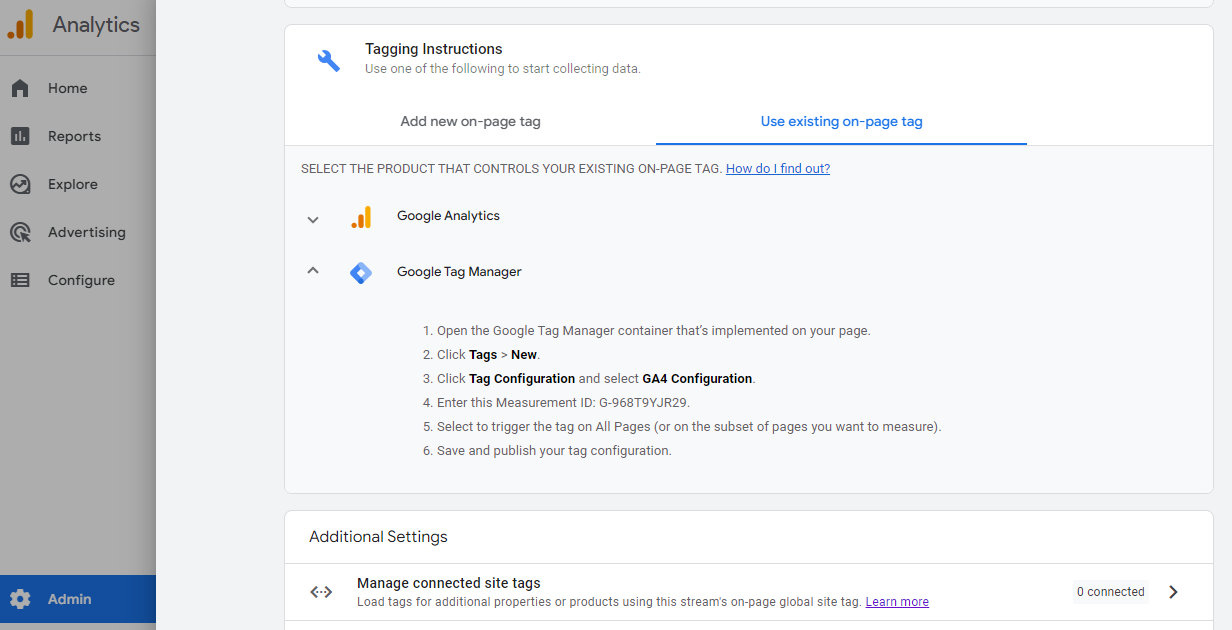
Now, let’s go over the other two tagging methods under the “Use existing on page tag” umbrella
Step 32
If you remember back at the beginning of the upgrade, there was an option to use your existing on page tags (see below) unfortunately for me, I did not have this option. If your current Universal Analytics account uses gtag.js to track metrics on your site, then this is for you!
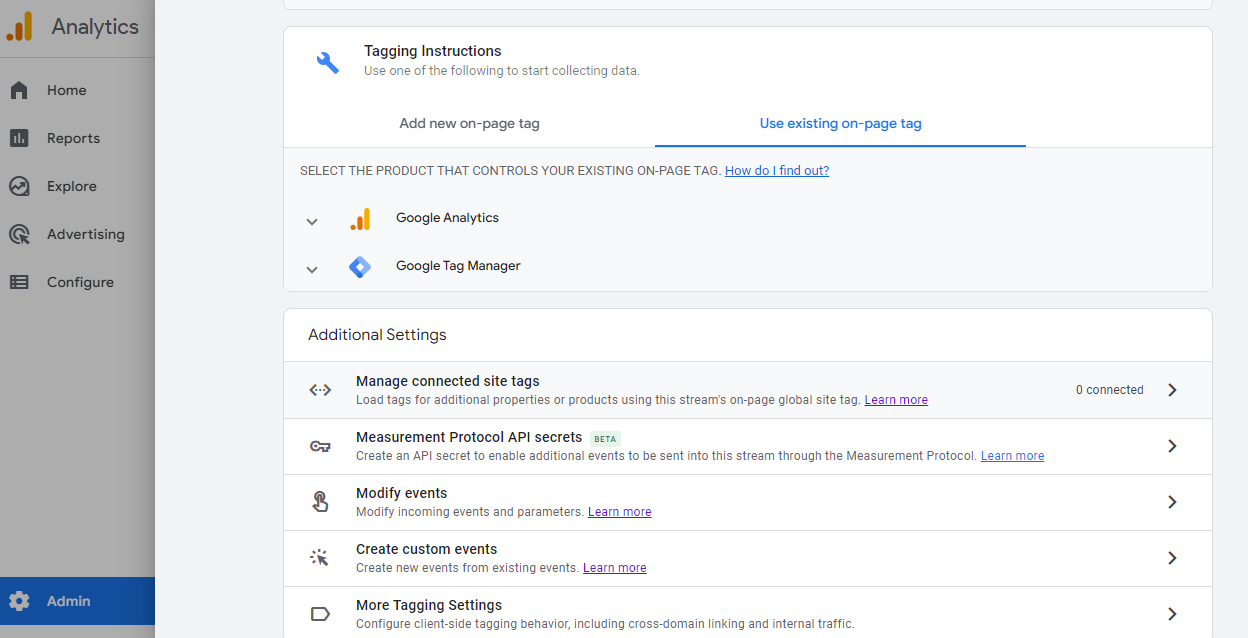
This was the notification that the setup wizard provinces at the beginning of the setup process

Step 33
First, we will go over the Universal Analytics option, click on the dropdown arrow, and you will see something similar to the screenshot below.

Step 34
Open the Admin panel of the Universal Analytics Property that you want to connect to your new GA4. Navigate to tracking info and tracking code. From here, click on “Tracking Code”
Step 35
After clicking on tracking code, you should see this screen
Step 36
Scroll down until you see “Connected Site Tags”
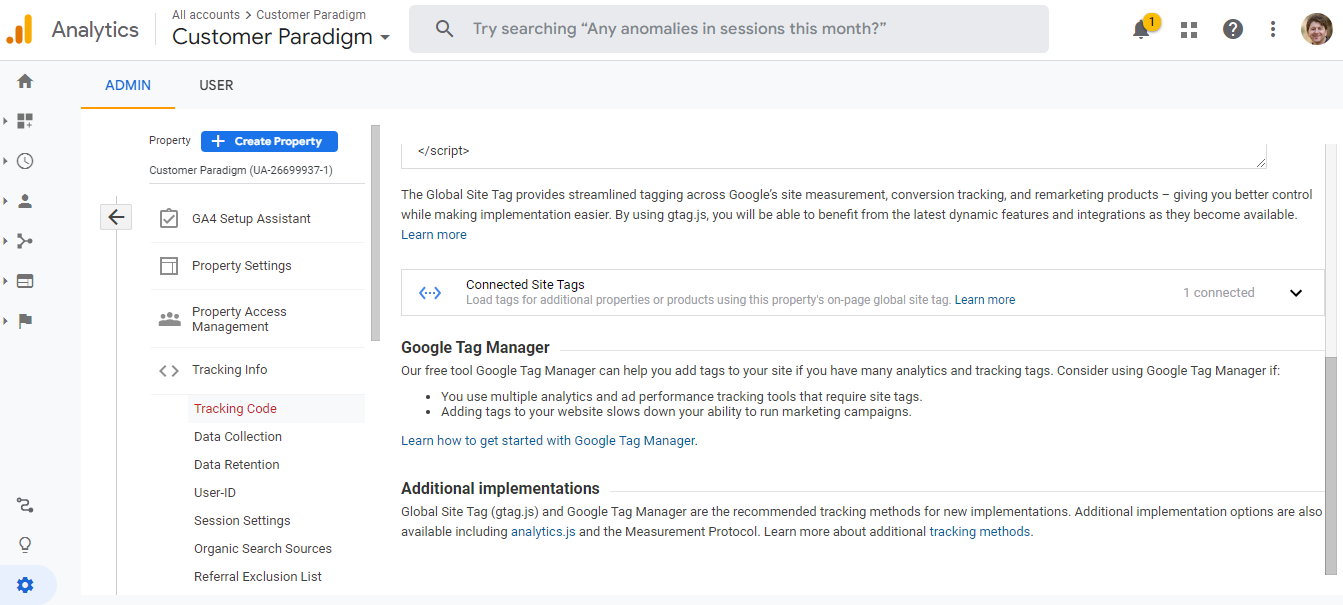
Step 37
Click on the dropdown arrow next to the “Connected Site Tags” text. You should see a window similar to the one below.
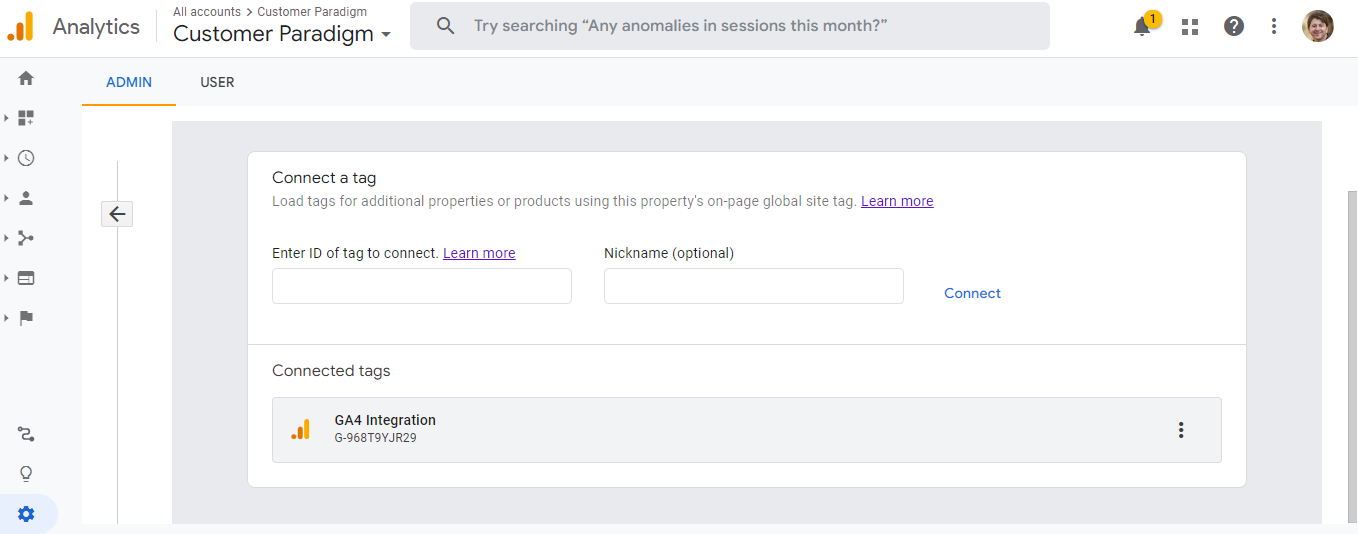
From here, plug in your GA4 measurement ID (this can be found in the data steam, it is also provided when you first select this option from the drop down menu)
That’s it! Your GA4 property is now using the tags from the old Universal analytics account.
Please note: While the properties are now connected, not every conversion, audience or custom dimension is transferred over. You will need to assess what needs to be recreated from the old Universal Account to the new GA4.
Now, let’s quickly go over the other “Use existing on page tag” option. This is with GTM
Step 38
If you go back to the tag installation section, select the Google Tag Manager option from the “Use existing on page tag” section.
This process is the exact same as the previous Google Tag Manager walk through.
There are 4 total options to tagging your site to use GA4. Whatever option you choose will depend on your current Universal Analytics account setup (are you using gtag.js or not?) or whether you prefer to use Google Tag Manager.
Also, please note, it can take up to 48 hours for data to start flowing from your site into GA4. Keep an eye on the dashboard for a couple of days. If you do not see data after 96 hours post installation, go back and double check that your tagging was set up correctly.
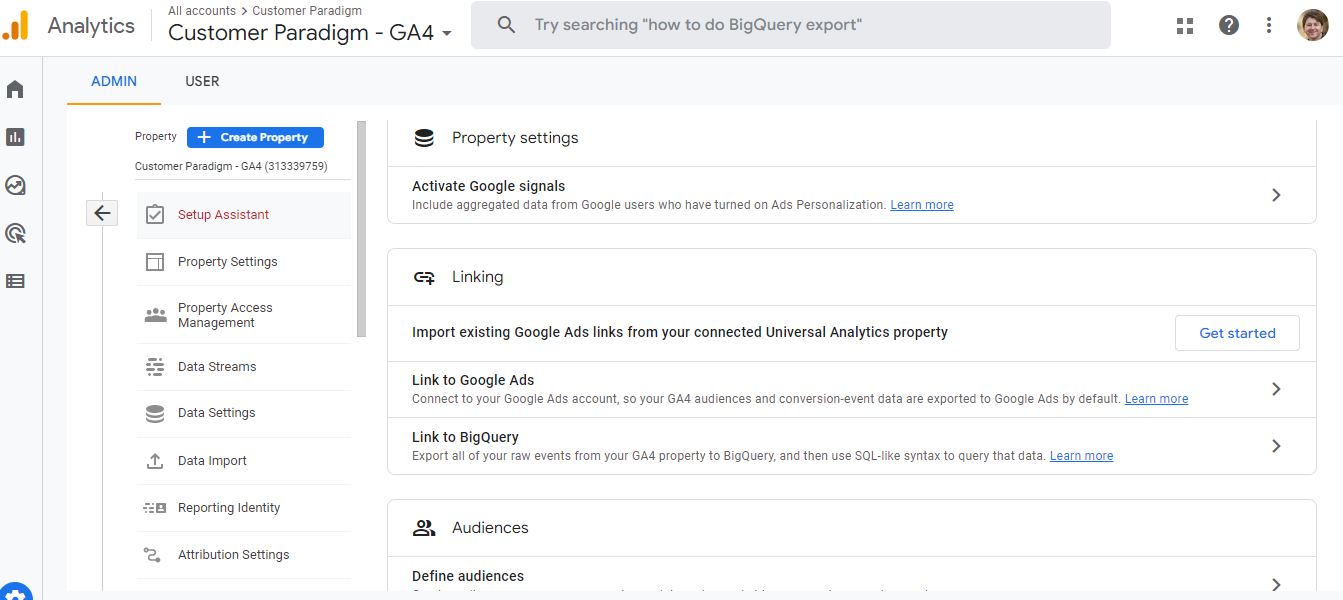
Now that your site has successfully installed GA4, let’s go over other features of the setup process such as enabling Google Signals, linking Google Ads and setting up conversion tracking.
Close out the “Web Stream Details” panel and navigate back to the “Setup Assistant” under the Admin panel
Step 39
From the“Setup Assistant” window, scroll down until you see “Property Settings” and “Activate Google Signals” you should see a screen similar to the one below
From here, click the arrow to the right of the screen
Step 40
After clicking on the arrow, you should see the screen below.
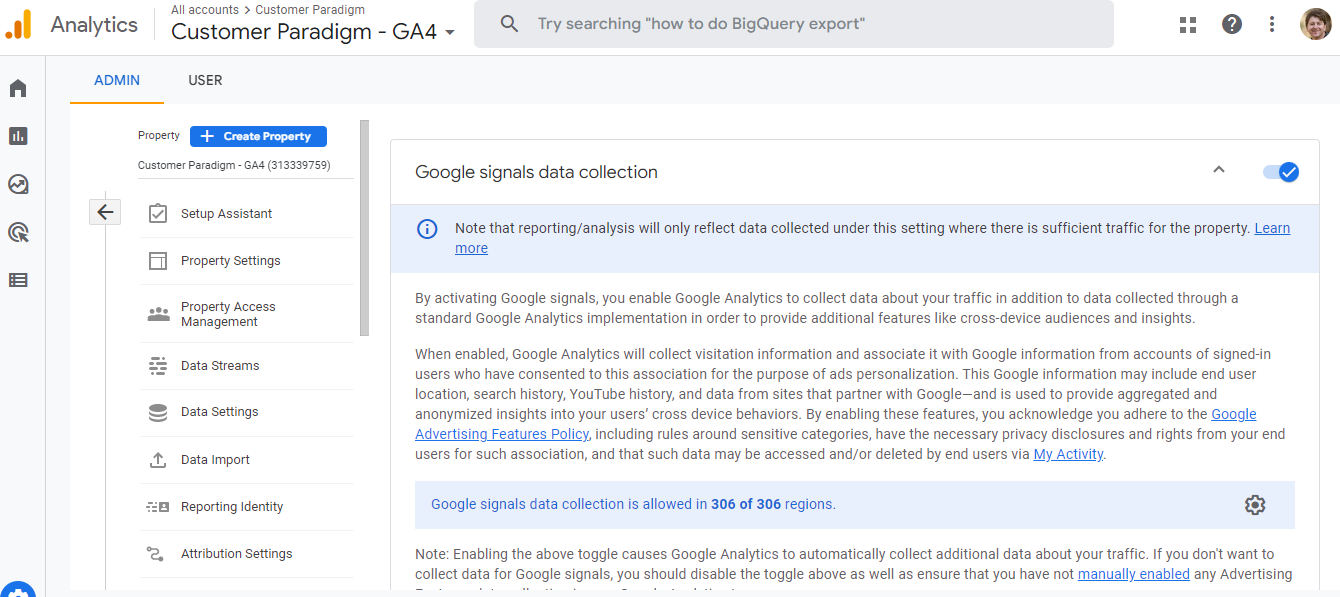
From here, click the check box next to “Google Signals data collection” so that it is on.
With privacy settings increasing and platform updates, it is becoming increasingly difficult to track user metrics.
Activating Google Signals basically allows Google to track users across the web whenever they are signed in to a Google Device and provide consent.
GA4 pairs this with User ID and Device ID to create a holistic image of the customer journey. Using these three signals, Google is able to deduplicate and identify a single user’s journey.
- User ID is any identifier that you assign to a user after completing a purchase, for fill, etc.
- Device ID is browser or app based ID that the Google cookie assigns to a user
For example, if someone looks at a product on their phone and later purchases said product on their computer, GA4 is powerful enough to use the three signals mentioned above and create a single path for that user.
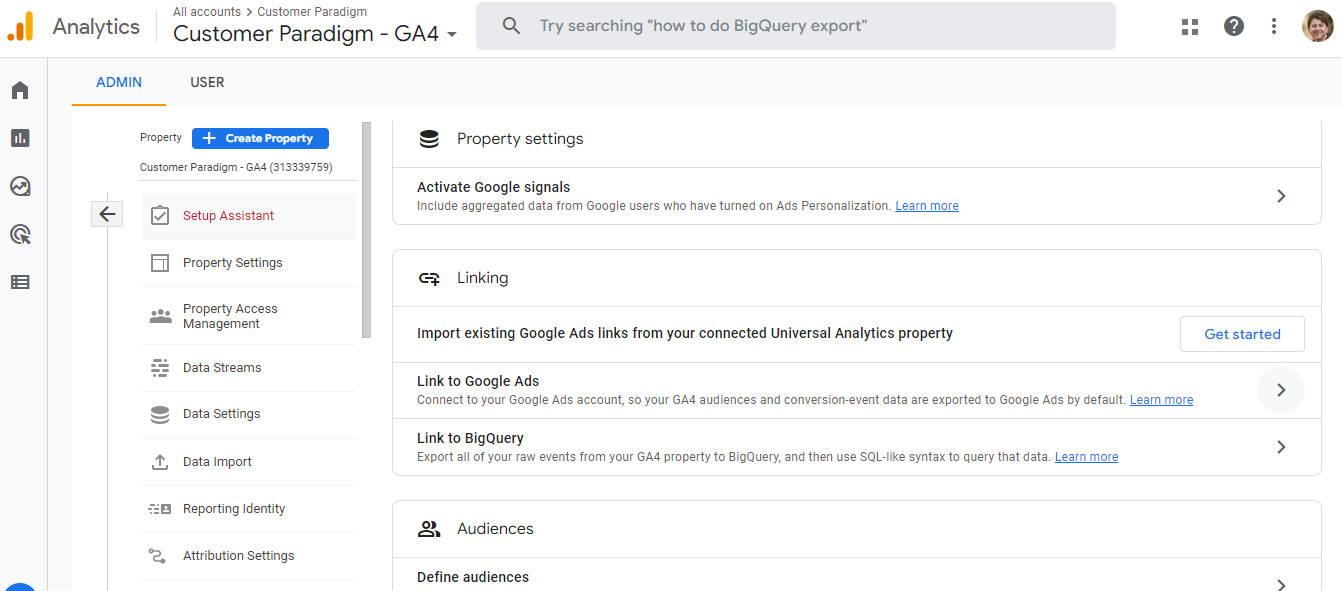
Step 41 – Next, let’s go over linking Google Ads.
Navigate back to the “Setup Assistant” window
From here, scroll until you see “Linking,” this is right below the “Property Settings” section we just covered.
Now, click the arrow to the right of “Link to Google Ads”
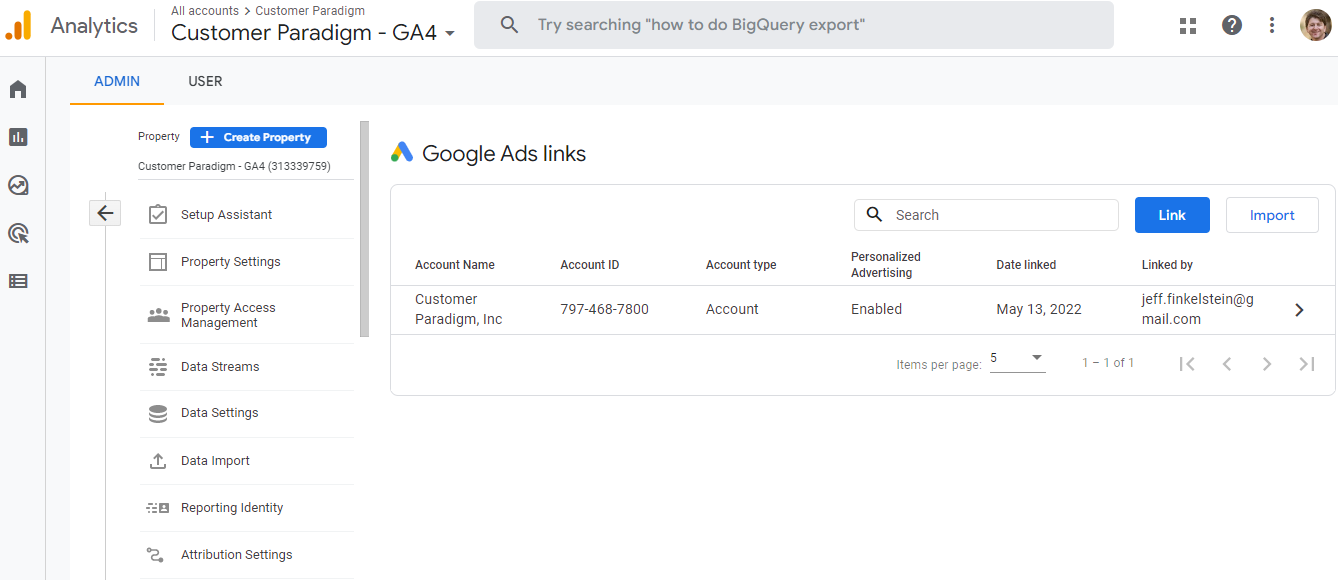
Step 42
After clicking the arrow, you should see the window below.
As you can see, I have already linked our Google Ads account to our GA4 property.
You can link multiple Google Ads accounts, to add another, click “Link”
Please Note: The email for both GA4 and Google Ads needs to match for you to link the accounts
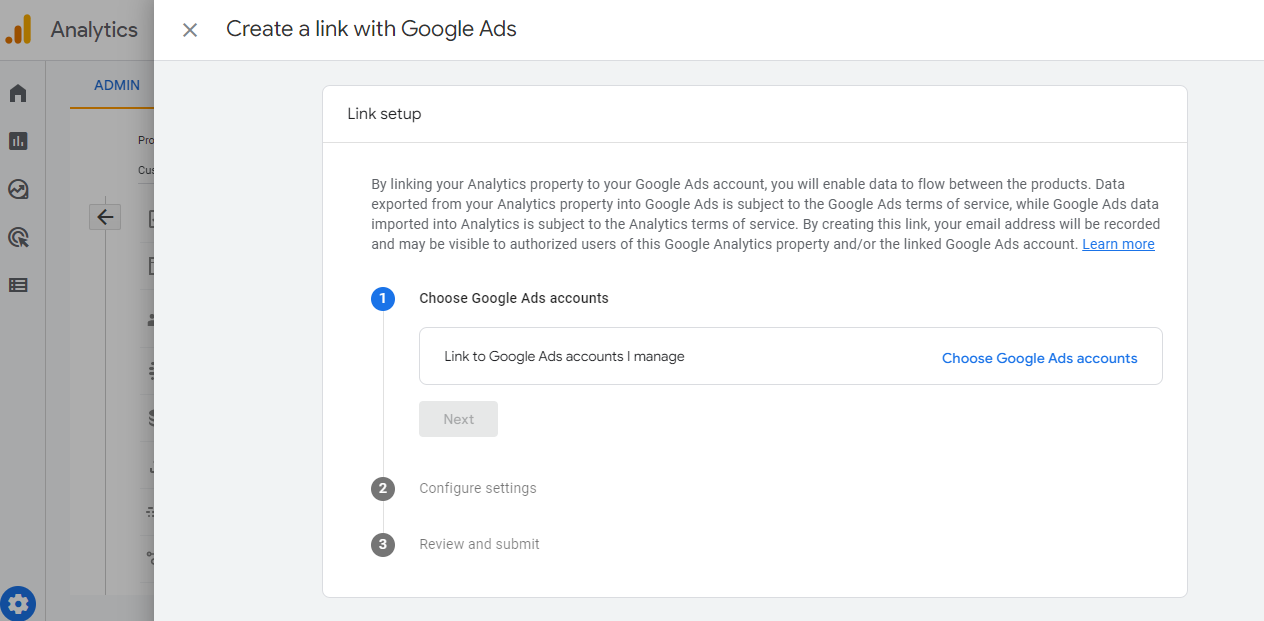
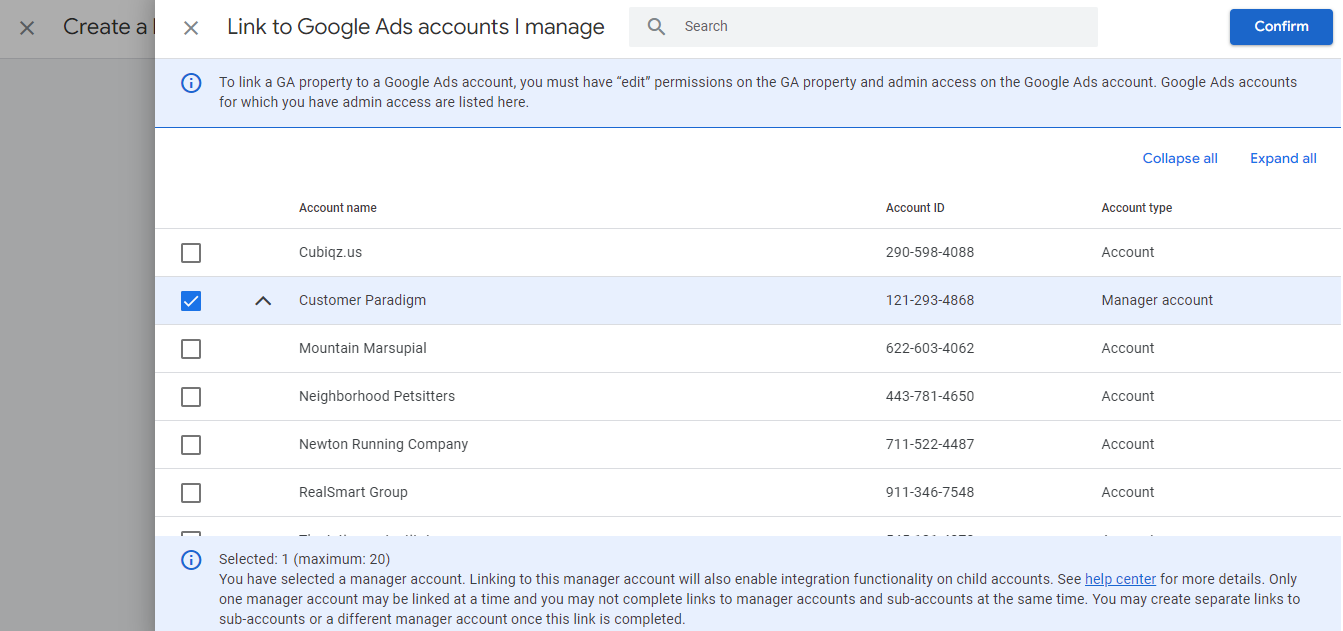
Step 43
Once you click “Link” you should see the window below.
If your Google Analytics account uses the same gmail as your Google Ads account, you should see your Google Ads account when you click “Choose Google Ads account”
If you do not see your Google ads, make sure you have “Edit” permissions for both accounts
Step 44
Under the “Choose Google Ads account,” select the account you wish to link, select it and “Confirm”
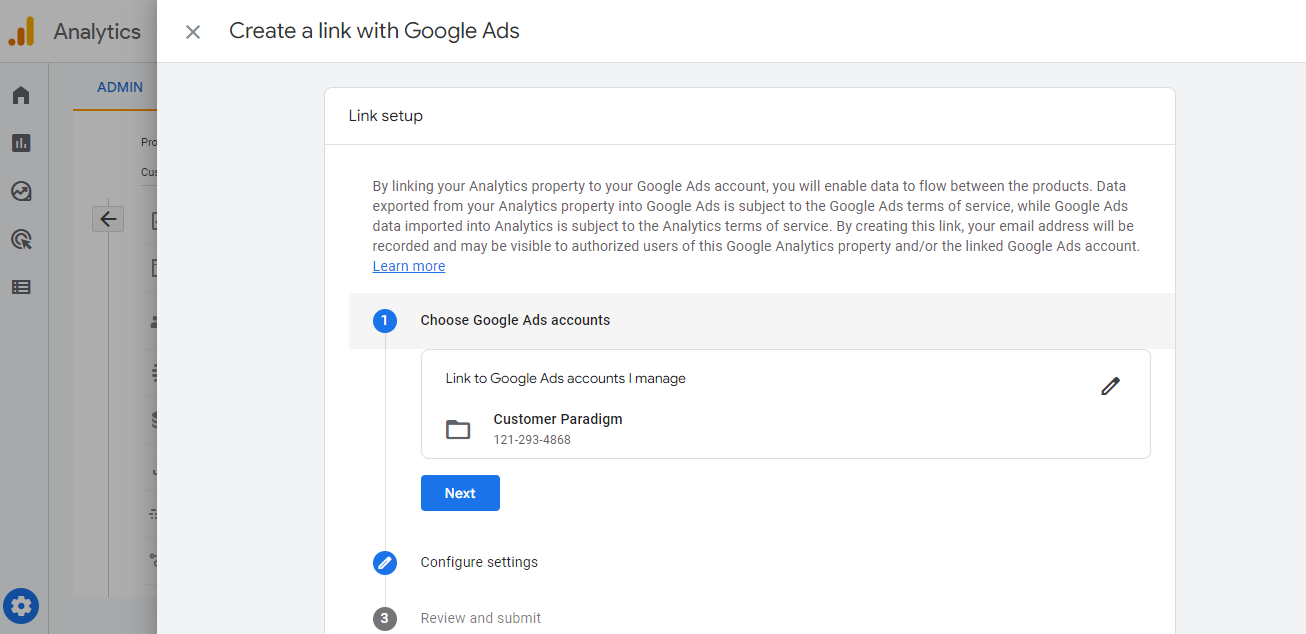
Step 45
After Confirming which account you want to link, you will be taken back to the first window. From here, click “Configure settings”
Step 46
Once you click configure settings, you should see the window below.
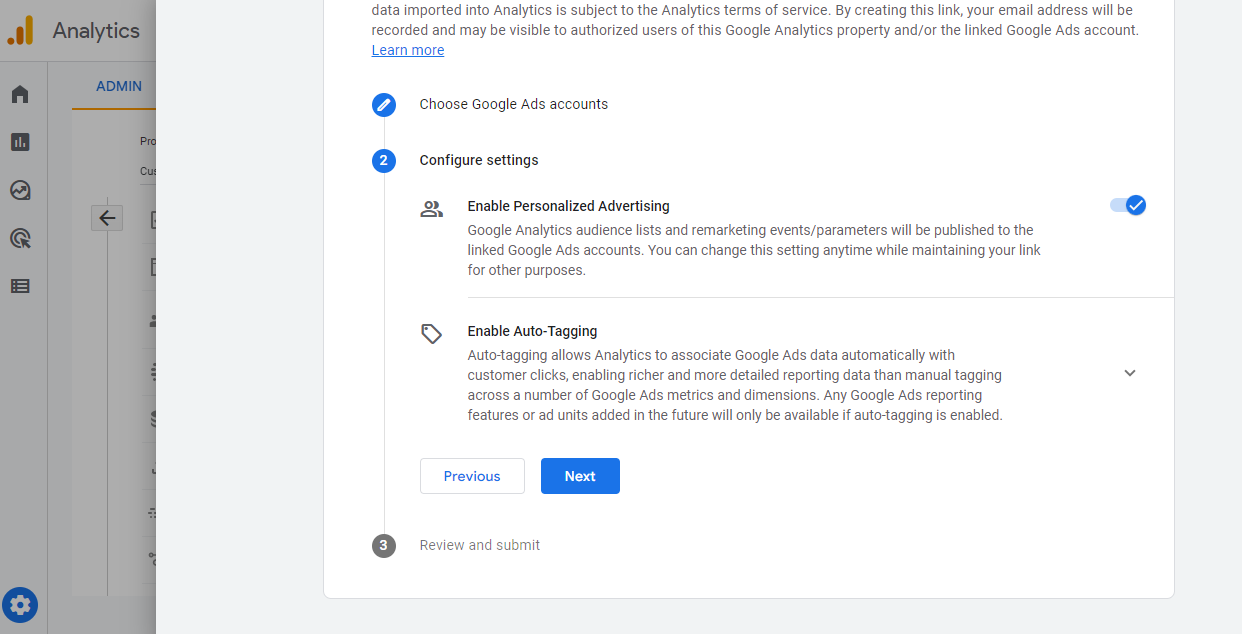
From here, you can get more information on Personalized Advertising and Auto Tagging. Enabling either of these depends on your measurement needs.
I recommend having both enabled to further enhance your marketing efforts
Now, click “Next.”
Step 47
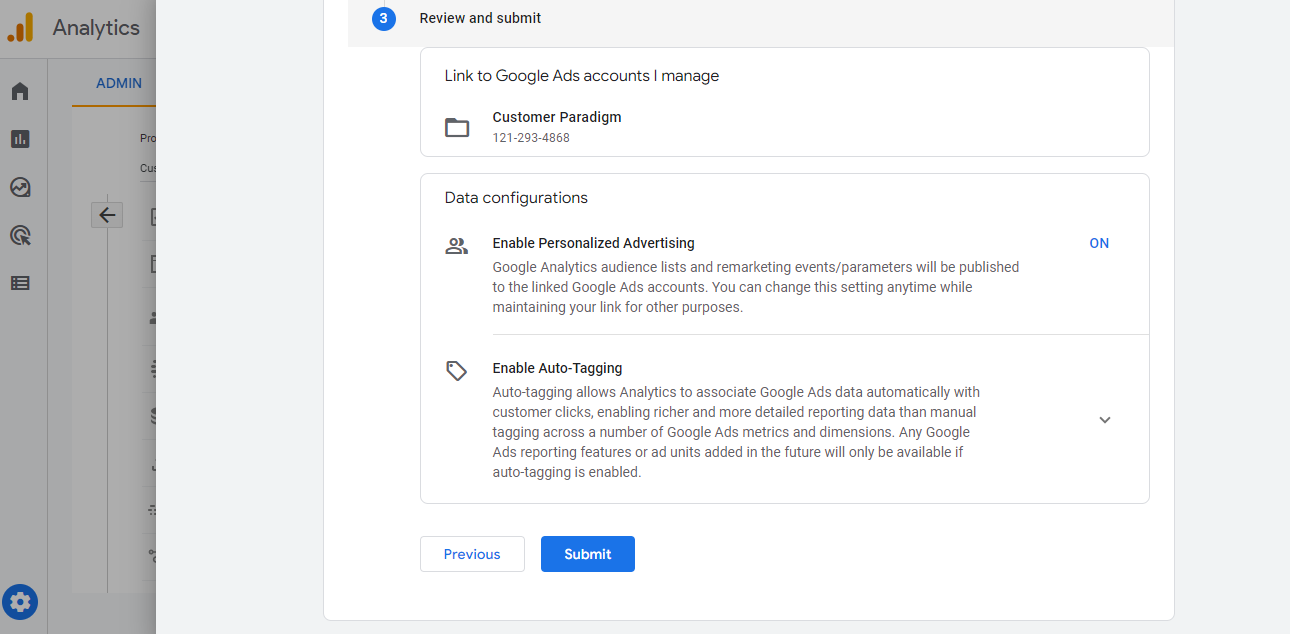
After clicking “Next” you can review the details, make sure the Google Ads account is the right one, ensure the measurement settings are how you want the, and then click “Submit”
That is it! Your google ads account is now linked to GA4
A couple of things to keep in mind.
- Google says it can take up to 48 hours to see Google Ads data flow into GA4. In my experience upgrading several clients, this is more like 96 hours
- Your google ads campaigns will also populate individually automatically, so you don’t need to do any extra configuration.
- You are also able to see the same metrics you would in Google Ads in the GA4 interface, such as clicks, impressions, click through rate (CTR), conversions, etc..
Speaking of conversions, let’s cover setting up conversion tracking in GA4
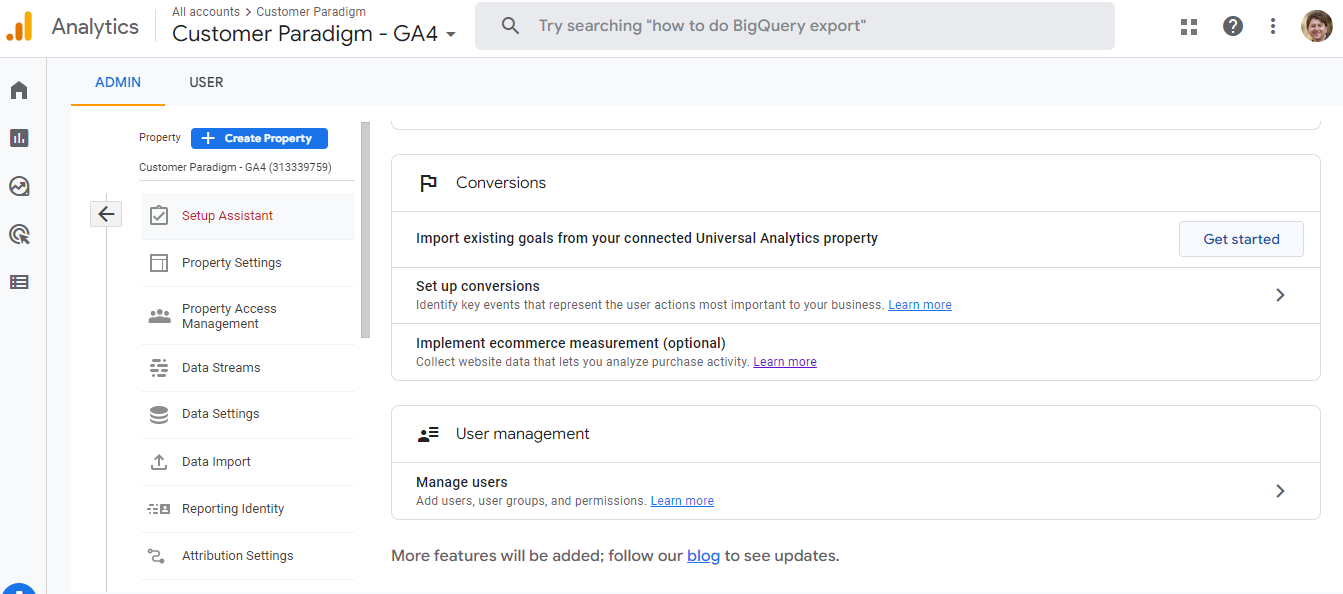
Navigate back to the “Setup Assistant” panel
Step 48
From the setup assistant, scroll until you reach “Conversions”
We are going to start by importing existing goals from the Universal Analytics account. This process takes your existing UA goals and converts them into measurable conversion events
Navigate to the “Import existing goals from your connected Universal Analytics property” and click on “Get Started”
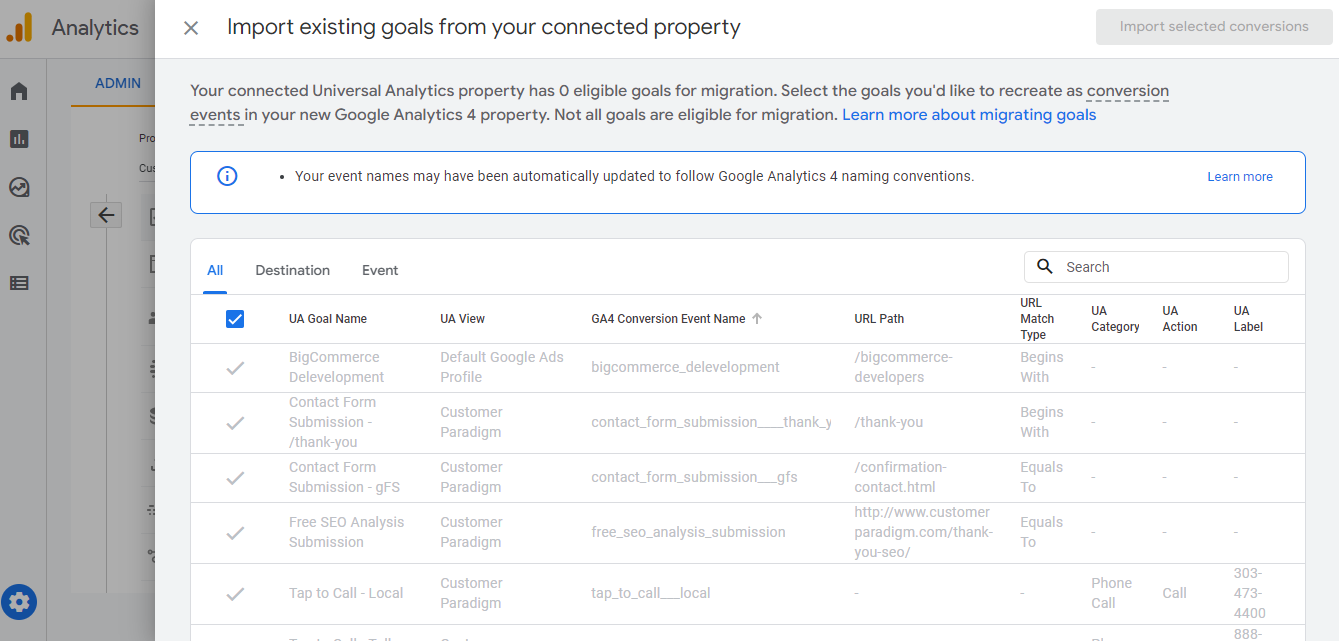
Step 49
After clicking “Get Started,” you should see a window similar to the one below.
Please note, not every UA goal is eligible to be recreated as a GA4 conversion, some of the actions you wish to measure will have to be recreated manually.
As you can see, I have already imported our eligible goals and generated them as conversion actions.
For you, select the goals you wish to import and click “Import Selected Conversions”
Step 50
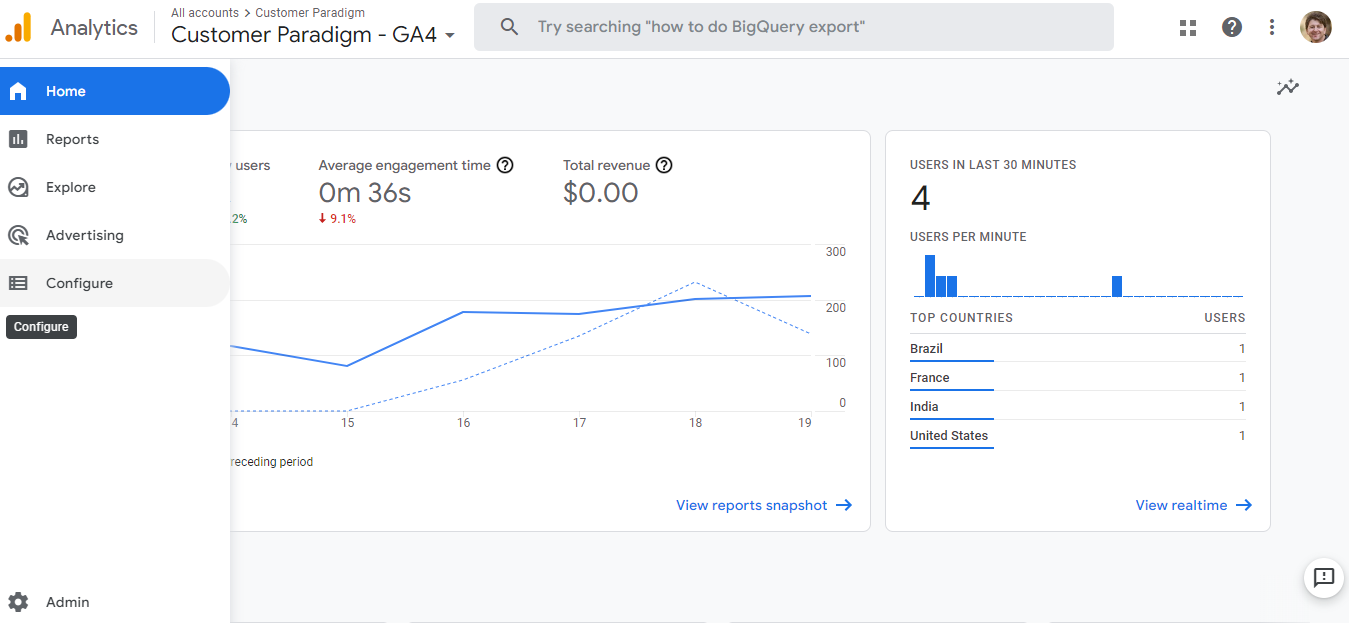
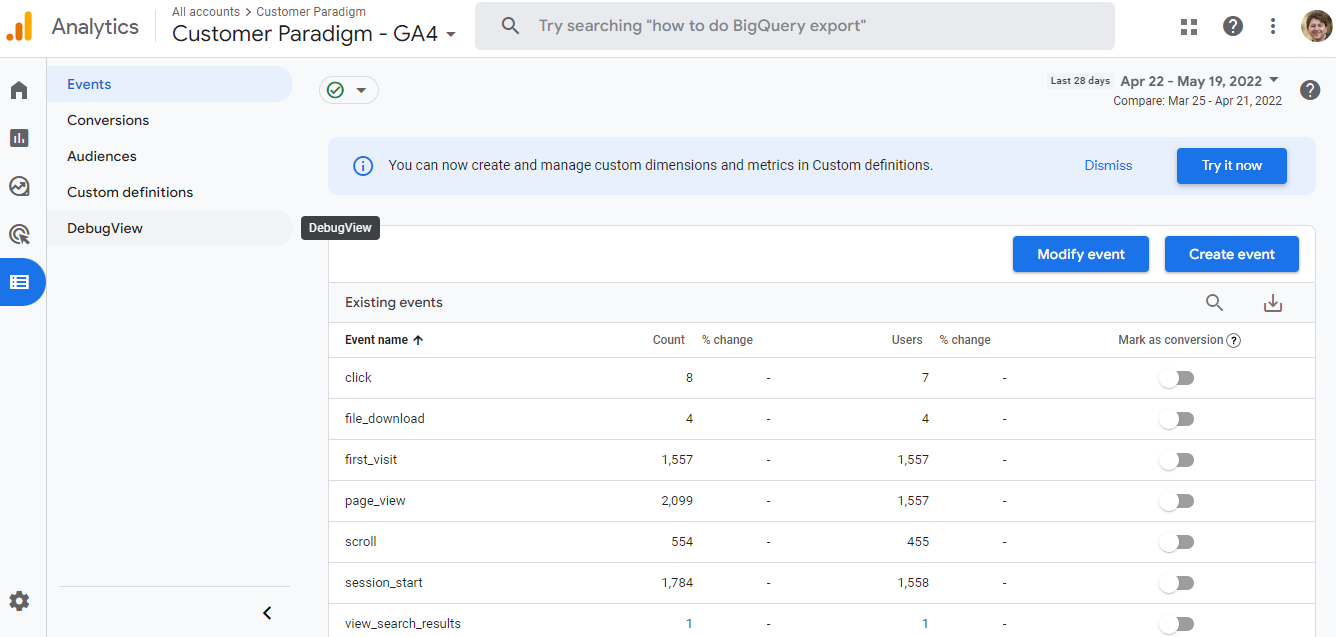
To see your imported conversion actions, go to the navigation bar on the left and select “Configure”
Step 51
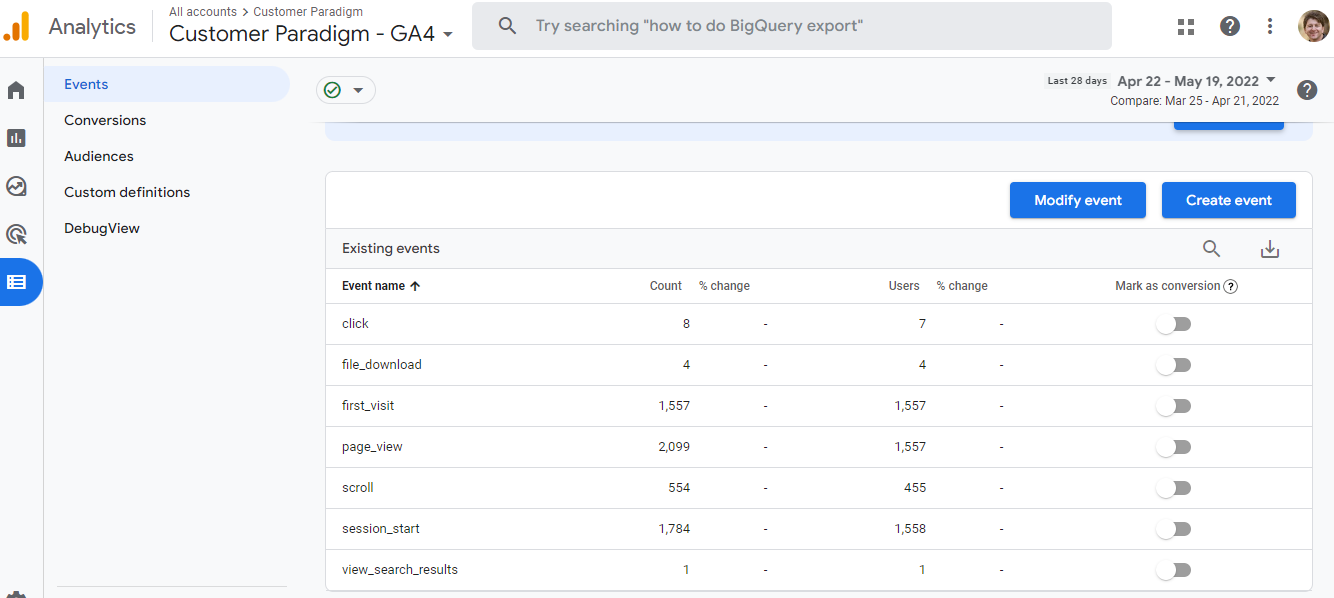
After clicking “Configure” you should see this window.
GA4 automatically creates many events based on user interactions on your site. This is due to the “Enhanced Measurement” feature and is also why I recommended having this feature enabled, like previously mentioned.
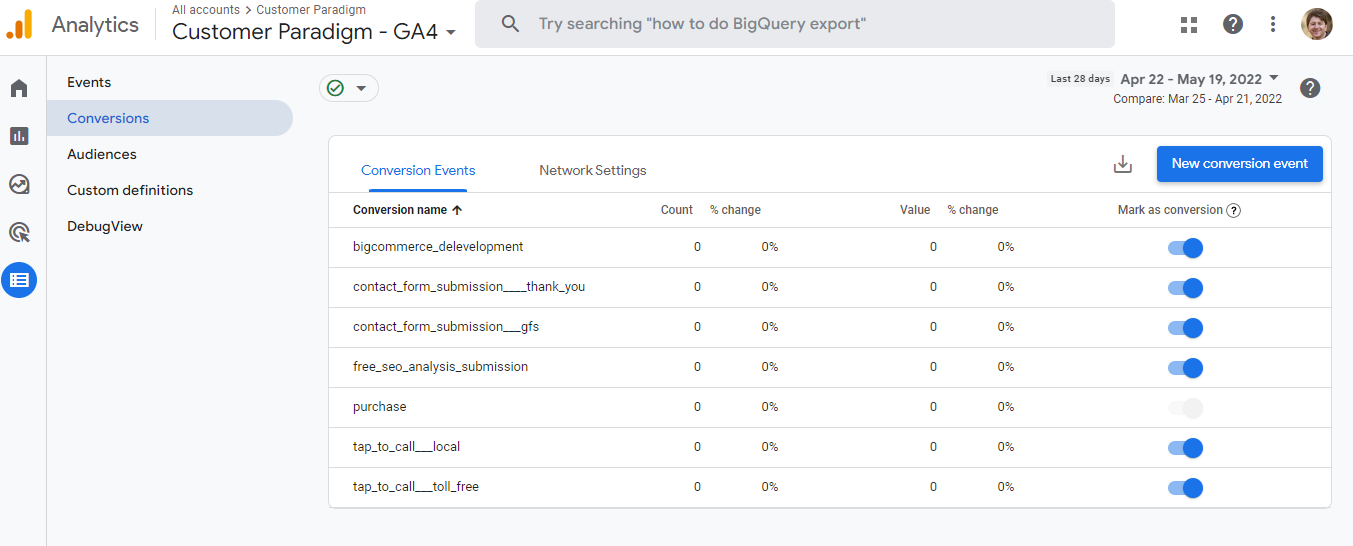
To see your imported conversions, navigate to “Conversions” (right below “Events”) and click
Step 52
After selecting “Conversions”, you should see something similar to the screenshot below.
If you do not see your imported conversions yet, give Google about 48 hours and you should see them begin to populate.
If you want to edit or change any of these Conversions, this can be done under the “Events” tab above “Conversions”.
Step 53
Navigate to “Events” and click on “Create event” at the top right of the table
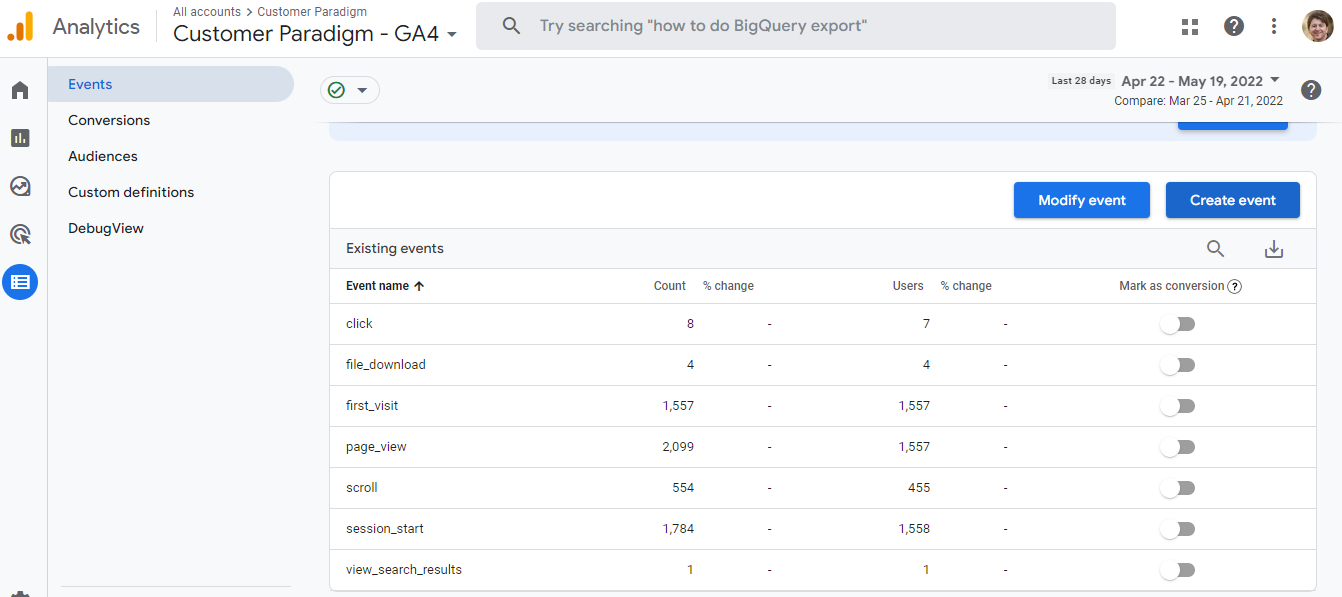
Step 54
After clicking on “Create event” you should see the following window.
These are all the imported conversions we uploaded earlier.
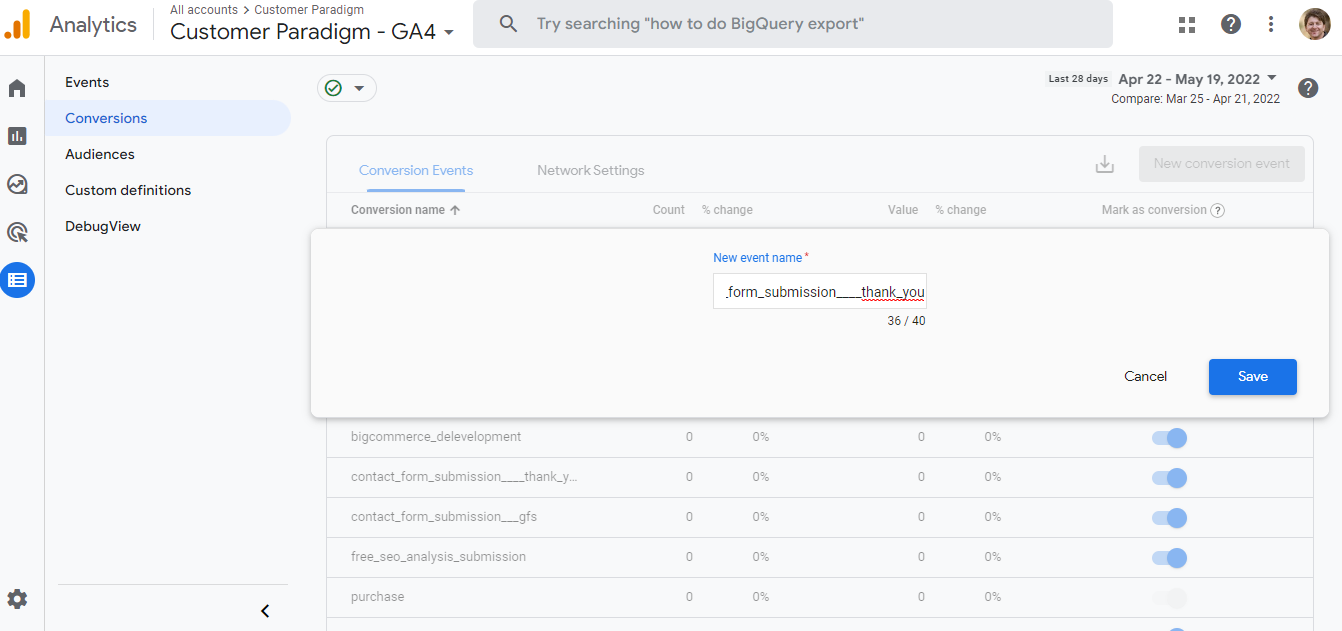
This is also where you would create new events that are not automatically generated by GA4. For this, click on “Create.”
If you want to edit any of the imported conversions, just click the arrow on the right side of the conversion you wish to edit.
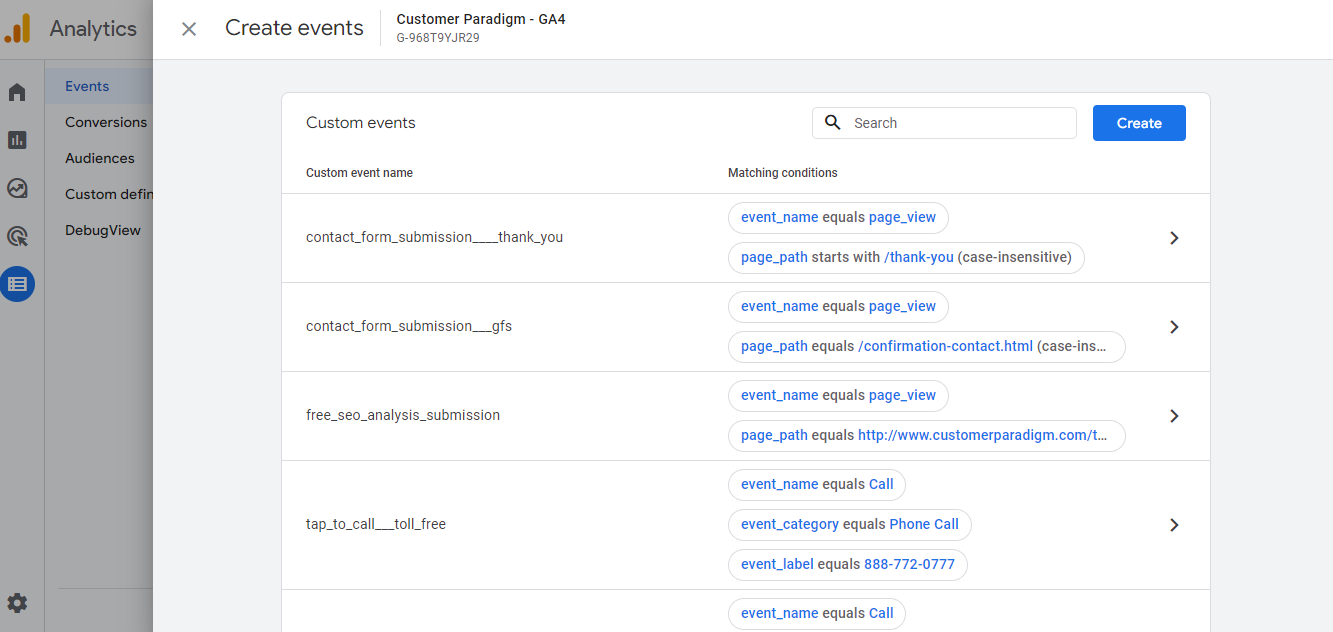
Step 55
For example:
If you want to change the parameters on the “contact_form_submission____thank_you,” you can add or edit parameters here.This is also where you can delete the event if need be.
GA4 has a ton of preset parameters for you to use or you can generate your own!
You can also create a new Custom Event by clicking on the “Create” button on the top right.
Any custom events can also be turned into a conversion action. This process is very simple.
(PLEASE NOTE: the following process does not need to be undertaken on imported conversions)
First, make your custom event by clicking on the “Create” button in the top right.
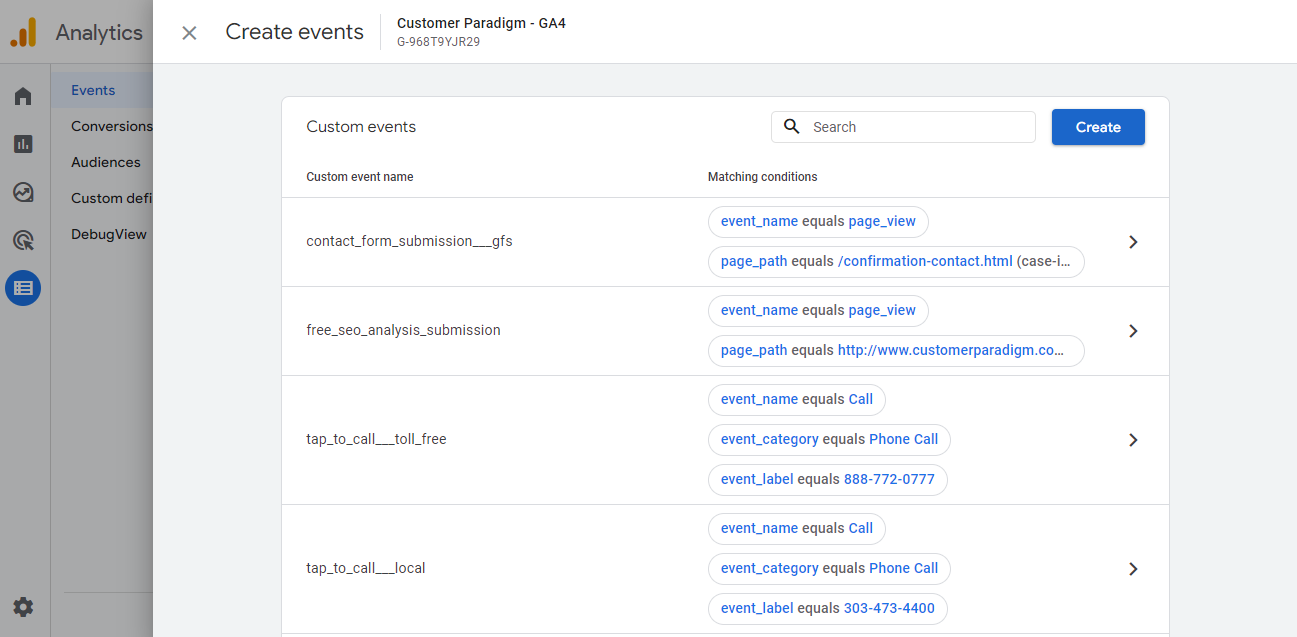
After clicking “Create” you should see a window similar to the one below.
Once you have your parameters set, copy the “Custom event name” that you generated. This needs to be down to the letter so I recommend highlighting the name and copying.
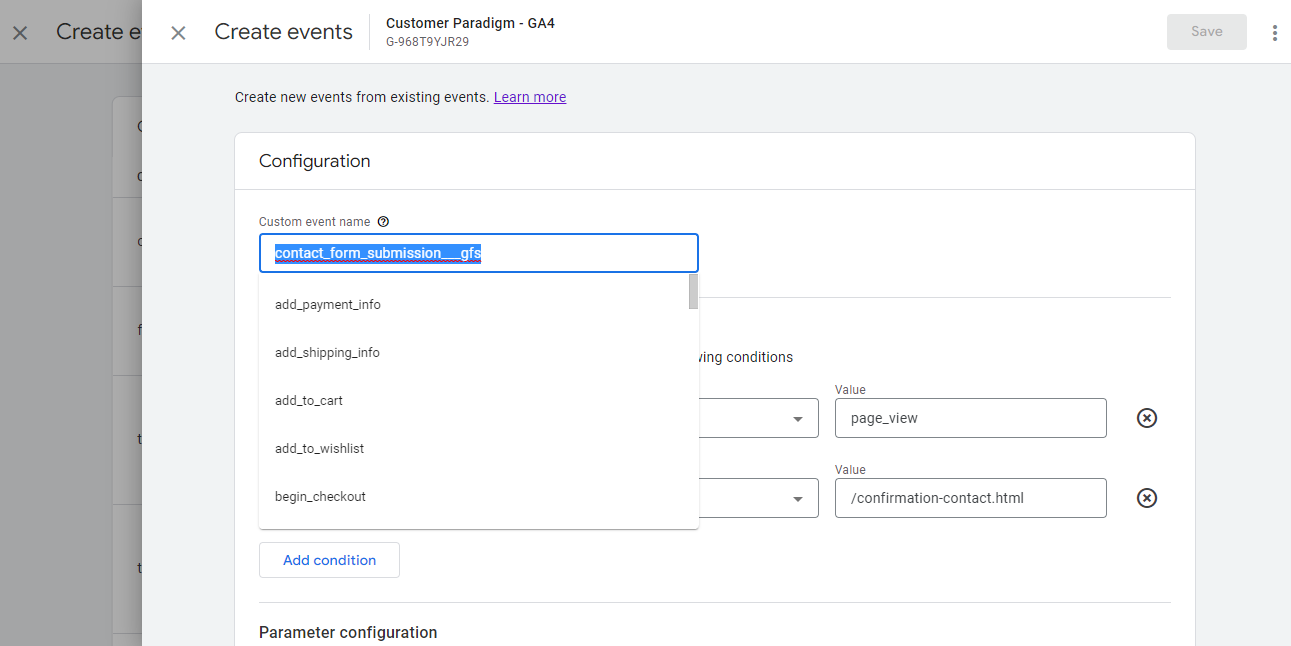
Next, navigate back to the “Conversion” tab under “Configure”
Step 56
From here, click on “New conversion event” in the top right of the table and paste in the “Custom event name” you copied in the previous steps.
Then click “Save”
There you go! Your custom event is now a conversion.
You can also make any event that GA4 automatically generated into a conversion,
For this, navigate back to the “Events” tab above “Conversions”
Step 57
Under “Events” you should see a toggle switch on the right side of each event.
To mark an event as a conversion, simply flip the switch. And there you go!
This can be done and undone at any time. Also, please note that this only applies to existing events

I highly recommend testing your imported or custom conversions and events using Google Tag Manager.
For instance, when I imported our eligible goals and made them conversion, the URL’s the Universal Account had been using got distorted, so the events were not tracking as they should.
You can conduct this testing using Google Tag Manager and the new “Debug” view in GA4.
Step 58
First, navigate to “Configure” on the left hand navigation menu.

Step 59
Next, find the “DebugView” towards the bottom of the menu
Now click on “Debug View”
Step 60
You should see a window similar to the one below. To enable this debugging, you need to have Google Tag Manager or Google Tag Assistant open in a separate window. This enables your computer to debug the site.

Step 61
Once you have both the GA4 Debug view and Google Tag Assistant (or Google tag manager) open, you will be able to see your events in real time. This allows you to test that your conversion tracking is set up correctly.

I am going to quickly go over installing an event using Google Tag Manager and the steps to make that event a conversion in GA4.
Please keep in mind, the following process is under the assumption that you have some basic knowledge using Google Tag Manager
Start by opening GTM, my example is going to be an event where someone clicks on our phone number on the site.
Step 62
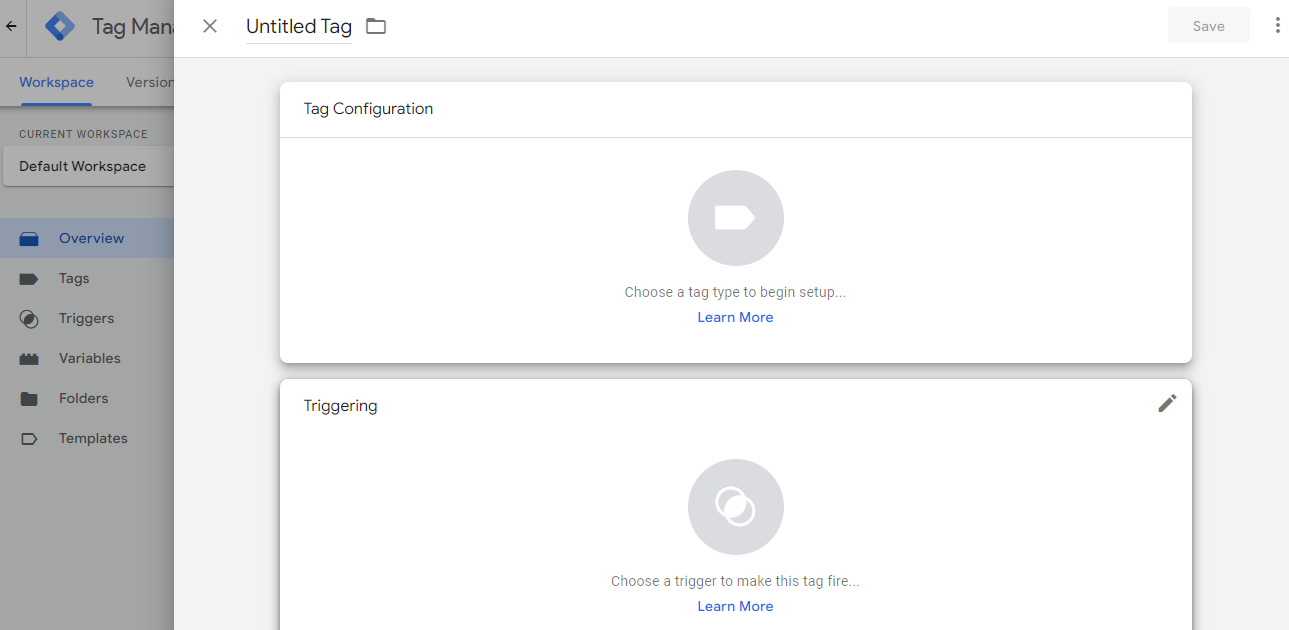
Once you open Google tag manager, select the “New Tag” button
Step 63
After clicking on “New Tag” you should see this window. From here, select “Tag Configuration”
Step 64
After selecting “Tag Configuration,” select “GA4 Event” and click
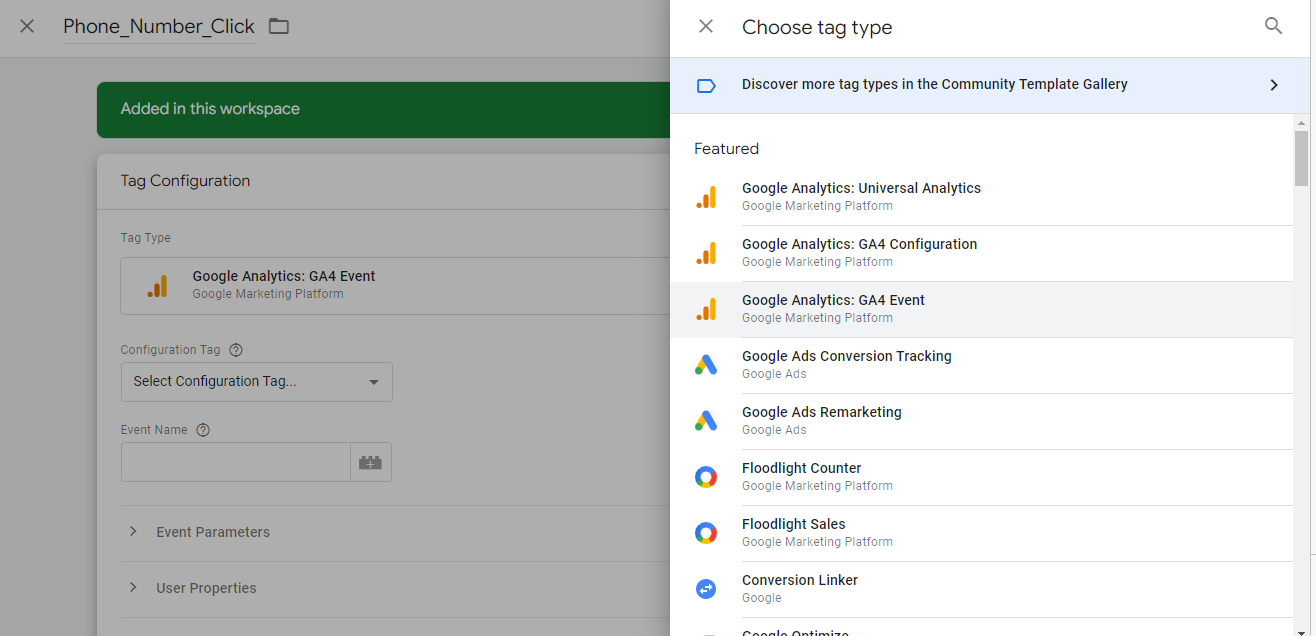
Step 65
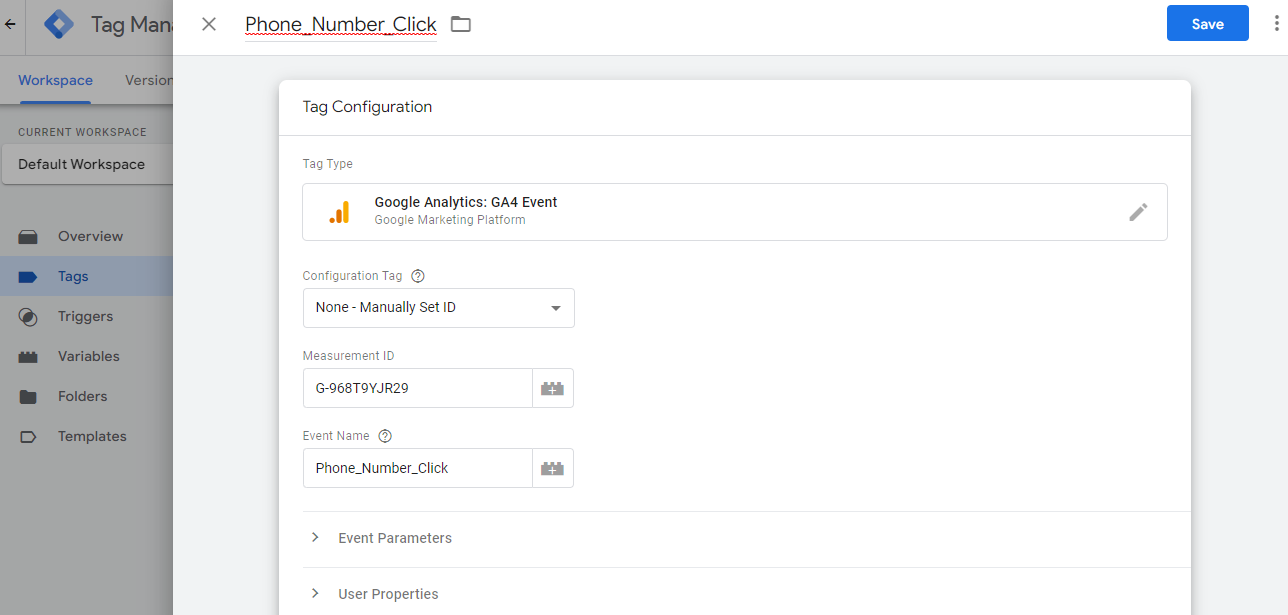
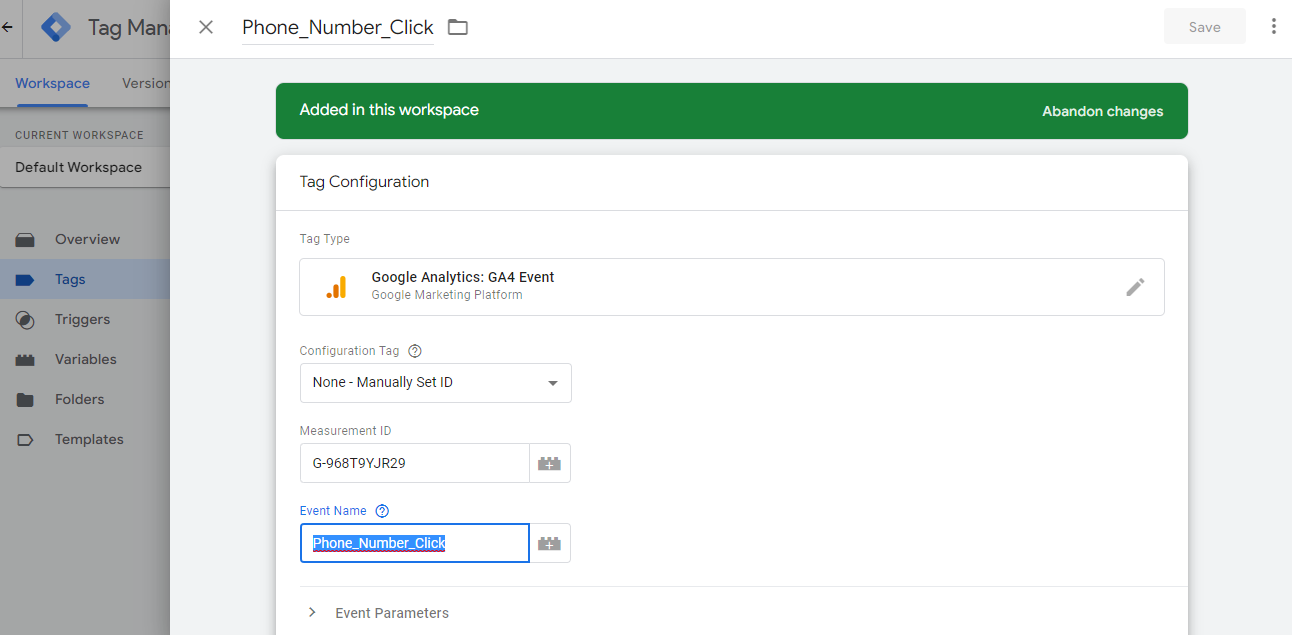
You should see a window similar to the one below. Now, plug in your GA4 measurement ID (this is found in the “Admin” panel under the “Data Stream”)
If you installed GA4 using Google Tag Manager, you should see your GA4 configuration tag under the “Measurement ID”
To keep things simple, I also recommend naming the “Event Name” the same as the Tag name
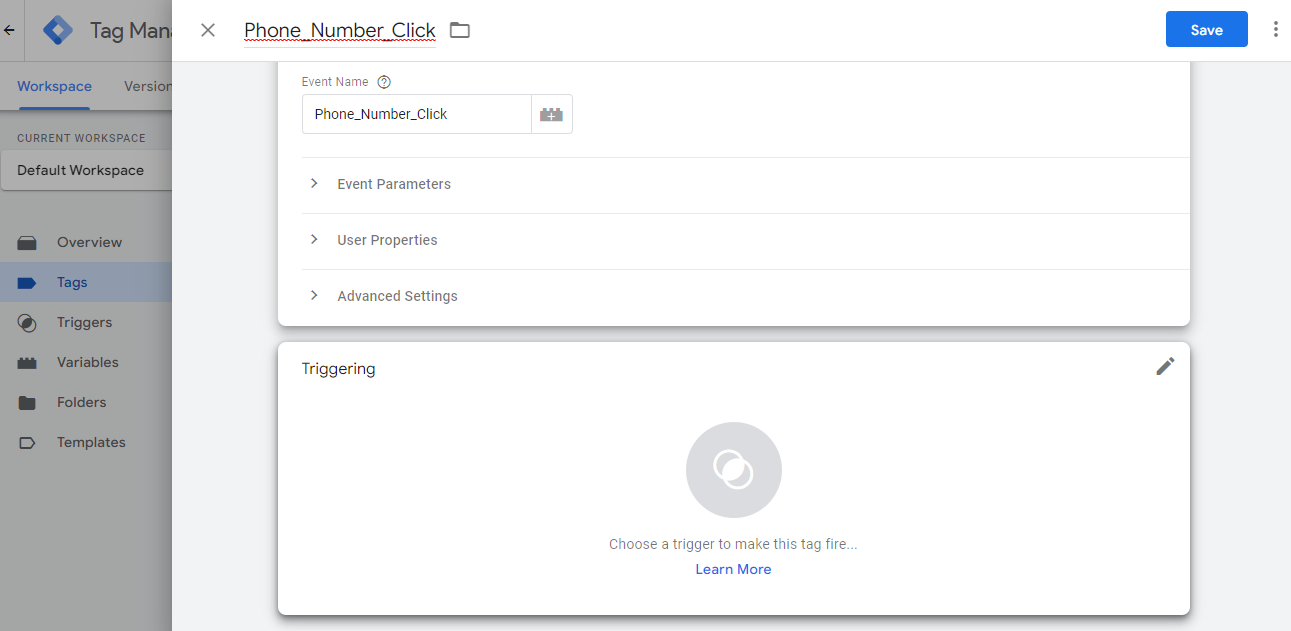
Step 66
Next, we need to set up the trigger. Click on “Triggering”
Step 67
After clicking on “Triggering” you should see this window.
To set up a new trigger, click the “+” in the corner

Step 68
After clicking the “+”, name your trigger and then click on “Trigger Configuration”
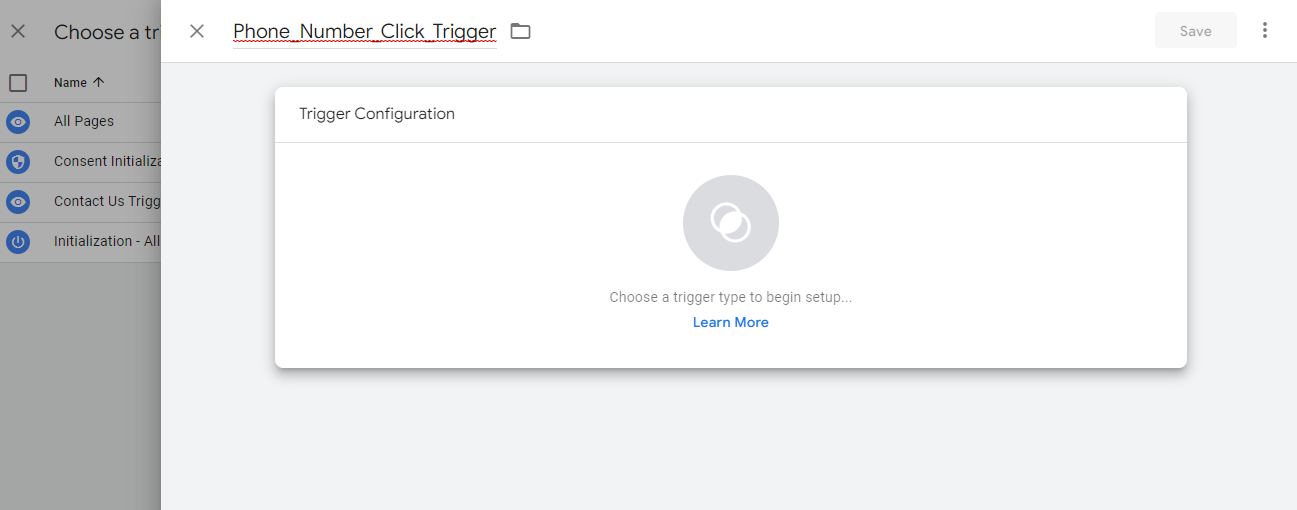
Step 69
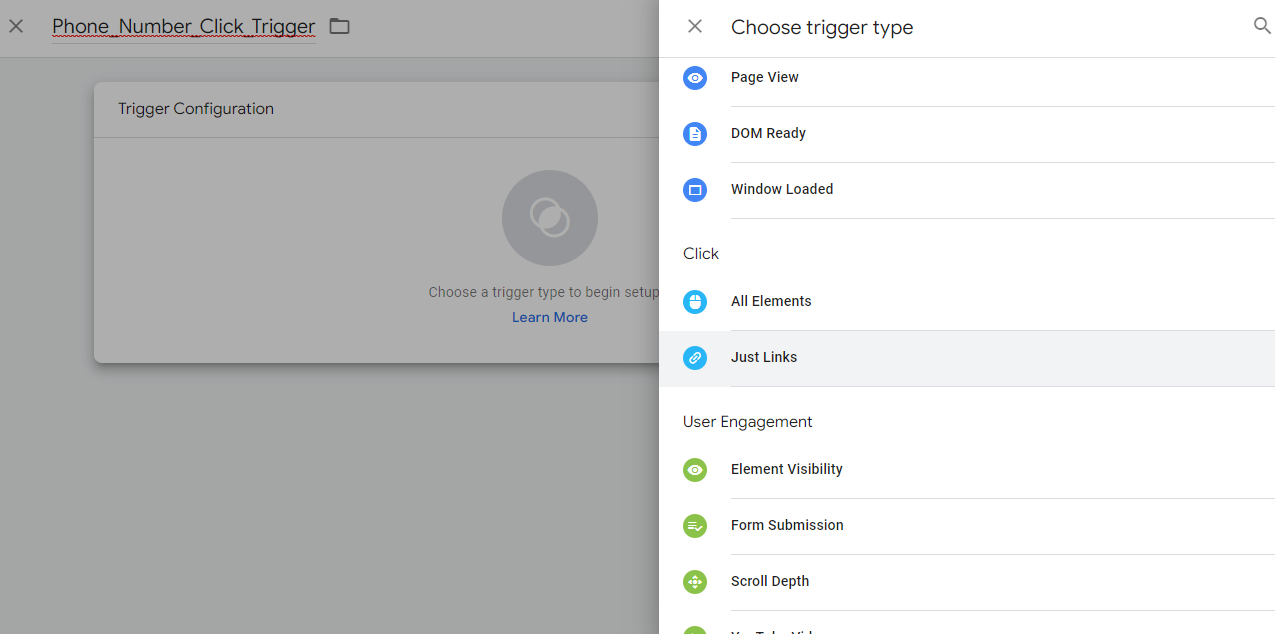
From here, you can select your “trigger type.” Since I am tracking a link click on our site, I chose “Just Links”
Step 70
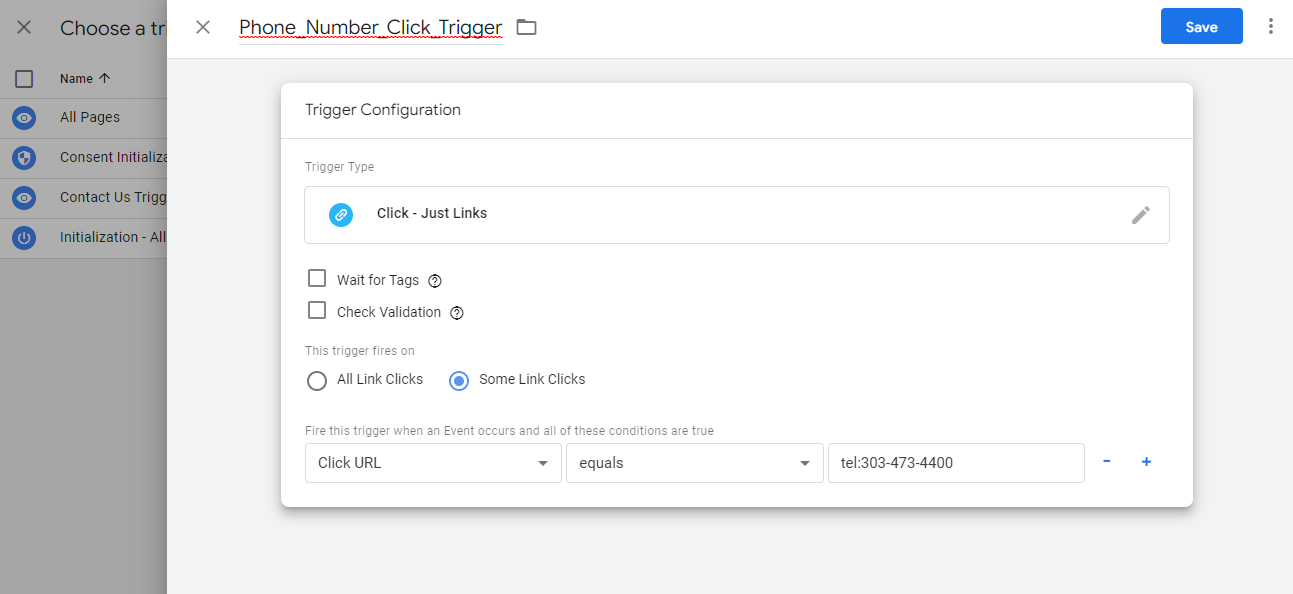
Because I only want to track clicks for a certain link, I set up the trigger to fire when the click url equals that specific number.
After you are done setting up your trigger, click “Save”
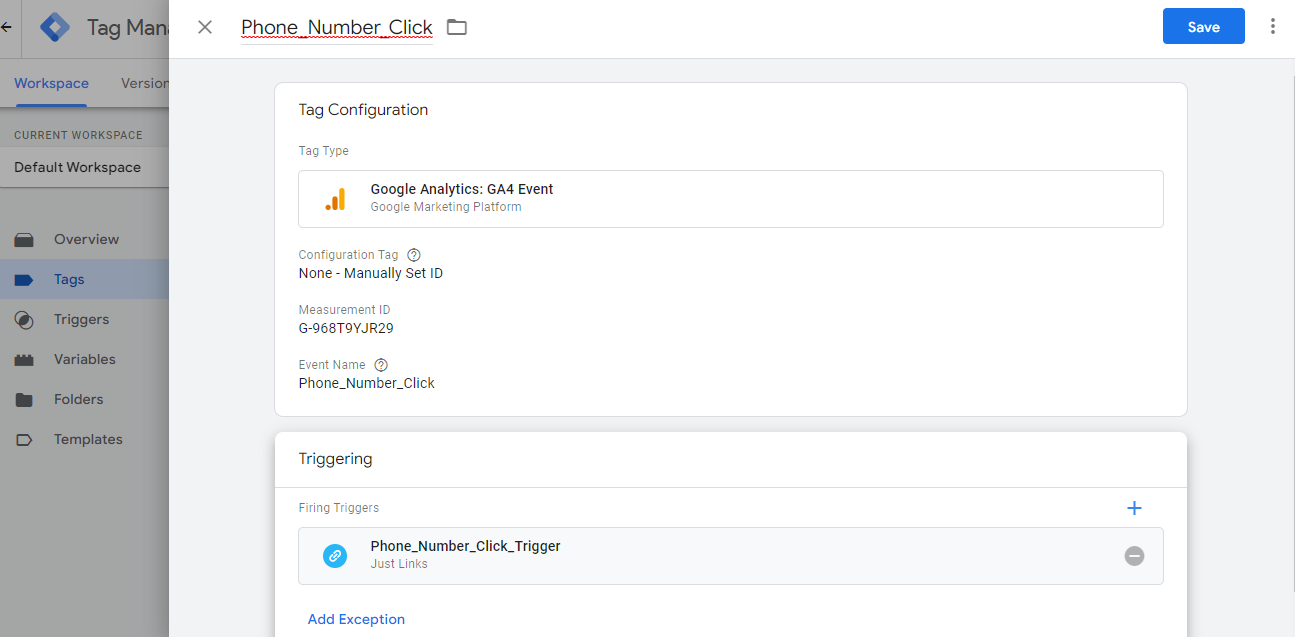
Step 71
Once you click “Save” your final setup should look similar to the screenshot below.
If everything looks good, click “Save”
Remember to test your tag configuration in the “Preview” mode on Google Tag manager.
For the purpose of this tutorial, I have already tested my configuration and confirmed it works.
Now, let’s make this event a conversion in GA4.
PLEASE NOTE: If you don’t want to mark this GTM event as a conversion in GA4 then you can skip the following steps! WooHoo!
Step 72
Navigate back to the tag in GTM
Now, highlight the event name, it is very important that you copy this exactly.
Step 73
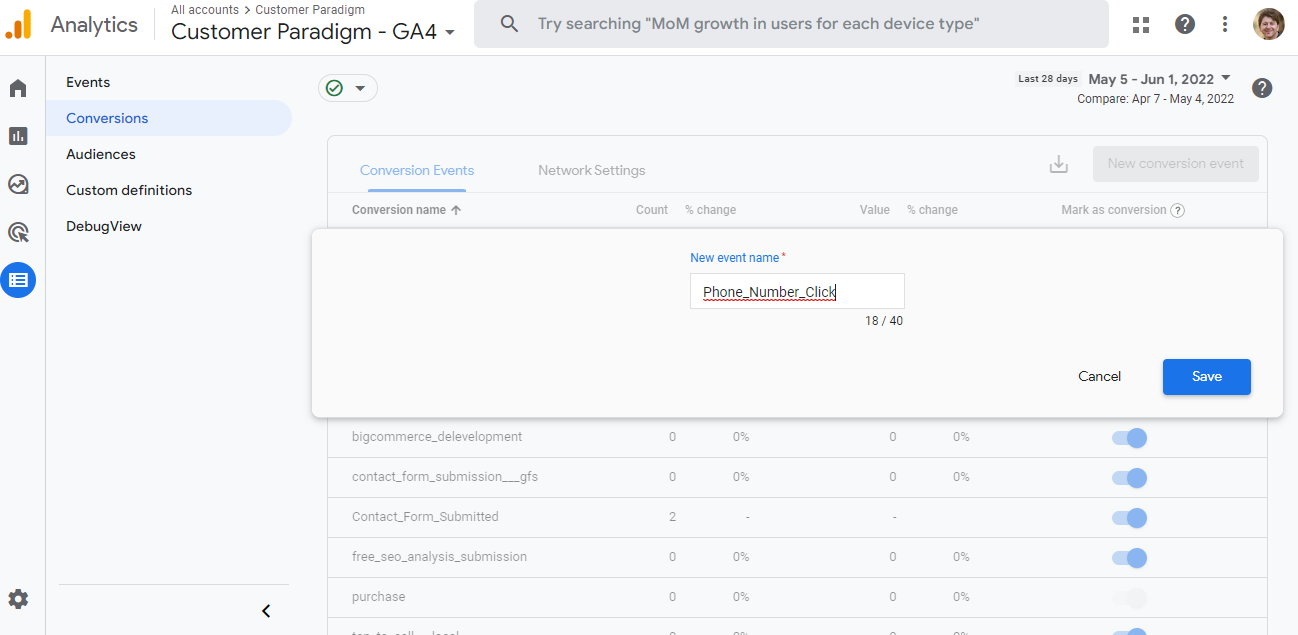
Next you want to open up your GA4 Property
Navigate to “Configure” and then “Conversions”
From here, select “New Conversion Event” at the top right of the “Conversions” table and paste the “Event Name” that you copied from Google Tag Manager.
Click save and boom! Your GTM event is now being tracked as a conversion in GA4
And there you go!
Your new GA4 property is now set up and ready to start collecting data.
Remember, it can take up to 48 hours for data to start flowing into your new GA4. If you do not see data after this period of time, double check your tag installation set up and linked accounts.
Google Analytics is a powerful tool that allows users to see the complete customer journey across multiple devices and platforms. With the current Universal Analytics coming to a close in July 2023, it is imperative to begin the upgrade so that your business can start collecting data.
For more GA4 support, check out this link
How we can help…