eLearning Series
by Jeff Finkelstein Magento: Adding a New Product – Part 1 To start log into your Magento Admin Panel and go to Catalog, Manage Products (See Below). 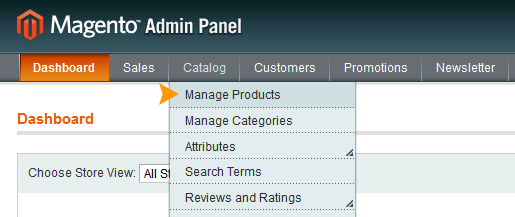 If you already have some products on your website you will now see a list of 20 most recent products. To add a new product you’ll want to click the “Add Product” button on the top right side of the screen. Now you can add custom types of products. However for this guide, we’re just going to be adding a simple product. So you will want to have “Attribute Set: Default” and “Product Type: Simple Product,” now just hit continue.
 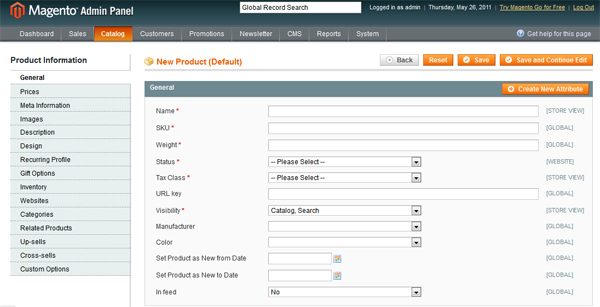 This will bring you to the Product Edit page. Now we can start adding information about our product. Remember that any field with a * next to it is required, and you must have something in these fields before you can save (so it’s best to fill these in first). Here is a guide to what each field does and some recommendations of what you should include. Name: The name of the product. This will show up on your Magento store as the header of the product page and anywhere else where the product’s name occurs.
SKU: Product’s SKU, this can be numbers or letters, the SKU in Magento will need to match the SKUs in any other system you have (such as your CRM or Fulfillment Center).
Weight: The weight of the product (in just numbers) if your unsure just enter a 1 because this field is required. Usually this field is not very important unless you are using the weight of your products to determine S&H charges for your customers.
Status: Can be either Enabled or Disabled. This simply means that if the product is Disabled, it will not appear on the website (an easy way of taking down a product without deleting it).
Tax Class: This specifies if the product will have any tax added onto its price for the customer upon checkout. Usually it is best to select “Taxable Goods” if you are unsure.
URL key: This will be the product’s URL, Magento will generate this for you automatically if you leave the field blank (which is recommended for SEO purposes). If you need the product to be at a specific URL however, you can do this yourself. For example, if you want your product to show up at this URL www.mystore.com/my-product-name.html, then you will want to put “my-product-name” in this field.
Visibility: This determines how a customer can come across your product on your website. If you want people to be able to both search and find your product in categories then you’ll want this set at “Catalog, Search”. If you don’t want this product to be found unless you give someone a direct link to the product, then you can set it to “Not Visible Individually.”
Manufacturer: This would be the Brand or Maker of the product. You can add additional choices by going to Catalog, Attributes, Manage Attributes.
Color: If you want your product to show up with a different color theme, you can change that here. If you leave it blank, everything will show up with your default styling.
In feed: If you are displaying your products in a RSS feed you can change this to yes.
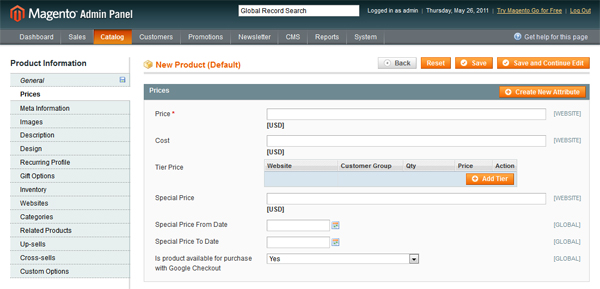
Next up you’re going to configure your product’s pricing! So click on Prices on the left hand column. Price: This will be your product’s default price, in USD.
Cost: This is used for reporting purposes. The cost you enter in here will be subtracted from the Price to provide Magento with the “Profit” column in all reports.
Tier Price: Tier pricing can use used to change the price of your product for specific stores, customers and quantities. The “Price” here will be added onto the default price of the product. You can also use a negative sign before the price to discount the product.
Special Price: You can enter a special price to show that an product is on sale. Entering a lower price here than in the Price field will show up on your website below the regular price, with the regular price crossed out.
Special Price From and To: This field enables you to set dates for when the special price will be available. Once those dates are over, the products price will return to the default Price.
Is product available for purchase with Google Checkout? Selecting ‘Yes’ makes your product available on Google Checkout. Finally, click on Meta Information on the left. This is the information that search engines like Google will look at.
Meta Title: This will be the title of your product’s webpage. It is usually best to include the product’s name, brand, color, and any other features that might be relevant to this product.
Meta Keywords: Your product’s keywords. This has become less essential now that fewer search engines actually use meta keywords in their algorithms.
Meta Descriptions: Your product’s general description. This is what should appear below your product’s Title in search results. Now it’s time to time to make your product look good on your website. To start find them image of your product that you would like to use on your computer. It is always best to make sure that this image is “optimized” for the web. Having an image that is too large (more than 300kb) will cause your website to load slowly and hurt conversions, but having a blurry or tiny image is just as bad! In general I like using images that are about 300x300px in size. If you need to show more detail in your image you can always multiple product images, just make sure your large image is not set as the Base Image in Magento. Now that you’ve chosen a nice image just go to Browse Files, find your image and then hit the Upload Files button. Once your images are uploaded you can choose which images are your Thumbnail, Small Image and Base Image. If you select all these for the same image Magento will automatically re-size the image to match. You should also Label your image with your product’s name. Now that your done with the basics, hit Save and Continue Edit. As long as you enabled your product you can also now see your new product on your website. As always go look at your product and make sure that everything is showing up correctly. Coming soon! Magento: Adding a New Product – Part 2